arch_single_shared
This scenario is a variant of the
Virtual disk images are stored in local storage, with the front-end hosting an image repository (image datastore). These images are subsequently transferred from the front-end to the hypervisors to initiate the virtual machines (VMs). Both the front-end and hypervisors utilize the directory /var/lib/one/datastores to store these images. It is possible to either utilize the root file system (FS) for this directory or symlink from any other location.
The following snippet shows the configuration required if no mount points are used:
ds:
mode: ssh/var/lib/one/datastores/.
If you want to use a dedicated volume mounted in a custom location (for example /mnt/one_datastores/), then you need to pre-create directories (owned by oneadmin) for each datastore and use the following snippet which will cause symlinks to be created automatically:
ds:

  mode: ssh
  mounts:
  - type: system
    path: /mnt/one_datastores/system/
  - type: image
    path: /mnt/one_datastores/default/
  - type: files
    path: /mnt/one_datastores/files/
The final setting on the hosts will be:
$ tree /mnt/one_datastores/
/mnt/one_datastores/
├── system
├── default
└── files

$ tree /var/lib/one/datastore/
/var/lib/one/datastores/
├── 0 -> /mnt/one_datastores/system/
├── 1 -> /mnt/one_datastores/default/
└── 2 -> /mnt/one_datastores/files/The most basic network configuration is a flat network (bridged). We will use the main interface of the Host to connect the VMs to the Network. The interfaces used in this mode are depicted in the following picture:
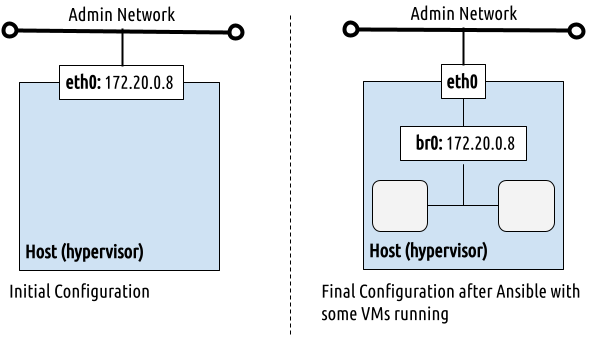
To create the virtual network for the VMs you need to pick up some IP. These IP addresses need to be reachable through the Network used by the main interface of the host, as the VM traffic will be forwarded through it.
The following snippet shows how to define a virtual network using some IPs in the Admin Network (the one used by the hosts):
 vn:
      bridge:
        admin_net:
          managed: true
          template:
            VN_MAD: bridge
            PHYDEV: eth0
            BRIDGE: br0
            AR:
              TYPE: IP4
              IP: 10.0.0.50
              SIZE: 48
            NETWORK_ADDRESS: 10.0.0.0
            NETWORK_MASK: 255.255.255.0
            GATEWAY: 10.0.0.1
            DNS: 1.1.1.1
If there is any other interface in the hosts you can use them. For example to define a dedicated VM network using bon0 and vxlan networking:
     vxlan:
        vms_net:
          managed: true
          template:
            VN_MAD: vxlan
            PHYDEV: bond0
            BRIDGE: br1
            VLAN_ID: 123
            FILTER_IP_SPOOFING: 'NO'
            FILTER_MAC_SPOOFING: 'YES'
            GUEST_MTU: 1450
            AR:
              TYPE: IP4
              IP: 192.168.0.10
              SIZE: 100
            NETWORK_ADDRESS: 192.168.0.0
            NETWORK_MASK: 255.255.255.0
            GATEWAY: 192.168.0.1
DNS: 192.168.0.1The Ansible playbook installs a complete suite of OpenNebula services including the base daemons (oned and scheduler), the OpenNebula Flow and Gate services and Sunstone Web-UI. You can just need to select the OpenNebula version to install and a pick a password for oneadmin
one_pass: opennebula
one_version: '6.6'You can use your enterprise distribution with the Ansible playbooks. Simply add your token to the var file. Also you can enable the Prometheus and Grafana integration part of the Enterprise Edition:
one_token: example:example
features:
  prometheus: true
The following file show the complete settings to install a single front-end with two hosts using local storage:
---
all:
  vars:
    ansible_user: root
    one_version: '6.6'
    one_pass: opennebulapass
    vn:
      admin_net:
        service:
          managed: true
          template:
            VN_MAD: bridge
            PHYDEV: eth0
            BRIDGE: br0
            AR:
              TYPE: IP4
              IP: 172.20.0.100
              SIZE: 48
            NETWORK_ADDRESS: 172.20.0.0
            NETWORK_MASK: 255.255.255.0
            GATEWAY: 172.20.0.1
            DNS: 1.1.1.1

frontend:
  hosts:
    fe1: { ansible_host: 172.20.0.7 }

node:
  hosts:
    node1: { ansible_host: 172.20.0.8 }
node2: { ansible_host: 172.20.0.9 }-
1. Prepare the inventory file: Update the
local.ymlfile in the inventory file to match your infrastructure settings. Please be sure to update or review the following variables:-
ansible_user, update it if different from root. -
one_pass, change it to the password for the oneadmin account -
one_version, be sure to use the latest stable version here
-
-
2. Check the connection: Verify the network connection, ssh and sudo configuration run the following command:
ansible -i inventory/local.yml all -m ping -b- 3. Site installation: Now we can run the site playbook that install and configure OpenNebula services
ansible-playbook -i inventory/local.yml opennebula.deploy.mainNow that the OpenNebula cloud is installed and ready to use let's review your installation. Let's first check the hosts, ssh into the frontend and check the hosts registered in OpenNebula:
# sudo -i -u oneadmin
$ onehost list
In the same way you can check the datastores and virtual networks
$ onedatastore list

$ onevnet list
Finally let's create a simple VM. Let's download an alpine image from the OpenNebula MarketPlace:
$ onemarketapp export
And instantiate the template attached to the admin_net network:
$ onetemplate instantiate