-
Notifications
You must be signed in to change notification settings - Fork 655
Install
To install the GitHub-Dark style, you will first need the Stylish browser extension/addon. It is available for:
The style can usually be installed automatically from userstyles.org, with Safari possibly being an exception, where you install the Style by using the 'S' button and searching for Github Dark. Manual installation is also possible, as described below.
- Go to https://userstyles.org/styles/37035/ to find the GitHub-Dark style.
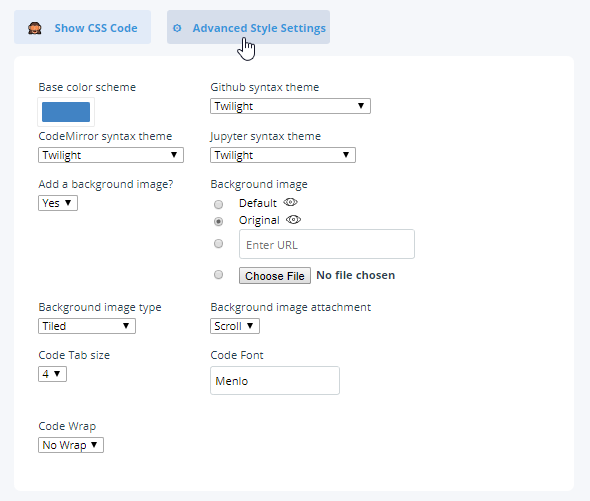
- To the right of the screenshot, make your desired selections:
- Select a syntax highlighting theme. You can preview the style using this demo.
- Pick a base color scheme. Essentially all the links and highlighted panels on GitHub will use this selected color.
- Choose to include a background image
- Use the default (this adds a base64 encoded image).
- Provide a link to your own. Please see the Image wiki page for more details on how to do this to get around the Content Security Policy.
- Or, upload an image (this converts the image into a base64 encoded code).
- Choose how to apply the background image:
- Tiled, or to fit the window (uses
background: cover). - Attachment: fix or scrolled.
- Tiled, or to fit the window (uses
- Pick a code tab size to be applied to all pre code blocks (only seen if tabs are used).
- Click the "Install with Stylish" button.
- Manual installation varies between browsers as described below.
- To build a custom style package, refer to the Build section.
- To manually edit the style and add cusomizations, refer to the Editing page for detailed instructions.
- In the browser, open the User Styles option page:
- Either click on the Stylish icon.
- Or, open the Firefox menu, click on Add-ons, then choose the "User Styles" tab.
- The "Install From URLs..." button can be used:
- It installs the style directly from userstyles.org (using default settings).
- Enter
https://userstyles.org/styles/37035/github-dark.
- Or, use the "Write New Style" button to open a new window:
- Name the Style, "GitHub-Dark" or whatever you desire.
- Copy (Ctrl+A then Ctrl+C) the default or (Grunt or manually) modified style, then paste (Ctrl+V) it into the space below the Style Name.
- Check for Errors, Preview or Save.
- Finally, open your favorite GitHub page and enjoy happy retinas!
- Further style editing:
-
If you used Grunt, and set the
"webkit"option totrue, no further editing is needed. -
Because webkit does not use
@-moz-document, if not already done in the editing step, you will need to remove the entire first line of css@-moz-document regexp("^https?://((gist|guides|help|status|developer)\.)?github\.com((?!generated_pages\/preview).)*$"), domain("render.githubusercontent.com") {
-
This will leave the comment at the top
/*! Github Dark Theme...of the style. -
Now remove the closing bracket
}from the end of the file.
-
- In the browser, open the User Styles option page.
- Click on the Stylish icon, then choose "Manage installed styles".
- Or, open the browser options, find the Extensions page ("More Tools" > "Extensions" in Chrome) and choose Stylish options.
- Click on the "Write new style" button:
- Name the Style, "GitHub-Dark" or whatever you desire.
- Copy (Ctrl+A then Ctrl+C) the default or (Grunt or manually) modified style, then paste (Ctrl+V) it into the space next to the Style Name.
- Now you'll need to update the "Applies to" section:
-
Select "URLs matching the regexp", then enter the following into the input next to it.
^https?://((gist|guides|help|status|developer).)?github.com((?!generated_pages/preview).)*$
-
Click "Add".
-
Select "URLs on the domain", then enter
render.githubusercontent.com
-
If you are using an Enterprise version, then click "Add" again and enter the url of your site.
-
- Finally, open your favorite GitHub page and enjoy happy retinas!
GitHub Dark Wiki - © 2013-2020 StylishThemes Team
