We read every piece of feedback, and take your input very seriously.
To see all available qualifiers, see our documentation.
Have a question about this project? Sign up for a free GitHub account to open an issue and contact its maintainers and the community.
By clicking “Sign up for GitHub”, you agree to our terms of service and privacy statement. We’ll occasionally send you account related emails.
Already on GitHub? Sign in to your account
nginx(读音:engine-x,音标:[ˈendʒɪnks'])是 HTTP 和反向代理服务器、邮件代理服务器和通用 TCP/UDP 代理服务器。
日常中最经常听到用到的就是反向代理以及负载均衡,那么什么是反向代理呢?
反向代理(Reverse Proxy)是指以代理服务器来接受 internet(ˈɪntəˌnɛt) 上的连接请求,然后将请求转发给内部网络上的服务器,并将从服务器上得到的结果返回给 internet 上请求连接的客户端,此时代理服务器对外就表现为一个反向代理服务器。
简单概括就是有一个中转服务器来转发你的请求,那么使用反向代理有什么好处呢?
在 nginx 中通过指定 proxy_pass(ˈprɒksi pɑːs) 即可完成请求转发到指定服务器
# 省略其他配置

server {
  listen       80;
  server_name  www.helloworld.com;

  location /app1/ {
    proxy_pass http://api_server;
    rewrite "^/app1/(.*)$" /$1 break;
  }

  location /app2/ {
    proxy_pass http://api_server;
  }
}
上面的两种形式是最长使用的场景。
假设访问 www.helloworld.com/api1/user/1,那么真实请求的是 http://api_server/user/1;
www.helloworld.com/api1/user/1
http://api_server/user/1
而如果访问 www.helloworld.com/api2/user/2,真实请求地址为 http://api_server/app2/user/2。
www.helloworld.com/api2/user/2
http://api_server/app2/user/2
上面的 rewrite(ˈriːraɪt) 是重写请求地址,而 (.*) 代表正则的组匹配,$1 是获取 () 的内容,同理如果存在多个 () 还可以通过$2,$3 的形式来简写。
rewrite(ˈriːraɪt)
(.*)
()
而在真实的开发中(可能是通过 webpack 或者 vite 这样的工具),为了解决跨域问题,我们也会引入反向代理,例如如下配置:
export default defineConfig({
  server: {
    proxy: {
      // 字符串简写写法
      '/foo': 'http://localhost:4567',
      // 选项写法
      '/api': {
        target: 'http://jsonplaceholder.typicode.com',
        changeOrigin: true,
        rewrite: (path) => path.replace(/^\/api/, ''),
      },
    },
  },
});
所以综上所述,反向代理我们一直在使用可能你并没有觉察到。
负载均衡(Load Balance)这个词经常会听到,它的作用就是分摊到多个操作单元上进行执行。
概念还是不太明显,举一个例子,如果有一个网站 www.helloworld.com,正常情况下它的 web 架构如下 这里如果服务器宕机了或者达到访问上限就会出现没办法访问情况。
www.helloworld.com
那么负载均衡如何解决如上问题呢?
在后端引入一个负载均衡器和一台额外的 web 服务器就可以缓解这种情况(注意,这里的 web 服务会提供一致的服务)。
所以负载均衡的作用就是在于分流,而像上面部署两台或者以上的 web 服务,我们称为集群。
下面看一个 nginx 的负载均衡例子,作为额外知识点补充
http {
     #设定mime类型,类型由mime.type文件定义
    include       /etc/nginx/mime.types;
    default_type  application/octet-stream;
    #设定日志格式
    access_log    /var/log/nginx/access.log;

    #设定负载均衡的服务器列表
    upstream load_balance_server {
        #weigth参数表示权值,权值越高被分配到的几率越大
        server 192.168.1.11:80   weight=5;
        server 192.168.1.12:80   weight=1;
        server 192.168.1.13:80   weight=6;
    }

   #HTTP服务器
   server {
        #侦听80端口
        listen       80;

        #定义使用www.xx.com访问
        server_name  www.helloworld.com;

        #对所有请求进行负载均衡请求
        location / {
            root        /root;                 #定义服务器的默认网站根目录位置
            index       index.html index.htm;  #定义首页索引文件的名称
            proxy_pass  http://load_balance_server ;#请求转向load_balance_server 定义的服务器列表

            #以下是一些反向代理的配置(可选择性配置)
            #proxy_redirect off;
            proxy_set_header Host $host;
            proxy_set_header X-Real-IP $remote_addr;
            #后端的Web服务器可以通过X-Forwarded-For获取用户真实IP
            proxy_set_header X-Forwarded-For $remote_addr;
            proxy_connect_timeout 90;          #nginx跟后端服务器连接超时时间(代理连接超时)
            proxy_send_timeout 90;             #后端服务器数据回传时间(代理发送超时)
            proxy_read_timeout 90;             #连接成功后,后端服务器响应时间(代理接收超时)
            proxy_buffer_size 4k;              #设置代理服务器(nginx)保存用户头信息的缓冲区大小
            proxy_buffers 4 32k;               #proxy_buffers缓冲区,网页平均在32k以下的话,这样设置
            proxy_busy_buffers_size 64k;       #高负荷下缓冲大小(proxy_buffers*2)
            proxy_temp_file_write_size 64k;    #设定缓存文件夹大小,大于这个值,将从upstream服务器传

            client_max_body_size 10m;          #允许客户端请求的最大单文件字节数
            client_body_buffer_size 128k;      #缓冲区代理缓冲用户端请求的最大字节数
        }
    }
}
这里在访问 www.helloworld.com 会按照以下权重访问
这里的 nginx -t 还有一个额外作用,在不指定-c 的情况下会测试默认的配置文件,且会输出一句额外信息
ginx: the configuration file /etc/nginx/nginx.conf syntax is ok
nginx: configuration file /etc/nginx/nginx.conf test is successful
可以从上面信息获取到默认的配置文件路径
它们之前优先级如下
=
^~
location /user/
/
下面看一个例子,假设 nginx 配置如下
location = / {
    [ configuration A ]
}

location / {
    [ configuration B ]
}

location /user/ {
    [ configuration C ]
}

location ^~ /images/ {
    [ configuration D ]
}

location ~* \.(gif|jpg|jpeg)$ {
    [ configuration E ]
}
分别请求以下内容会匹配到那条规则呢?
alias 与 root 有着细微的差异,以下面 nginx 配置为例
server {
  # 省略其他
  # 自定义一些变量
  set $path /usr/share/nginx/html/icare/dist;

  charset utf-8;

  location / {
    root $path;
    index index.html;
    try_files $uri $uri/ /index.html;
  }

  location /media/ {
    expires 1h;
    alias /usr/share/nginx/html/icare/static/download/;
  }

  location ^~ /app/center/assets {
    alias $path/assets/;
    gzip on;
    gzip_http_version 1.1;
    gzip_min_length 1k;
    gzip_comp_level 5;
    gzip_types *;
    expires 30d;
  }

}
静态资源的存放路径为: /usr/share/nginx/html/icare/dist
/usr/share/nginx/html/icare/dist
静态资源的公共前缀为/app/center/,此前缀是通过 vite 设置 base 来完成的
base: command === 'build' ? '/app/center/' : '/';
而假定我们请求一个资源 http://10.0.40.33:8000/app/center/assets/index.d1eb2512.js
http://10.0.40.33:8000/app/center/assets/index.d1eb2512.js
如果上面的 alias 为 root 就会请求 /usr/share/nginx/html/icare/dist/app/center/assets/index.d1eb2512.js 这条资源
root
/usr/share/nginx/html/icare/dist/app/center/assets/index.d1eb2512.js
而实际上 app/center 这个目录是不存在,如果使用 root 指令就会导致资源无法正常加载。
对此使用 aliasa 指令来指定目录,还是以上面资源为例,指定 alias 情况下,真正请求的资源地址为 /usr/share/nginx/html/icare/dist/assets/index.d1eb2512.js
/usr/share/nginx/html/icare/dist/assets/index.d1eb2512.js
所以概括一下:
上面简短的介绍了一下 nginx 的一些知识点,下面看几种常见的场景
不需要任何后端服务的项目,可能是一个纯展示信息,假设静态资源放置到了/app/dist 下
worker_processes  1;

events {
	worker_connections  1024;
}

http {
    include       mime.types;
    default_type  application/octet-stream;
    sendfile        on;
    keepalive_timeout  65;

    gzip on;
    gzip_types text/plain application/x-javascript text/css application/xml text/javascript application/javascript image/jpeg image/gif image/png;
    gzip_vary on;

    server {
		listen       80;
		server_name  static.zp.cn;

		location / {
			root /app/dist;
			index index.html;
			#转发任何请求到 index.html
		}
	}
}
运行 nginx 就可以看到展示的信息了。
spa 单页面部署可以根据路由分为 history 和 hash 模式,即(/hello or #hello)区别。
对于 hash 只需要前端这边路由处理即可不涉及到服务端,所以只需要确保指向正确的 index.html 即可。
而 history 模式需要则保证在刷新页面之后,用户请求的页面地址依然可以正确返回内容,后面会详细介绍,下面看一下 hash 模式 nginx 如何配置?
worker_processes 1;

events {
  worker_connections 1024;
}

http {
  include mime.types;
  default_type application/octet-stream;
  sendfile on;
  keepalive_timeout 65;

  gzip on;
  gzip_types text/plain application/x-javascript text/css application/xml text/javascript application/javascript image/jpeg image/gif image/png;
  gzip_vary on;

  root /app/dist;

  server {
    listen 80;
    server_name static.zp.cn;

    location / {
      index index.html index.htm;
    }
    location ^~ /assets/ {
      add_header Cache-Control "public,max-age=31536000";
      # Allow cross origin access
      add_header Access-Control-Expose-Headers "Access-Control-Allow-Origin";
      add_header Access-Control-Allow-Origin "*";
    }

  }
}
这里新增了 ^~ /assets/它的意思是如果请求 url 包含/assets/内容就采用该匹配规则。
^~ /assets/
worker_processes 1;

events {
  worker_connections 1024;
}

http {
  include mime.types;
  default_type application/octet-stream;
  sendfile on;
  keepalive_timeout 65;

  gzip on;
  gzip_types text/plain application/x-javascript text/css application/xml text/javascript application/javascript image/jpeg image/gif image/png;
  gzip_vary on;

  root /app/dist;

  server {
    listen 80;
    server_name static.zp.cn;

    location / {
      try_files $uri /index.html;
      index index.html index.htm;
    }
    location ^~ /assets/ {
      add_header Cache-Control "public,max-age=31536000";
      # Allow cross origin access
      add_header Access-Control-Expose-Headers "Access-Control-Allow-Origin";
      add_header Access-Control-Allow-Origin "*";
    }

  }
}
对比之下 history 模式则多了一个 try_files。
try_files 的作用是检查文件是否存在,如果存在返回该文件,否则返回后置文件。
举个例子 访问 static.zp.cn/a 的时候$uri 为/a,此时按照顺序会检查如下文件
为了演示方便没有包含接口请求,生产环境中一般会出现 proxy_pass 指定。
到此分享就结束了,下面是一些工具链接,如果有需要可以收藏。
如果文章有错误的地方也欢迎指出。
The text was updated successfully, but these errors were encountered:
No branches or pull requests
nginx(读音:engine-x,音标:[ˈendʒɪnks'])是 HTTP 和反向代理服务器、邮件代理服务器和通用 TCP/UDP 代理服务器。
日常中最经常听到用到的就是反向代理以及负载均衡,那么什么是反向代理呢?
什么是反向代理?
反向代理(Reverse Proxy)是指以代理服务器来接受 internet(ˈɪntəˌnɛt) 上的连接请求,然后将请求转发给内部网络上的服务器,并将从服务器上得到的结果返回给 internet 上请求连接的客户端,此时代理服务器对外就表现为一个反向代理服务器。
简单概括就是有一个中转服务器来转发你的请求,那么使用反向代理有什么好处呢?
nginx 中如何配置反向代理?
在 nginx 中通过指定 proxy_pass(ˈprɒksi pɑːs) 即可完成请求转发到指定服务器
上面的两种形式是最长使用的场景。
假设访问
www.helloworld.com/api1/user/1,那么真实请求的是http://api_server/user/1;而如果访问
www.helloworld.com/api2/user/2,真实请求地址为http://api_server/app2/user/2。上面的
rewrite(ˈriːraɪt)是重写请求地址,而(.*)代表正则的组匹配,$1 是获取()的内容,同理如果存在多个()还可以通过$2,$3 的形式来简写。与 dev 开发对比
而在真实的开发中(可能是通过 webpack 或者 vite 这样的工具),为了解决跨域问题,我们也会引入反向代理,例如如下配置:
所以综上所述,反向代理我们一直在使用可能你并没有觉察到。
什么是负载均衡?
负载均衡(Load Balance)这个词经常会听到,它的作用就是分摊到多个操作单元上进行执行。
概念还是不太明显,举一个例子,如果有一个网站
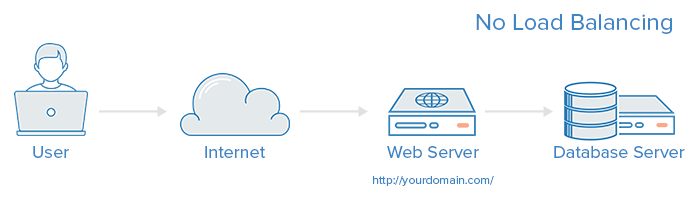
www.helloworld.com,正常情况下它的 web 架构如下这里如果服务器宕机了或者达到访问上限就会出现没办法访问情况。
那么负载均衡如何解决如上问题呢?
负载均衡如何解决
在后端引入一个负载均衡器和一台额外的 web 服务器就可以缓解这种情况(注意,这里的 web 服务会提供一致的服务)。
所以负载均衡的作用就是在于分流,而像上面部署两台或者以上的 web 服务,我们称为集群。
下面看一个 nginx 的负载均衡例子,作为额外知识点补充
nginx 负载均衡示例
这里在访问 www.helloworld.com 会按照以下权重访问
nginx 常见命令
这里的 nginx -t 还有一个额外作用,在不指定-c 的情况下会测试默认的配置文件,且会输出一句额外信息
ginx: the configuration file /etc/nginx/nginx.conf syntax is ok nginx: configuration file /etc/nginx/nginx.conf test is successful可以从上面信息获取到默认的配置文件路径
location 匹配规则
它们之前优先级如下
=不再寻找;^~不再寻找;location /user//;location 实战
下面看一个例子,假设 nginx 配置如下
分别请求以下内容会匹配到那条规则呢?
alias 与 root 区别
alias 与 root 有着细微的差异,以下面 nginx 配置为例
静态资源的存放路径为:
/usr/share/nginx/html/icare/dist静态资源的公共前缀为/app/center/,此前缀是通过 vite 设置 base 来完成的
而假定我们请求一个资源
http://10.0.40.33:8000/app/center/assets/index.d1eb2512.js如果上面的 alias 为
root就会请求/usr/share/nginx/html/icare/dist/app/center/assets/index.d1eb2512.js这条资源而实际上 app/center 这个目录是不存在,如果使用 root 指令就会导致资源无法正常加载。
对此使用 aliasa 指令来指定目录,还是以上面资源为例,指定 alias 情况下,真正请求的资源地址为
/usr/share/nginx/html/icare/dist/assets/index.d1eb2512.js所以概括一下:
实战
上面简短的介绍了一下 nginx 的一些知识点,下面看几种常见的场景
部署静态站点
不需要任何后端服务的项目,可能是一个纯展示信息,假设静态资源放置到了/app/dist 下
运行 nginx 就可以看到展示的信息了。
部署 spa 单页面
spa 单页面部署可以根据路由分为 history 和 hash 模式,即(/hello or #hello)区别。
对于 hash 只需要前端这边路由处理即可不涉及到服务端,所以只需要确保指向正确的 index.html 即可。
而 history 模式需要则保证在刷新页面之后,用户请求的页面地址依然可以正确返回内容,后面会详细介绍,下面看一下 hash 模式 nginx 如何配置?
hash nginx 配置
这里新增了
^~ /assets/它的意思是如果请求 url 包含/assets/内容就采用该匹配规则。history nginx 配置
对比之下 history 模式则多了一个 try_files。
try_files 的作用是检查文件是否存在,如果存在返回该文件,否则返回后置文件。
举个例子 访问 static.zp.cn/a 的时候$uri 为/a,此时按照顺序会检查如下文件
最后
到此分享就结束了,下面是一些工具链接,如果有需要可以收藏。
如果文章有错误的地方也欢迎指出。
The text was updated successfully, but these errors were encountered: