You can’t control the weather, but you can communicate about it!
There are a great number of businesses that are affected by seasonality. From coffee shops to parka stores, the day’s weather can have a major impact on your customer’s decision to purchase.
Recently here in Chicago the weather has dipped well below 0° (that’s -17.7° C to everyone else). That has meant that we have less time spent outside, and more time in front of screens (and fireplaces!) inside.
That inspired me to create a tutorial that demonstrates the extensible power of the ActiveCampaign platform, complete with free open source code examples that you can use to create a special “weather” trigger automation.
In this tutorial we are going to create a warm-weather automation for a hypothetical sunglasses company with contacts all over the United States. When the forecast suggests a daily high above 65 (the day that college kids decide to air out their couches) in a contact’s location, we will send them a coupon code to receive 10% off their order.
The way we will do this is by sending a contact’s details via webhook to a custom application. That custom application will reformat the data, and send the contact’s location to the DarkSky weather forecasting API. DarkSky will send back a forecast about the contact’s location to our custom application. The custom application will reformat the data for ActiveCampaign, and send it back to ActiveCampaign to update the contact record.
For the purposes of this article, I wont get into the complications of provisioning a 1-time use or exipring coupon code, since I want to focus on the weather part of the puzzle.
I will try and minimize code as much as possible so that you can simply take advantage of the application. Don’t be intimidated, we can do this!
I will try and keep the list of requirements to a minimum. At a minimum you will need only two things:
- An ActiveCampaign account – sign up here
- A Heroku account – sign up here
- An Dark Sky API Key – get that here
If you want to play around more and extend the functionality of the application you can access the source code at the github repo.
The ActiveWeather microservice will enrich several custom fields on your contact’s record. It will update the contact with an approximate latitude and longitude, as well as the forecasted high temperature for the day, the low temperature, and a “temp icon” which is a simple string you can use to approxamate the weather for that day.
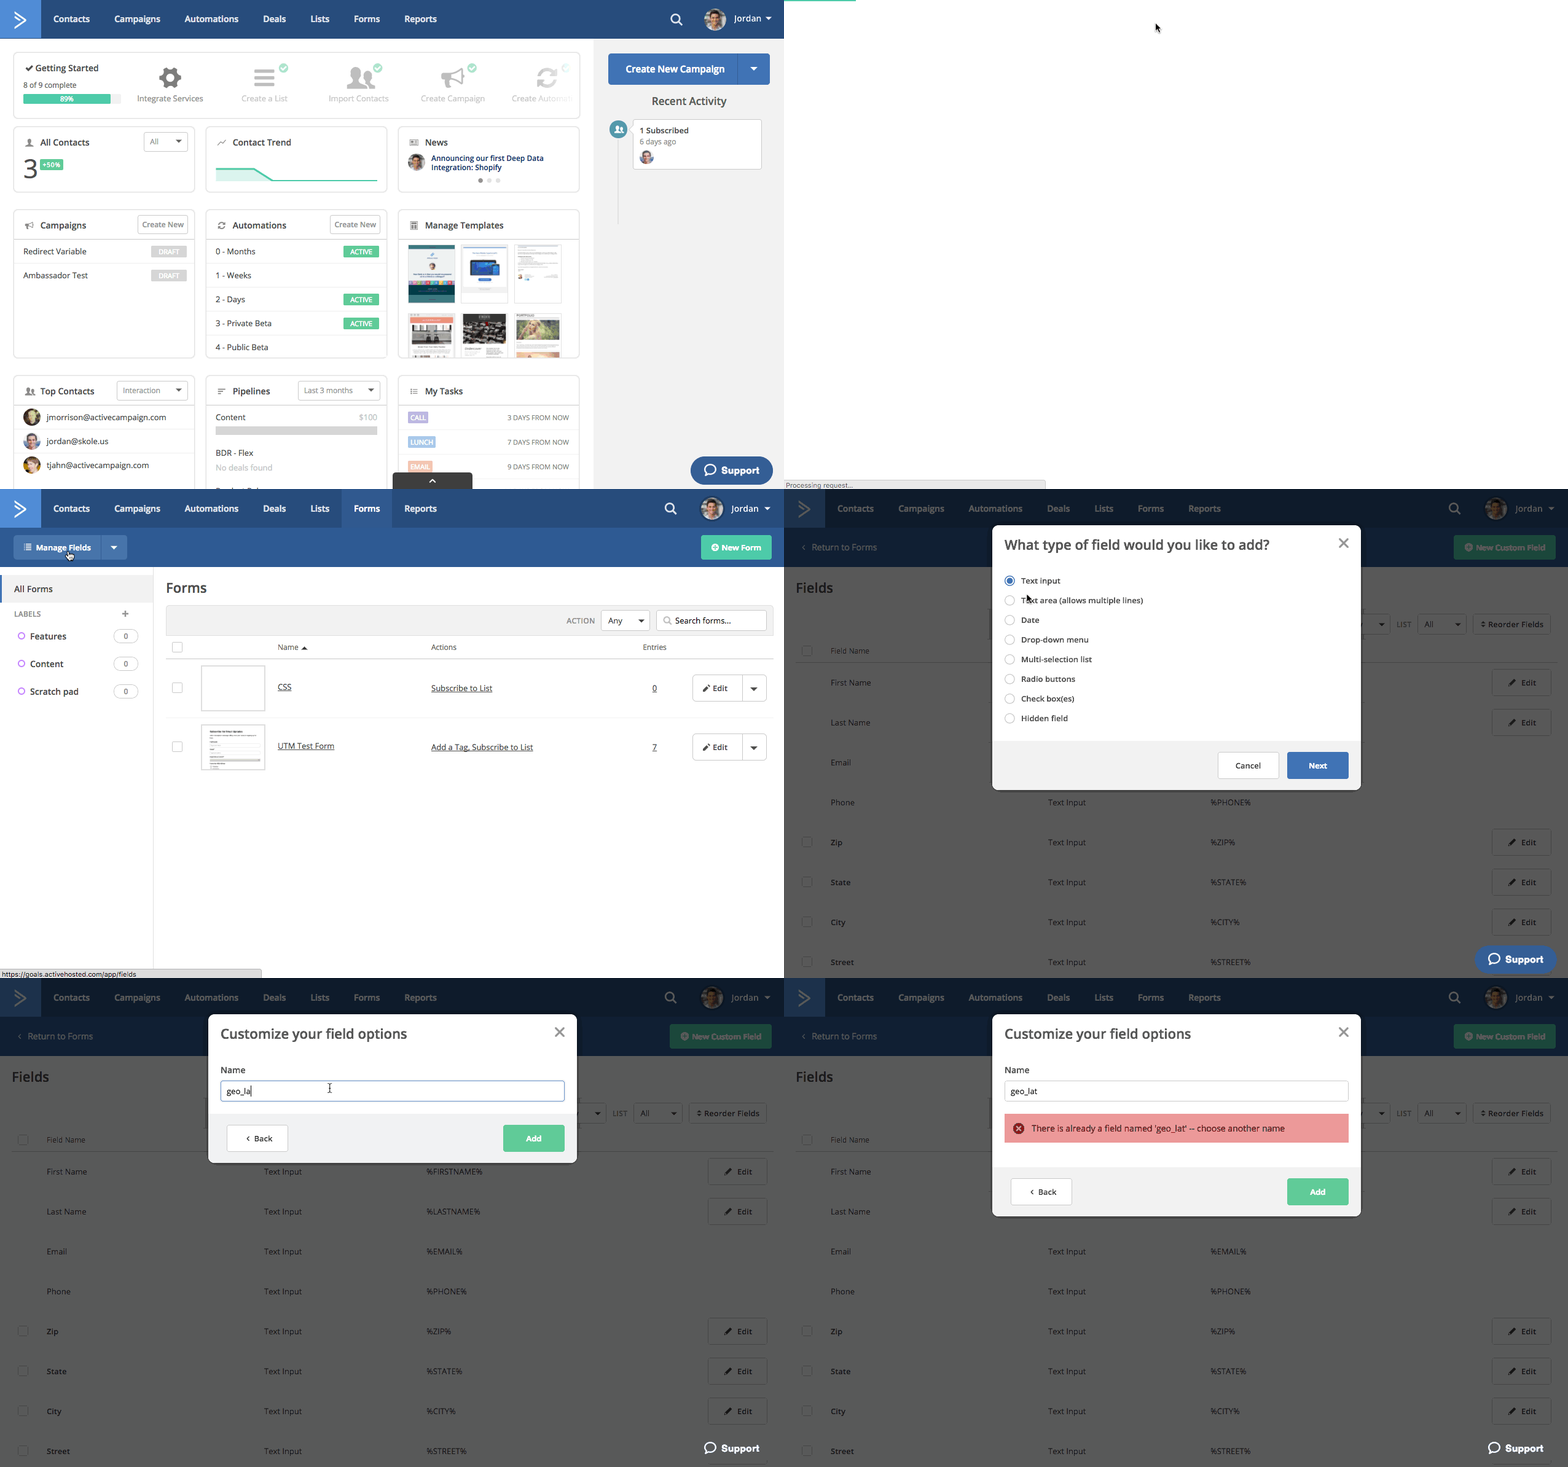
Log into your ActiveCampaign account, and navigate to the forms tab.
In the top left, click on “manage fields” and then in top right, click on “add new field.” Choose “text field” and create a new field called geo_lat.
Repeat this process until you have created the following 5 fields:
- geo_lat
- geo_long
- temp_high
- temp_low
- temp_icon
Once you have created these custom fields they should appear in the list of all your custom fields, with the personalization tags of %GEOLAT% %GEOLONG% %TEMPHIGH% %TEMPLOW% and %TEMPICON%. If for whatever reason you have something else, you can edit the custom fields to match.
IMPORTANT: The application maps to these custom fields, if they are not accurate then the application wont be able to update your contact records.
Make sure to log into your Heroku account and then click this button:
This will create an instance of the project in Heroku that you can use. Follow the prompts to complete customizing the application for your own use.
You can choose to set your DarkSky API key as an environment variable if you would like during deployment, or you can pass the DarkSky API key as a query parameter when you build your webhook. Any key passed as a query parameter will override the api key saved as an environment variable.
The free version of Heroku should be fine for the demonstration purposes of this article, however you may hit certain limits when operating with a large number of contacts.
Your application should have deployed successfully. You can check that it did by clicking on the “view” button at the bottom of the page. That page will also help you write down your webhook url.
Now that you have deployed your API to Heroku, we are all set to create our webhook url. The url will look like this:
https://{{heroku-app-name}}.herokuapp.com/{{activecampaign-account}}/catch/weather?apiKey={{activecampaign-api-key}}
Replace {{heroku-app-name}} with the hostname of the application you deployed to Heroku. Replace {{activecampaign-account}} with your ActiveCampaign subdomain, and replace {{activecampaign-api-key}} with your ActiveCampaign API key, located in settings → developer in your account.
If you did not set your DarkSky API key as an environment variable, you should include it as &darkSkyKey={{darkSkyKey}} so your complete url should look like this:
https://{{heroku-app-name}}.herokuapp.com/{{activecampaign-account}}/catch/weather?apiKey={{activecampaign-api-key}}&darkSkyKey={{dark-sky-api-key}}
If you need help constructing your url, I have included a url builder at the root of the application you deployed to Heroku.
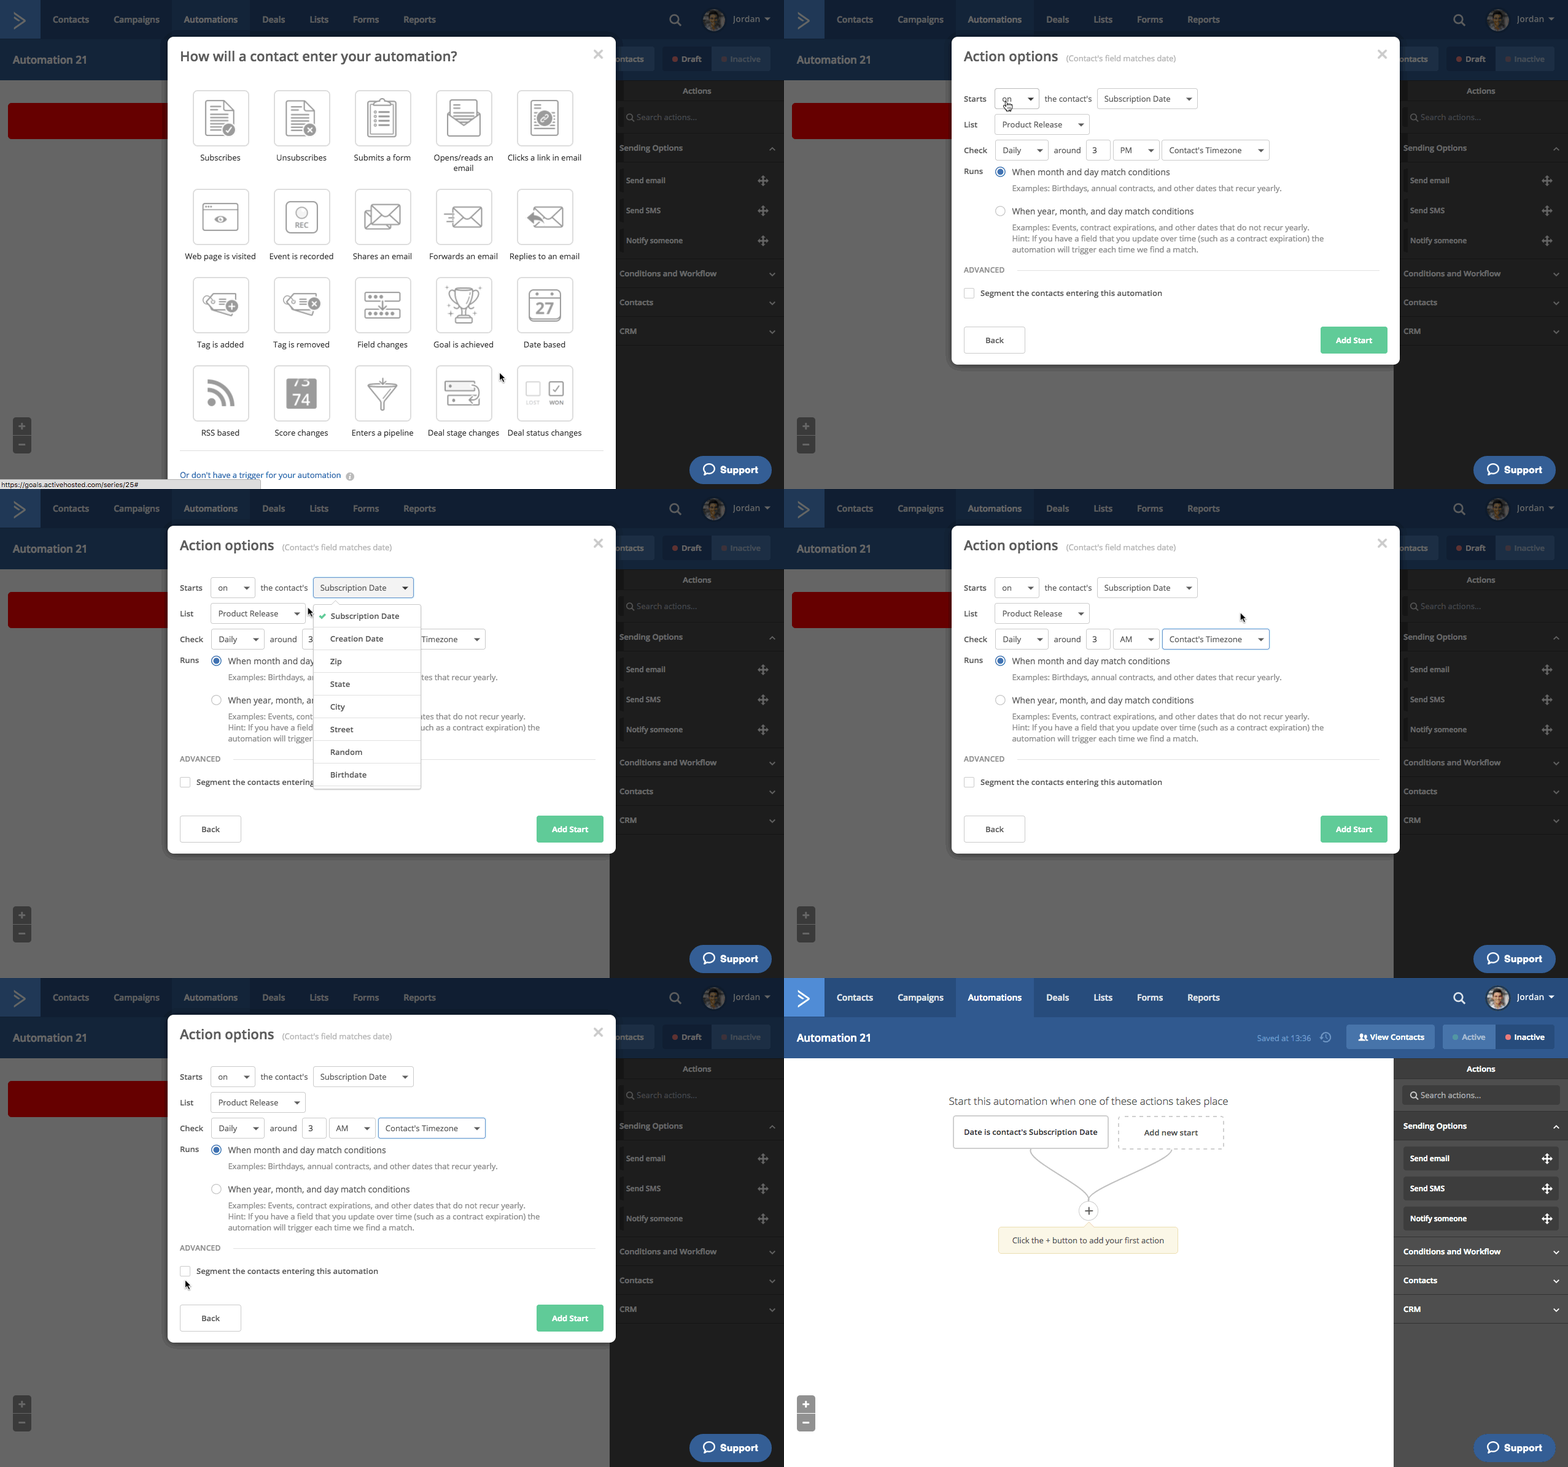
Now that your API is up and running, we need to create an automation to take advantage of it. We will be creating an automation that runs every morning at 3am in the contact’s local time.
When the automation starts, it will update the contact’s information with the days forecast, and wait for 1 hour.
If the forecasted temperature for the day is hotter than 65 degrees F, and the contact has never received the campaign before, we will send them the campaign. Otherwise we will end the automation.
You can install the template now using this link – http://tplshare.com/_0xr92n
Start by creating a trigger for the automation that runs daily at 3am, starting when the contact first subscribes to your contact list.
Add an action to post a webhook to the url you wrote down earlier. This is how we will update the contact’s weather information every day.
Add a wait condition, to wait for 3 hours. It doesnt matter how long to wait, so long as you give at least 5-10 minutes for the contact record to be updated.
Create an if statement, that checks if the contact’s custom field %TEMPHIGH% is above 65 degrees F. If yes, then create an email to send to them. If no, end the automation.
Go back to the original if statement, and edit the segment to make sure the contact has never received the email that you are planning on sending them.
End both branches of the automation.
Hopefully this got your creative juices flowing, about how you can integrate external applications into ActiveCampaign, to continue to “stack” marketing apps to achieve your business objectives.
If you are a software developer, we would love to have you integrate your application into ActiveCampaign to provide better value for your users. You are encouraged to join us in our developer forums: https://community.activecampaign.com/c/developers
Let us know what types of appilications you would like to see integrated with ActiveCampaign by submitting your ideas to acideas.activecampaign.com
If you are a marketer interested in learning more about software development I recommend taking a look at https://code.org/learn.


