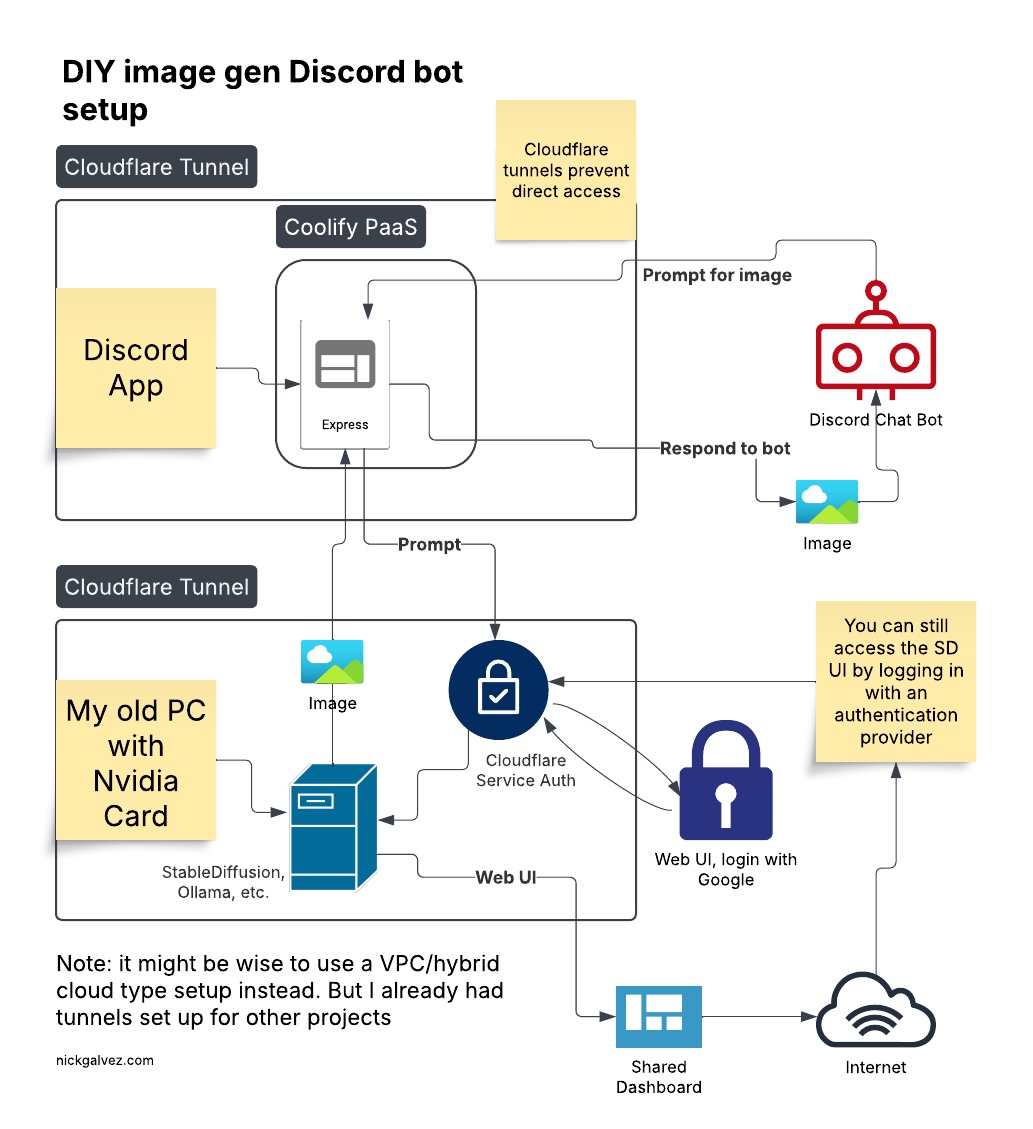
A broke engineer's attempt to make a midjourney type Discord bot on an old PC.
After looking at the terrifying costs to host a cloud GPU, I set up stable-diffusion-webui on my old PC. I already had a Coolify server running where I deploy test projects, so I started with a hello world chatbot and went from there.
- Cloudflare tunnel to my old PC. No exposing ports and IPs like in the old days.
- Cloudflare App to connect to the tunnel with
- Service auth policy using an app ID/Key
Discord App
- Coolify Server hosting an Express app
- Express handles the
/scribblecommand from Discord, and sends the generated image back to chat.
- Express handles the
- Create a private Discord app with guild_id (your server id) permissions
Home PC
- Stable Diffusion webUI on Python
- LAN access to the webUI
- API endpoints enabled in Stable Diffusion webUI
Good question, it doesn't need to be. You can run your discord bot on localhost of the same machine as the image generator.
I wanted to learn more about Coolify and Cloudflare, CI/CD, and Docker. Plus it just feels like the less running in my house, the better for security.
From your Discord server with the bot enabled: /scribble <prompt>
Create a .env file with your discord info
Run npm run start after cloning. That should get you going.
You should see a message that you are connected to Discord.
Add this to the Configuration > General > Start Command field:
npx tsx src/index.ts
You can also add a Github Webhook so it will auto deploy when you push changes. Coolify is so... cool!
Install SD web UI by following the instructions on their Github.
Once it's working add the --listen arguement to ensure the API is on. Here's some settings that work with my 16gb 4060 ti:
python launch.py --listen --xformers --api --medvram --always-batch-cond-uncond
I'm also running ollama so I don't want to eat up all the vram!
Now you can debug your app on localhost if you haven't set up a cloudflare tunnel. Just add your server's IP and port to the .env file.
Hopefully you will now be able to get a response from the API!
