❤️💕💕Go语言高级篇章,在此之前建议你先了解基础和进阶篇。Myblog:http://nsddd.top
[TOC]
实现一个简单的在线词典,使用 CLI 的参数调用第三方词典并且返回翻译,效果如下:
#\go-by-example\simpledict\v4> go run .\main.go cloud
cloud UK: [klaud] US: [klaʊd]
n.云;大群;(镜面)朦胧;黑影;阴影;瑕疵;嫌疑;集合
vt.如云一般地覆盖;使阴暗;玷污;弄脏
vi.阴云密布;变模糊[[TDD]] 是测试驱动开发的缩写。这是一种软件开发方法,要求在编写代码之前先编写测试,并在编写代码时重复运行这些测试。这样可以确保代码按预期工作,并在开发过程中发现问题。
举个例子,假设我们要编写一个Go语言函数,该函数接受两个整数并返回它们的和。在使用TDD方法开发时,我们首先编写测试函数,如下所示:
func TestSum(t *testing.T) {
    result := Sum(2, 3)
    expected := 5
    if result != expected {
        t.Errorf("Expected %d but got %d", expected, result)
    }
}
这个测试函数使用了Go语言的testing包,它检查调用Sum(2,3)是否返回正确的结果。
然后我们编写Sum函数
func Sum(a int, b int) int {
    return a + b
}
这时我们可以运行测试,如果测试通过,则说明Sum函数按预期工作。如果测试不通过,则说明函数存在问题,我们需要调整代码并再次运行测试。
最后我们可以运行 go test 来运行所有的单元测试。
$ go test
PASS
ok      example/sum        0.002s
这样我们就可以确保代码按预期工作,并在开发过程中发现问题。
作为一个开源的爱好者,我喜欢在GitHub actions进行测试,在 projects 上进行项目跟踪和管理。
在GitHub中使用 Projects 和 Actions 来实现CI/CD流程需要几个步骤。
- 在GitHub上创建一个新项目,或打开现有项目。
- 在项目根目录下创建一个名为 ".github/workflows" 的目录,并在其中创建一个 yml 文件来配置你的工作流程。 例如,你可以创建一个名为 "ci.yml" 的文件来配置持续集成工作流程。
- 在yml文件中,使用 GitHub Actions 提供的语法配置你的工作流程。例如,你可以配置在每次提交后运行单元测试,并在测试通过后自动部署到生产环境。
- 提交更改并推送到GitHub。
- 使用 GitHub Projects 来管理你的项目。在 GitHub 上创建一个项目仪表板,并将其与你的项目关联。你可以使用此仪表板来跟踪项目进度,查看待办事项列表和问题跟踪。
- 通过在 GitHub Actions 中配置 webhooks,可以让每次提交都自动触发工作流程。
- 在Actions中查看构建和部署结果。
ci.yaml 文件:
name: CI

on:
  push:
    branches:
      - main
  pull_request:
    branches:
      - main

jobs:
  build:
    runs-on: ubuntu-latest

    steps:
    - name: Checkout code
      uses: actions/checkout@v2

    - name: Run tests
      run: go test -v ./...
⚠️ 当然,你也可以修改 yaml 文件,配置一个简单的工作流程,在每次 issue 创建或 pull request 时将相关信息写入项目。这样可以节省很多时间,具体用法看GitHub官方文档,我觉得很麻烦不演示了。
当然,我们应该充分利用 GitHub 带给我们的帮助,对于我来说,对于一个优秀的GitHub使用者来说,在工程代码开战前,你是否应该考虑 文档、测试先行、CI 帮助你自动推进。
对于 coverage 来说,对于开源项目无疑是非常重要的,如下:
**覆盖率高达 98% 的项目,必然更受 contributor 喜爱。 **
当然,除此之外,code climate(代码审核)也很重要,4.0 的指数意味着质量的保证。
Code Climate 是一个在线代码质量分析平台,可以帮助您提高代码质量并管理技术债务。它可以对您的代码进行静态分析,以检测和报告潜在的问题,如代码重复、漏洞、代码覆盖率等。
Code Climate 可以与 GitHub 集成,并在每次提交或拉取请求时自动运行分析。您可以在 Code Climate 的网站上查看分析报告和统计数据,并使用其中的工具来管理您的代码库。
选择 彩云科技
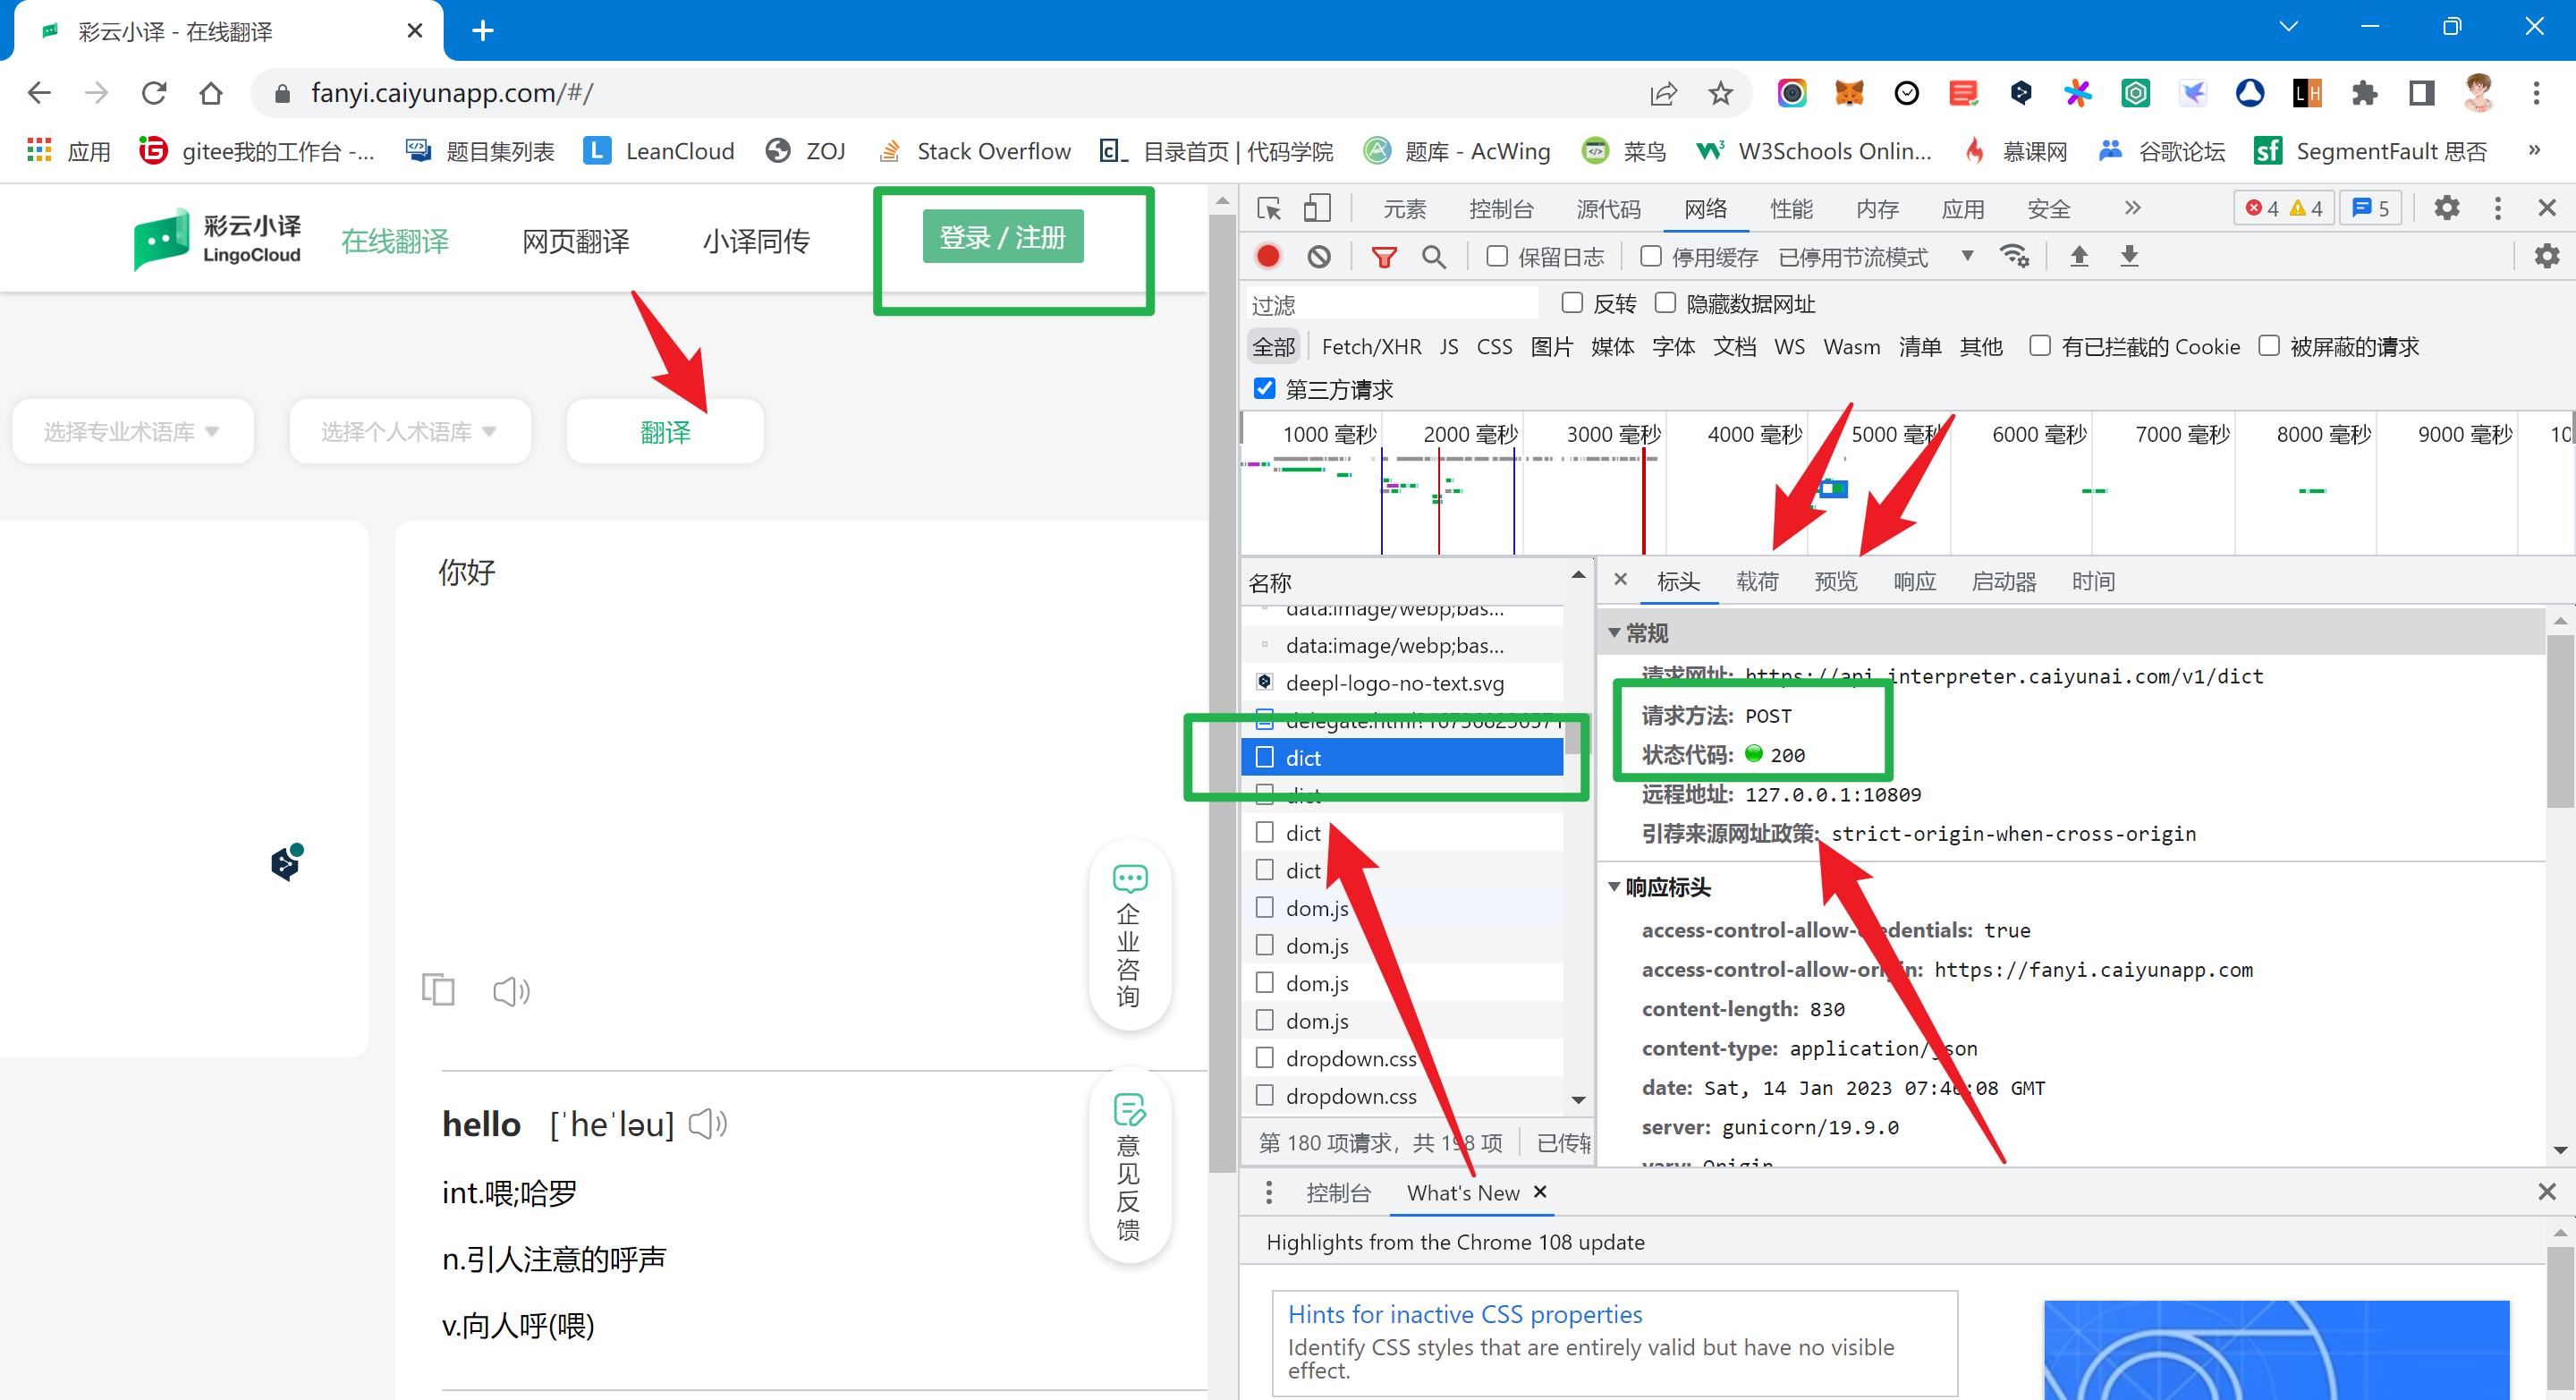
接下来,我们就可以找到自己想要的数据了:
下一步,我们想办法去 Golang 获取请求。
右键复制请求 cURL ,得到请求的 json 数据:
curl 'https://api.interpreter.caiyunai.com/v1/dict' \
  -H 'authority: api.interpreter.caiyunai.com' \
  -H 'accept: application/json, text/plain, */*' \
  -H 'accept-language: zh-CN,zh;q=0.9,zh-HK;q=0.8,en-ZA;q=0.7,en;q=0.6' \
  -H 'app-name: xy' \
  -H 'content-type: application/json;charset=UTF-8' \
  -H 'device-id;' \
  -H 'origin: https://fanyi.caiyunapp.com' \
  -H 'os-type: web' \
  -H 'os-version;' \
  -H 'referer: https://fanyi.caiyunapp.com/' \
  -H 'sec-ch-ua: "Not?A_Brand";v="8", "Chromium";v="108", "Google Chrome";v="108"' \
  -H 'sec-ch-ua-mobile: ?0' \
  -H 'sec-ch-ua-platform: "Windows"' \
  -H 'sec-fetch-dest: empty' \
  -H 'sec-fetch-mode: cors' \
  -H 'sec-fetch-site: cross-site' \
  -H 'user-agent: Mozilla/5.0 (Windows NT 10.0; Win64; x64) AppleWebKit/537.36 (KHTML, like Gecko) Chrome/108.0.0.0 Safari/537.36' \
  -H 'x-authorization: token:qgemv4jr1y38jyq6vhvi' \
  --data-raw '{"trans_type":"en2zh","source":"hello"}' \
  --compressed
生成代码:
package main

import (
	"fmt"
	"io/ioutil"
	"log"
	"net/http"
	"strings"
)

func main() {
	client := &http.Client{}
	var data = strings.NewReader(`{"trans_type":"en2zh","source":"hello"}`)

    //设置请求头
	req, err := http.NewRequest("POST", "https://api.interpreter.caiyunai.com/v1/dict", data)
	if err != nil {
		log.Fatal(err)
	}
	req.Header.Set("authority", "api.interpreter.caiyunai.com")
	req.Header.Set("accept", "application/json, text/plain, */*")
	req.Header.Set("accept-language", "zh-CN,zh;q=0.9,zh-HK;q=0.8,en-ZA;q=0.7,en;q=0.6")
	req.Header.Set("app-name", "xy")
	req.Header.Set("content-type", "application/json;charset=UTF-8")
	req.Header.Set("device-id", "")
	req.Header.Set("origin", "https://fanyi.caiyunapp.com")
	req.Header.Set("os-type", "web")
	req.Header.Set("os-version", "")
	req.Header.Set("referer", "https://fanyi.caiyunapp.com/")
	req.Header.Set("sec-ch-ua", `"Not?A_Brand";v="8", "Chromium";v="108", "Google Chrome";v="108"`)
	req.Header.Set("sec-ch-ua-mobile", "?0")
	req.Header.Set("sec-ch-ua-platform", `"Windows"`)
	req.Header.Set("sec-fetch-dest", "empty")
	req.Header.Set("sec-fetch-mode", "cors")
	req.Header.Set("sec-fetch-site", "cross-site")
	req.Header.Set("user-agent", "Mozilla/5.0 (Windows NT 10.0; Win64; x64) AppleWebKit/537.36 (KHTML, like Gecko) Chrome/108.0.0.0 Safari/537.36")
	req.Header.Set("x-authorization", "token:qgemv4jr1y38jyq6vhvi")
	resp, err := client.Do(req)
	if err != nil {
		log.Fatal(err)
	}
	defer resp.Body.Close()	//defer:栈
	bodyText, err := ioutil.ReadAll(resp.Body)
	if err != nil {
		log.Fatal(err)
	}
	fmt.Printf("%s\n", bodyText)
}
🚀 编译结果如下:
PS D:\文档\最近的\awesome-golang\docs\code\go-by-example\simpledict\v4> go run .\test.go cloud
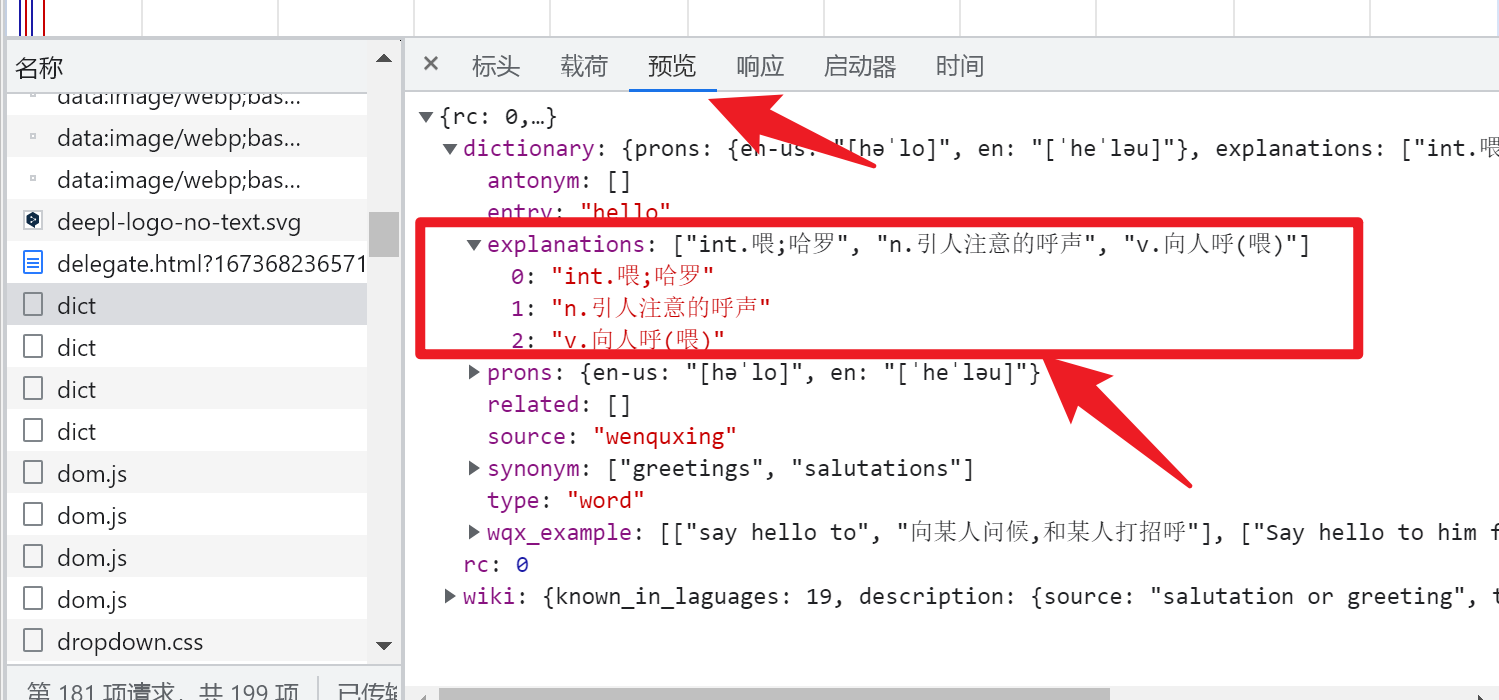
{"rc":0,"wiki":{"known_in_laguages":19,"description":{"source":"salutation or greeting","target":null},"id":"Q12068060","item":{"source":"hello","target":"Hello"},"image_url":"http:\/\/www.caiyunapp.com\/imgs\/link_default_img.png","is_subject":"true","sitelink":"https:\/\/www.caiyunapp.com\/read_mode\/?id=5c1654ca4faac90001a6f17a"},"dictionary":{"prons":{"en-us":"[h\u0259\u02c8lo]","en":"[\u02c8he\u02c8l\u0259u]"},"explanations":["int.\u5582;\u54c8\u7f57","n.\u5f15\u4eba\u6ce8\u610f\u7684\u547c\u58f0","v.\u5411\u4eba\u547c(\u5582)"],"synonym":["greetings","salutations"],"antonym":[],"wqx_example":[["say hello to","\u5411\u67d0\u4eba\u95ee\u5019,\u548c\u67d0\u4eba\u6253\u62db\u547c"],["Say hello to him for me . ","\u4ee3\u6211\u95ee\u5019\u4ed6\u3002"]],"entry":"hello","type":"word","related":[],"source":"wenquxing"}}
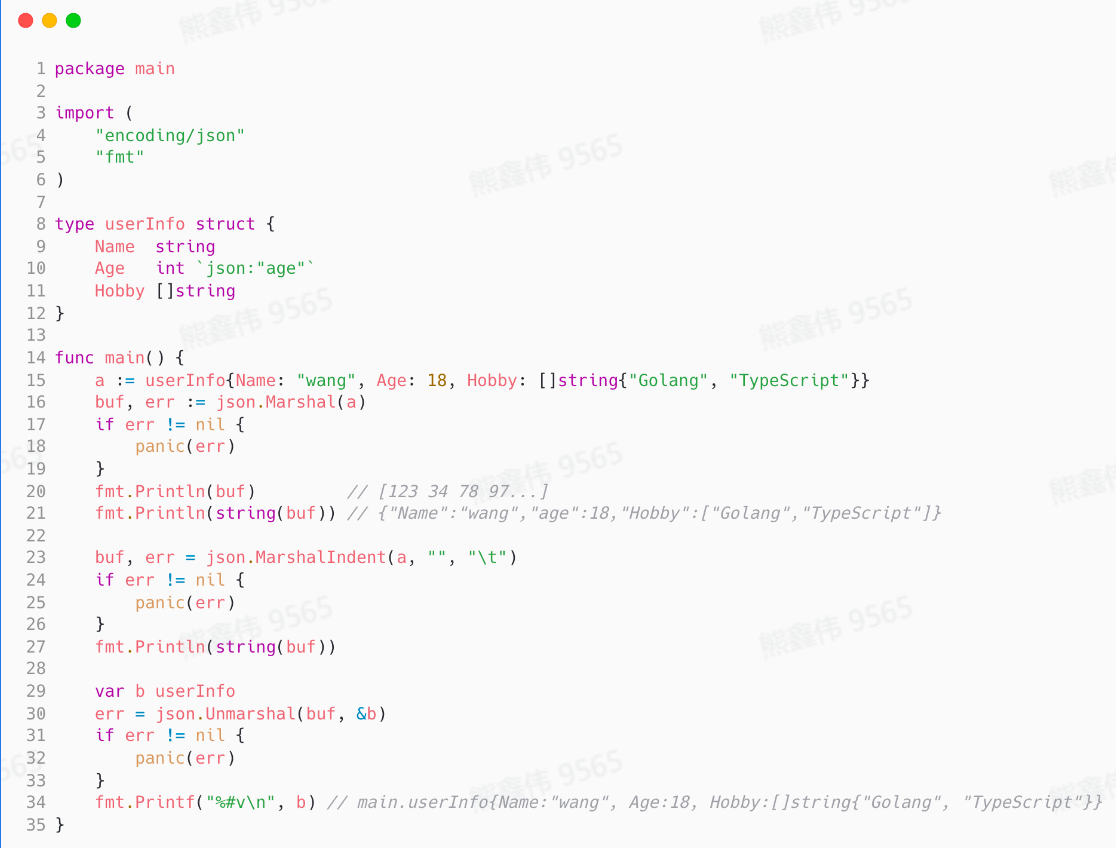
给出的请求序列化,得到的是 json反序列化即可~
序列化方法:
变更:
type AutoGenerated struct {
	Rc int `json:"rc"`
	Wiki struct {
		KnownInLaguages int `json:"known_in_laguages"`
		Description struct {
			Source string `json:"source"`
			Target interface{} `json:"target"`
		} `json:"description"`
		ID string `json:"id"`
		Item struct {
			Source string `json:"source"`
			Target string `json:"target"`
		} `json:"item"`
		ImageURL string `json:"image_url"`
		IsSubject string `json:"is_subject"`
		Sitelink string `json:"sitelink"`
	} `json:"wiki"`
	Dictionary struct {
		Prons struct {
			EnUs string `json:"en-us"`
			En string `json:"en"`
		} `json:"prons"`
		Explanations []string `json:"explanations"`
		Synonym []string `json:"synonym"`
		Antonym []interface{} `json:"antonym"`
		WqxExample [][]string `json:"wqx_example"`
		Entry string `json:"entry"`
		Type string `json:"type"`
		Related []interface{} `json:"related"`
		Source string `json:"source"`
	} `json:"dictionary"`
}💡简单的一个案例如下:
package main

import (
	"bytes"
	"encoding/json"
	"fmt"
	"io/ioutil"
	"log"
	"net/http"
	"os"
)

/*
cURL
*/

type DictRequest struct {
	TransType string `json:"trans_type"`
	Source    string `json:"source"`
	UserID    string `json:"user_id"`
}

type DictResponse struct {
	Rc   int `json:"rc"`
	Wiki struct {
		KnownInLaguages int `json:"known_in_laguages"`
		Description     struct {
			Source string      `json:"source"`
			Target interface{} `json:"target"`
		} `json:"description"`
		ID   string `json:"id"`
		Item struct {
			Source string `json:"source"`
			Target string `json:"target"`
		} `json:"item"`
		ImageURL  string `json:"image_url"`
		IsSubject string `json:"is_subject"`
		Sitelink  string `json:"sitelink"`
	} `json:"wiki"`
	Dictionary struct {
		Prons struct {
			EnUs string `json:"en-us"`
			En   string `json:"en"`
		} `json:"prons"`
		Explanations []string      `json:"explanations"`
		Synonym      []string      `json:"synonym"`
		Antonym      []string      `json:"antonym"`
		WqxExample   [][]string    `json:"wqx_example"`
		Entry        string        `json:"entry"`
		Type         string        `json:"type"`
		Related      []interface{} `json:"related"`
		Source       string        `json:"source"`
	} `json:"dictionary"`
}

func query(word string) {
	client := &http.Client{}
	request := DictRequest{TransType: "en2zh", Source: word}
	buf, err := json.Marshal(request)
	if err != nil {
		log.Fatal(err)
	}
	var data = bytes.NewReader(buf)
	req, err := http.NewRequest("POST", "https://api.interpreter.caiyunai.com/v1/dict", data)
	if err != nil {
		log.Fatal(err)
	}
	req.Header.Set("Connection", "keep-alive")
	req.Header.Set("DNT", "1")
	req.Header.Set("os-version", "")
	req.Header.Set("sec-ch-ua-mobile", "?0")
	req.Header.Set("User-Agent", "Mozilla/5.0 (Macintosh; Intel Mac OS X 10_15_7) AppleWebKit/537.36 (KHTML, like Gecko) Chrome/99.0.4844.51 Safari/537.36")
	req.Header.Set("app-name", "xy")
	req.Header.Set("Content-Type", "application/json;charset=UTF-8")
	req.Header.Set("Accept", "application/json, text/plain, */*")
	req.Header.Set("device-id", "")
	req.Header.Set("os-type", "web")
	req.Header.Set("X-Authorization", "token:qgemv4jr1y38jyq6vhvi")
	req.Header.Set("Origin", "https://fanyi.caiyunapp.com")
	req.Header.Set("Sec-Fetch-Site", "cross-site")
	req.Header.Set("Sec-Fetch-Mode", "cors")
	req.Header.Set("Sec-Fetch-Dest", "empty")
	req.Header.Set("Referer", "https://fanyi.caiyunapp.com/")
	req.Header.Set("Accept-Language", "zh-CN,zh;q=0.9")
	req.Header.Set("Cookie", "_ym_uid=16456948721020430059; _ym_d=1645694872")
	resp, err := client.Do(req)
	if err != nil {
		log.Fatal(err)
	}
	defer resp.Body.Close()
	bodyText, err := ioutil.ReadAll(resp.Body)
	if err != nil {
		log.Fatal(err)
	}
	if resp.StatusCode != 200 {
		log.Fatal("bad StatusCode:", resp.StatusCode, "body", string(bodyText))
	}
	var dictResponse DictResponse
	err = json.Unmarshal(bodyText, &dictResponse)
	if err != nil {
		log.Fatal(err)
	}
	fmt.Println(word, "UK:", dictResponse.Dictionary.Prons.En, "US:", dictResponse.Dictionary.Prons.EnUs)
	for _, item := range dictResponse.Dictionary.Explanations {
		fmt.Println(item)
	}
}

func main() {
	if len(os.Args) != 2 {
		fmt.Fprintf(os.Stderr, `usage: simpleDict WORD
example: simpleDict hello
		`)
		os.Exit(1)
	}
	word := os.Args[1]
	query(word)
}
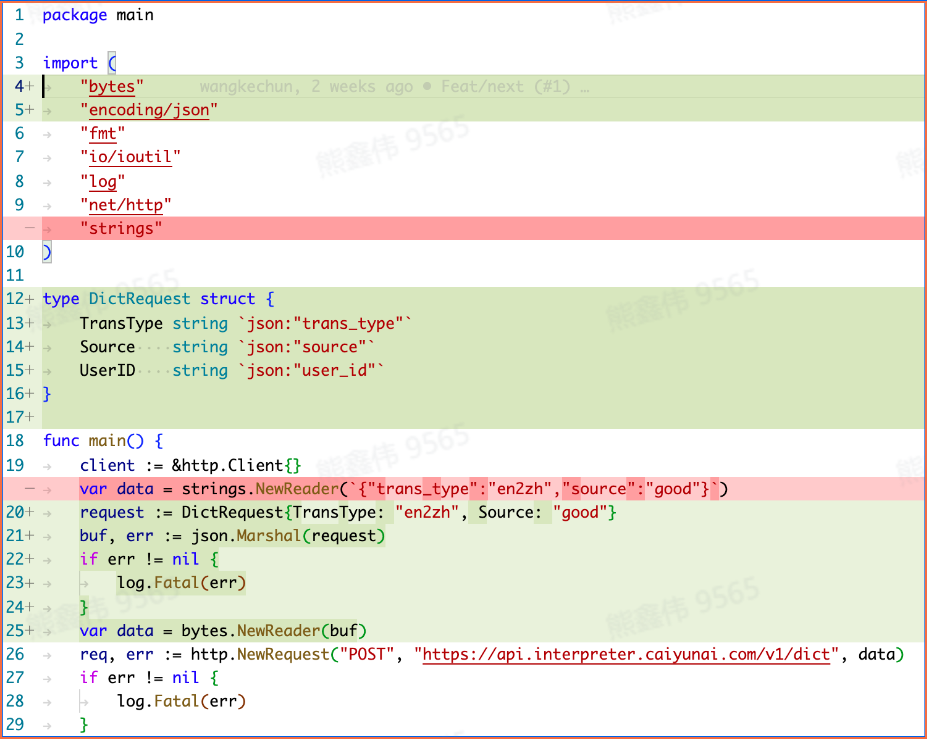
这段代码是使用 Go 语言请求翻译 API,然后对响应数据进行解析。
首先是导入了一些 Go 内置库,其中 "net/http" 和 "encoding/json" 在本代码中起到重要作用。
接着定义了 DictRequest 和 DictResponse 两个结构体,它们分别用于请求数据和响应数据的解析。
query 函数中,首先创建了一个 http.Client 实例,然后使用 json.Marshal 将请求数据转换为 json 格式,并使用 http.NewRequest 创建了一个新的请求。
接着设置请求头信息,这些信息都是请求 API 所需的。最后调用 client.Do 函数发送请求。
在这里,响应数据被解析到了 DictResponse 结构体中,并输出到终端。
🚀 编译结果如下:
PS D:\文档\最近的\awesome-golang\docs\code\go-by-example\simpledict\v4> go run .\main.go  cub
cub UK: [kʌb] US: [kʌb]
n.幼仔
[俗]初出茅庐者
[口语]小伙子;牛栏;牛棚;饲料槽


