Started February 23, 2016; Restarted July 25, 2016; Restarted again January 11, 2018; Restarted again January 2, 2019
Copyright (c) 2016-2020 Gregory Adam Scott ([email protected])
Armoured Commander II is free software: you can redistribute it and/or modify it under the terms of the GNU General Public License as published by the Free Software Foundation, either version 3 of the License, or (at your option) any later version.
Armoured Commander II is distributed in the hope that it will be useful, but WITHOUT ANY WARRANTY; without even the implied warranty of MERCHANTABILITY or FITNESS FOR A PARTICULAR PURPOSE. See the GNU General Public License for more details.
You should have received a copy of the GNU General Public License along with Armoured Commander II, in the form of a file named "license.txt". If not, see https://www.gnu.org/licenses/.
To run the armcom2.exe PyInstaller build, you may need:
- Visual C++ Redistributable https://visualstudio.microsoft.com/downloads/
To run armcom2.py, you will need:
- Python 3.6.6 https://www.python.org/downloads/release/python-366/
- Libtcod 1.6.4 https://bitbucket.org/libtcod/libtcod
- XPLoader https://github.com/RCIX/XPLoader
- PySDL2 https://github.com/marcusva/py-sdl2
To run on OSX use a virtual environment (e.g. pipenv) with Python >= 3.6.6 and install the following libraries:
Then run python armcom2.py
If the starting font size is too large then change "display_font_size" in data/armcom2.cfg
To run the game on Linux, two steps are required:
- Install only Libtcod 1.6.5, newer versions will not work
- Once libtcod is installed, copy the contents of /usr/lib/libtcod*.so.* into libtcodpy_local/
Thanks to peterjohnhartman for this information!
In Armoured Commander II, you play the role of a tank commander in World War II, leading your crew through a campaign in one of the major conflicts of the war. It is (I would argue) a "roguelike" style of game, which in general means that it:
- emphasizes gameplay over graphics, using an extended Petscii character set rather than bitmap graphics;
- is turn-based and allows the player to stop and resume at virtually any point; and
- rewards mastery of the game mechanics and encourages multiple playthroughs.
The original Armoured Commander was very closely modelled upon and inspired by the 1987 board game Patton's Best, but ArmCom2 is an attempt to go beyond that model while maintaining the basic format of the player being in control of a single tank.
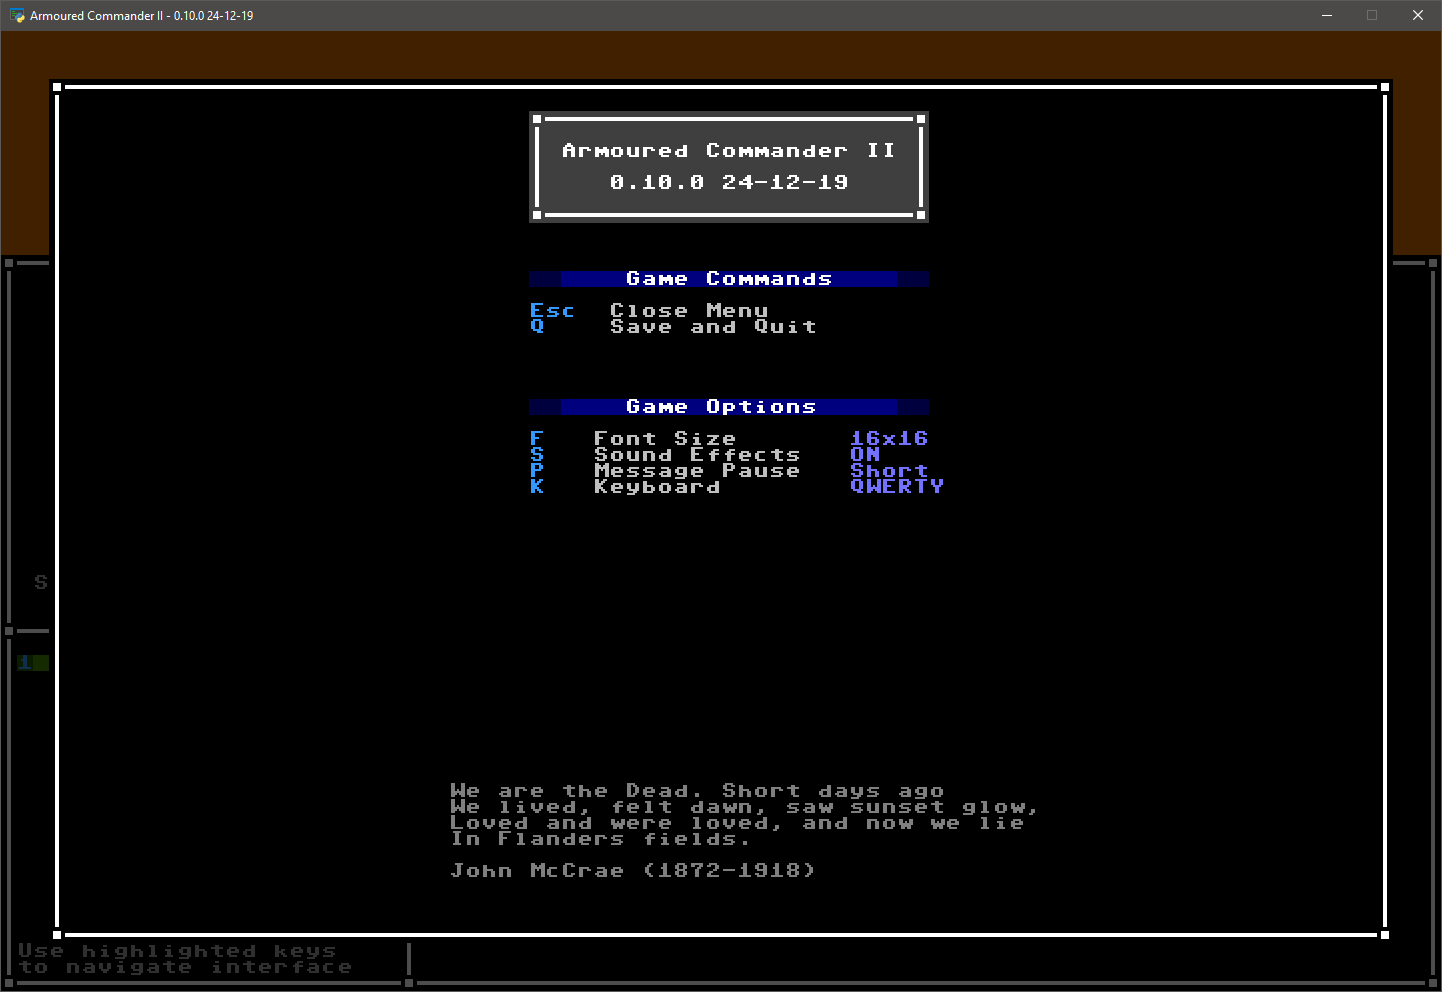
 In the Main Menu, you can continue your most recently saved campaign, load and continue a saved campaign, start a new campaign, change game options, or quit the game.
To Continue or Load a campaign, it must have been saved with a compatible version of the game. If the first two version numbers (separated by single dots) match, it will be compatible. Otherwise, you won't be able to resume your campaign unless you load it with a compatible version of the game.
If you start a New Campaign, any current saved campaign will be erased. You can only have one saved campaign at any one time.
Game Options can be accessed here and from the in-game menu as well. Changing the Font Size will change the total window size. Sound Effects, including the main menu theme, can be toggled here. Changing the Master Volume will change the volume of the theme music and all sound effects. Message Pause changes the length of time that pop-up messages are displayed before disappearing. Several Keyboard layouts are supported, and you can set your own keyboard mapping by editing the "custom" dictionary in the keyboard_mapping.json file in the data folder, and selecting it here.
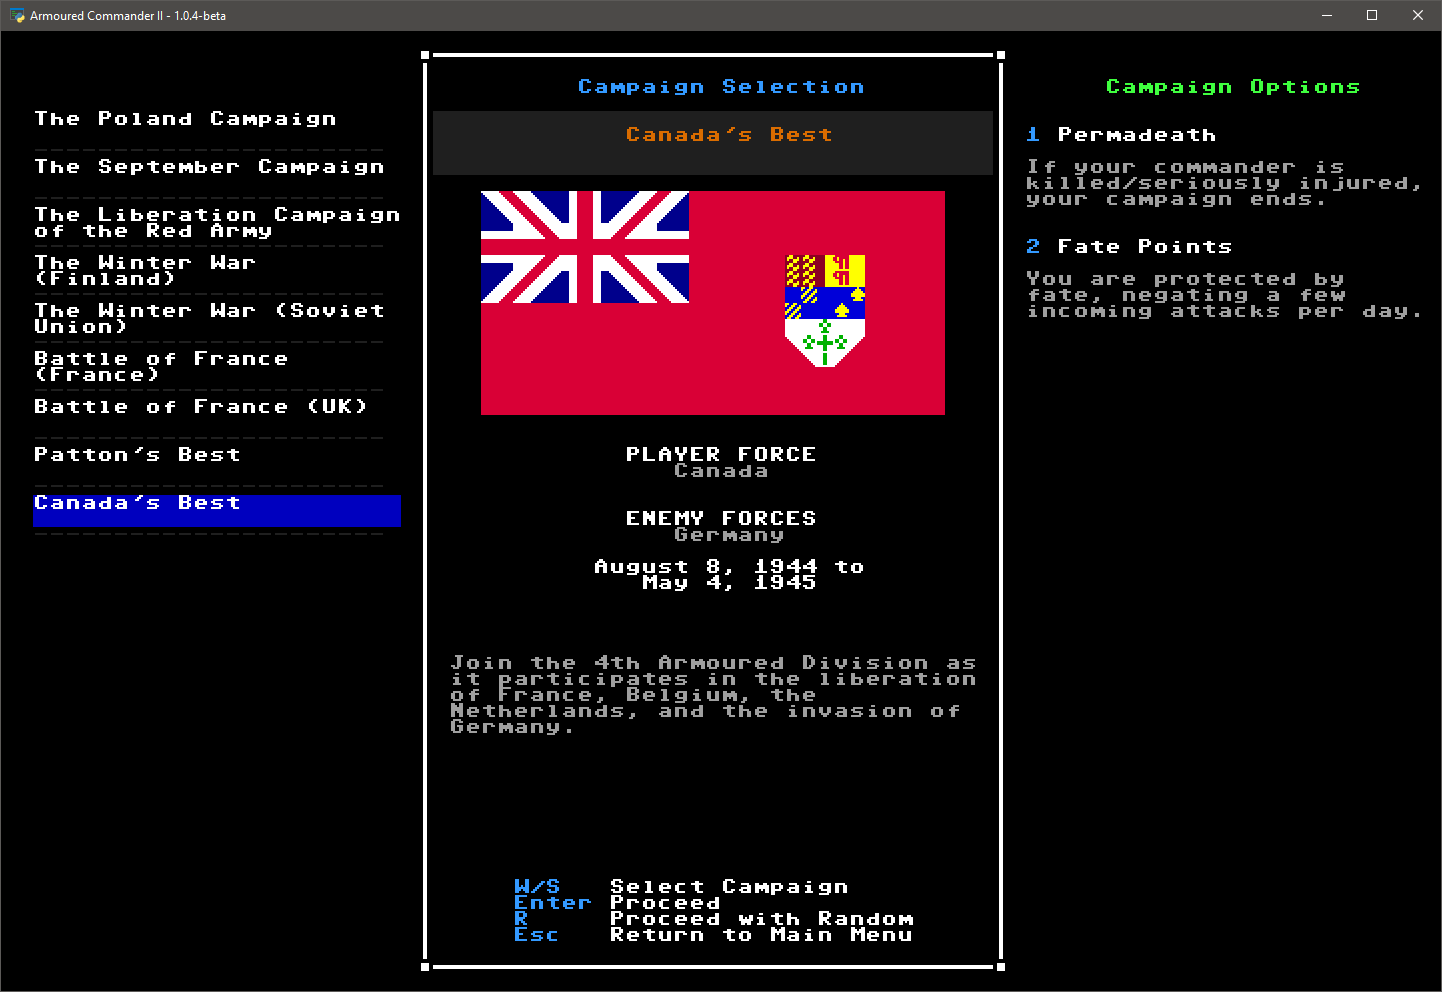
Several campaigns are included with the game. Each one takes place over a fixed period of time between 1939 and 1945, placing you in the role of a tank and battlegroup commander. Player Force means the national military force that you will be a part of. Enemy Forces lists the expected national forces that will be your opponents in this campaign. Some campaigns are longer than others; the actual days within the campaign calendar on which you will be called up for action will be determined randomly.
From this screen you can select a campaign to start, or have the game select one randomly.
You can also set your Campaign Options in this menu. "Permadeath" means that your Commander represents you, and if he is killed or seriously injured, your campaign ends immediately. Otherwise you can continue your campaign with a newly assigned Commander. "Fate Points" are replenished at the start of each Campaign Day, and each one silently saves you from an incoming attack that would have otherwise destroyed your tank.
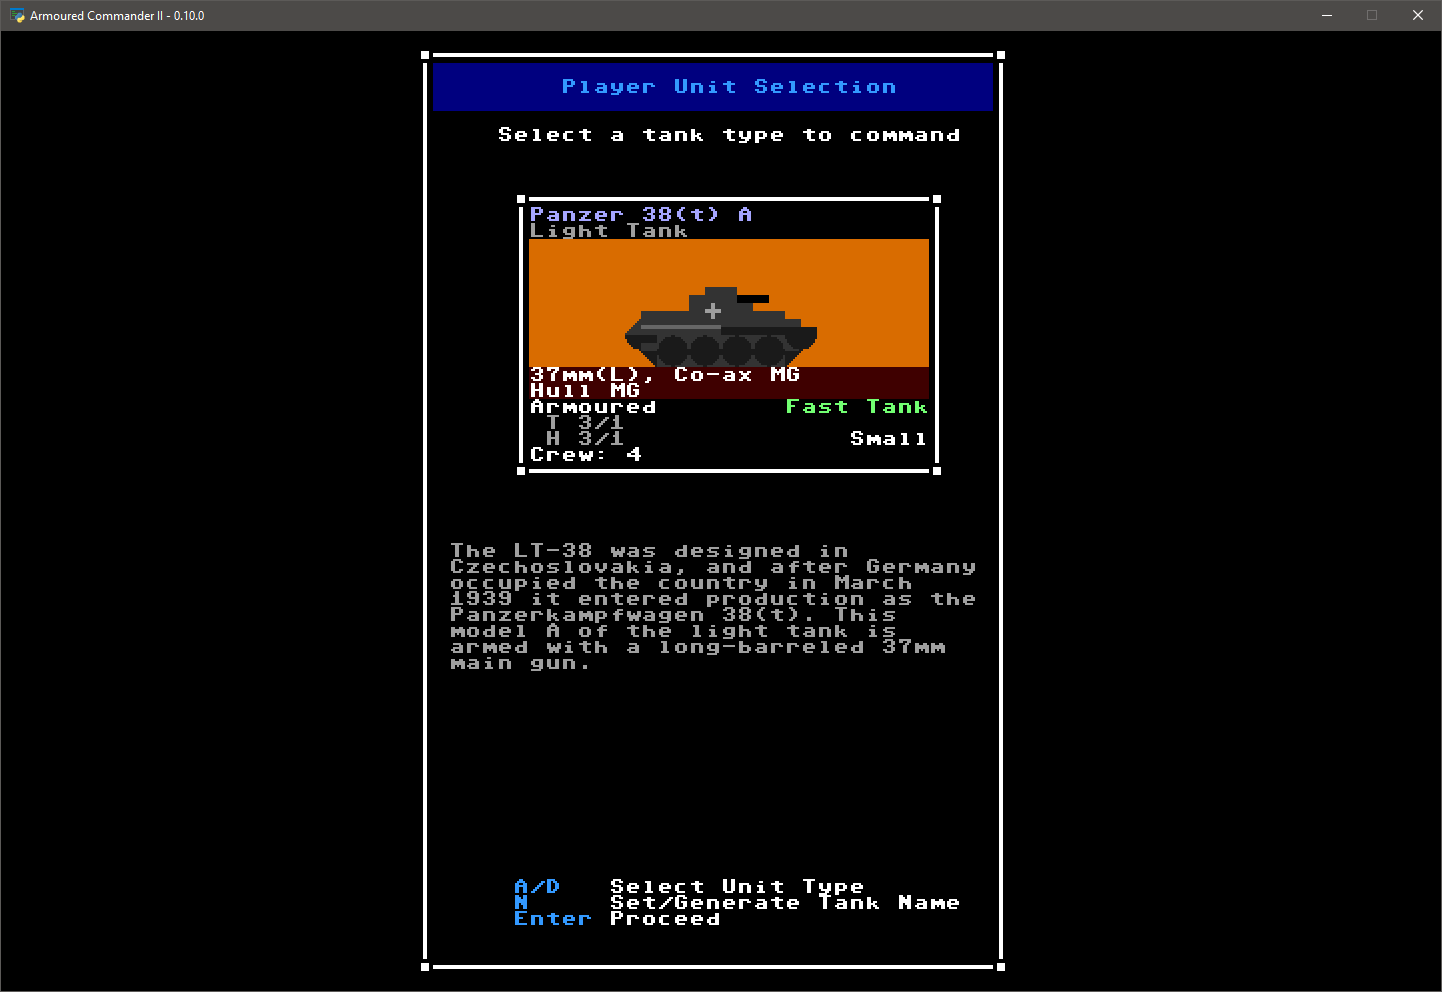
A selection of tank models are available to you at the start of the campaign. During Refit Weeks, and if you have to abandon your tank, you will have an opportunity to select a new model. Available models depend on the current calendar date; some models will only become available to you later on in a campaign. Pay close attention to the stats of your chosen tank, since you may be riding in it for some time.
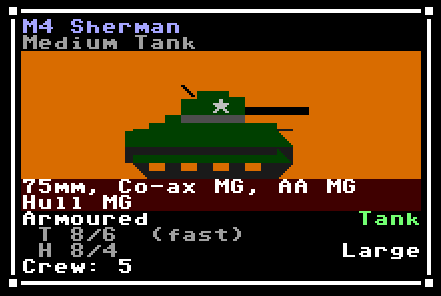
Virtually everything you need to know about a unit is included in its unit information display. Your tank's stats are especially important, so here is an example of how to read them:
- M4 Sherman: This is the unit identifier, unique to each model of tank
- Medium Tank: This is the unit's class, indicating generally what type of unit it is
- Portrait: A rough approximation of this unit as viewed from the side
- 75mm, etc. (dark red background): A list of weapon systems on this unit, starting with its main armament
- Guns may be short (S), long (L), or very long (LL) barreled
- Co-ax weapons are mounted on the turret alongside (or as) the main gun
- Anti-Aircraft (AA) machine guns (MG) can fire in any direction, but must often be fired from outside of the tank
- Bow MGs are fixed to the front of the hull
- If a weapon is displayed in a light grey colour, it means that it is unrealiable and has a greater chance of breaking down
- Armoured or Unarmoured vehicles have their armour values listed here
- The T line refers to turret armour, but if there is no rotatable turret it will appear as U (Upper Structure) instead; if the turret has a fast traverse, this will be noted by (fast)
- H refers to hull armour
- The two armour values x/x refer to front and side armour respectively for that area
- Rear armour values for any location are one level lower than its side level
- The movement class of the unit is shown in green in the lower right
- If a vehicle has light ground pressure this will be displayed in a light shade of green, if heavy ground pressure, a darker shade. Ground pressure affects the chance of bogging down.
- If a vehicle has an especially powerful engine, a plus sign will appear next to the movement class
- Any special vehicle features will appear below the movement class:
- HVSS stands for Horizontal Volute Spring Suspension; vehicles with this upgrade are slightly faster and less likely to bog
- Recce is short for reconnaissance, and means that the vehicle is less likely to be ambushed at the start of a scenario
- ATV means that this is an All-terrain Vehicle (no effect yet)
- The size class of the unit appears below that. Larger targets are easiser to spot and hit
- Finally, the normal number of crew for this unit
A full crew, with yourself as the commander, will be automatically generated for your chosen tank.
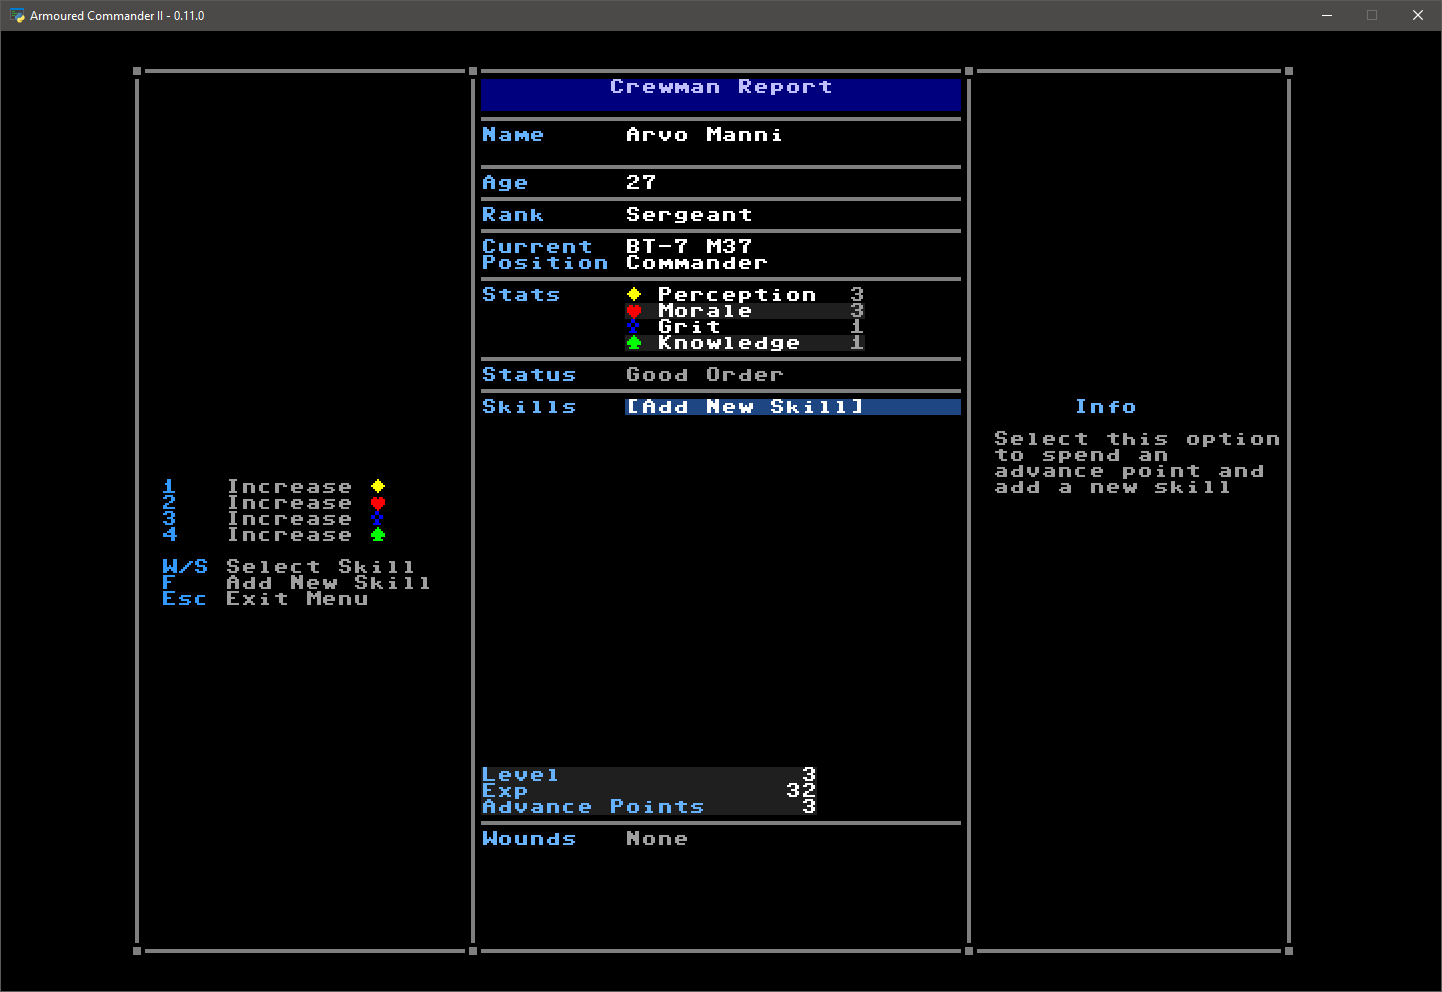
Each crewman in your tank has their own set of stats, skills, and experience points. Names are randomly generated, but you can assign a nickname to each crewman.
Crew Stats
Each crewman has four stat values, which are randomly generated at the start of the game but can be improved by spending Advance Points later on.
- Perception is used during attempts to spot enemy units on the scenario layer
- Morale represents the crewman's ability to resist psychological stress and harm (not yet used as of Alpha 10)
- Grit is used to resist wounds and negative status effects such as Stunned
- Knowledge applies a small modifier to all skill bonuses
Crew Experience
Every time you earn a Victory Point in the game, any crewman who is conscious at the time also receives an experience point. At the end of each combat day they may go up one or more levels depending on their exp. Each time they go up a level, they are awarded with an Advance Point which can be spent increasing the crewman's stats or adding a skill.
Crew Skills
19 skills are available (as of Alpha 10), but not all are available to crewmen in all tank positions. Some of them have another skill as a prerequisite. All apply some kind of bonus as described in the skill description. (Full skill tree and description list to follow)
You can access the in-game menu from any layer of the game and at any time. From here you can save your campaign to continue later, as well as change game options.
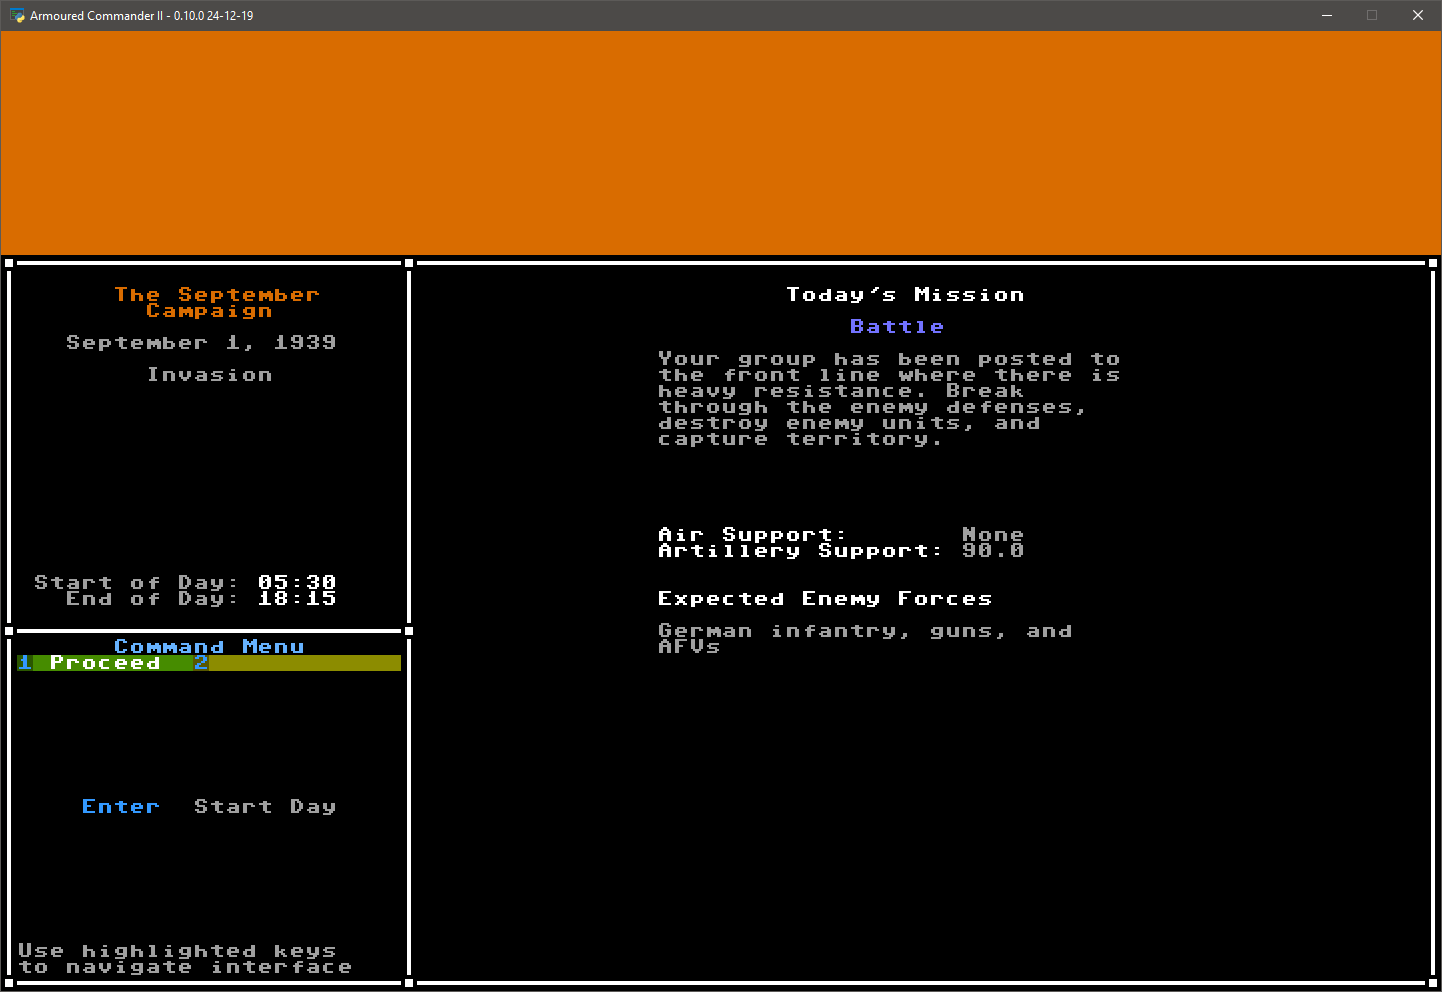
In the Campaign Calendar layer you can view information about the upcoming or a just-completed combat day. Pressing 2 will bring up the Crew and Tank tab of the command menu. Here you can review each of your crew, see your tank's stats, and assign crew and tank nicknames if you have not done so already. Most layers display the main list of commands in this area of the screen.
Press 1 to return to the Proceed menu tab, and press Enter to start your combat day. If you survive your combat day, you will return to this layer from which you can proceed to the next combat day.
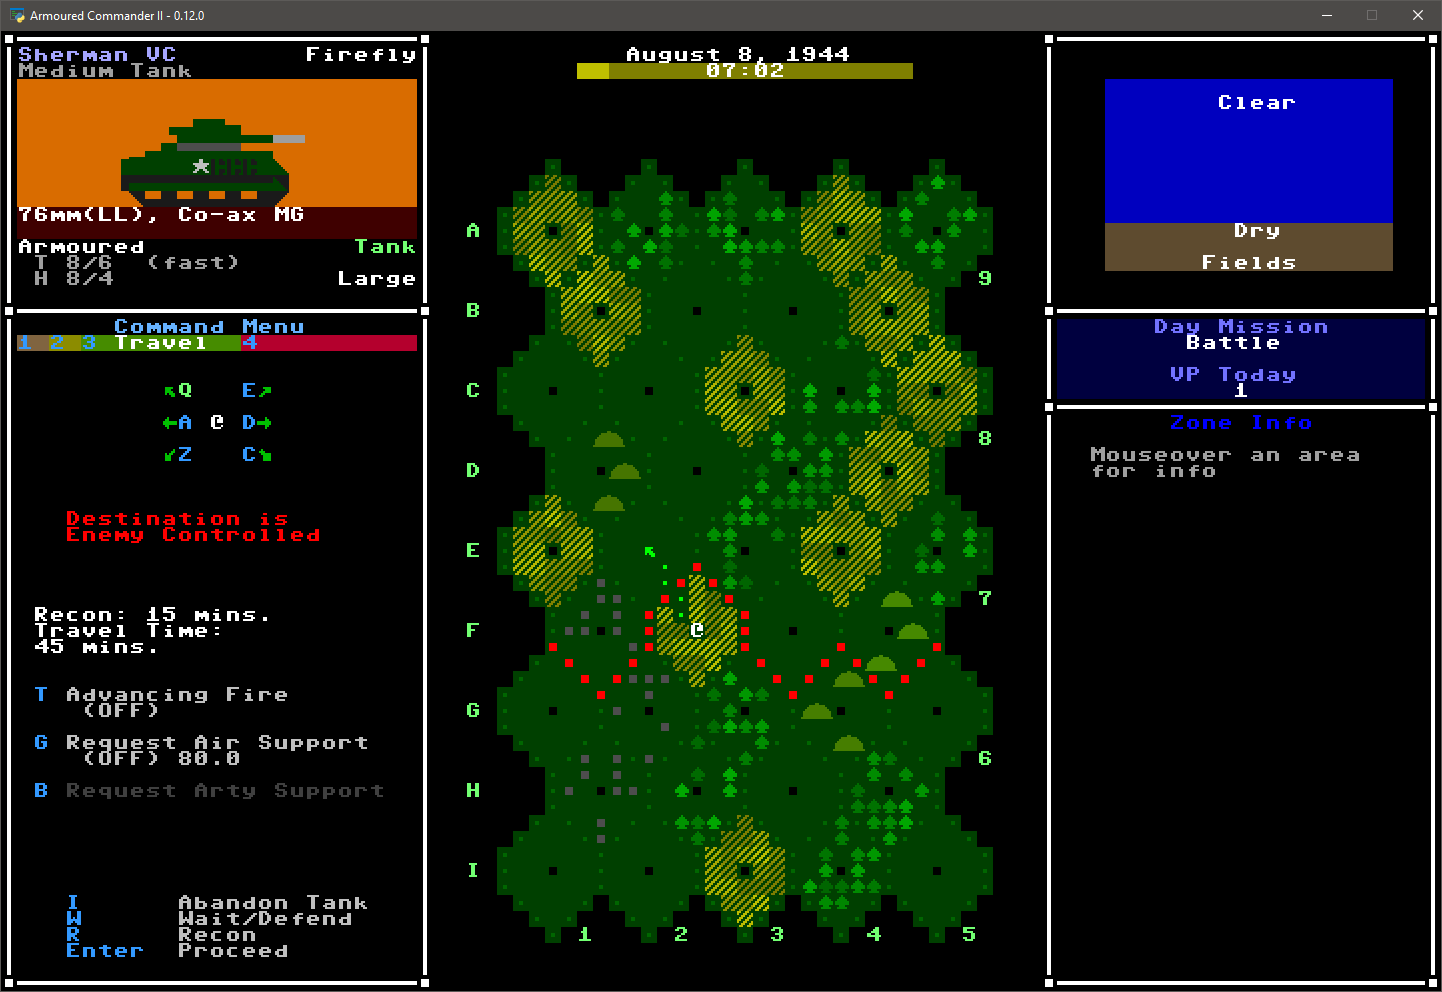
In this layer you lead your tank and battlegroup across a terrain map of hex zones. Your own tank is displayed in the upper left of the screen, and several tabs of commands appear in the lower left. Current weather and ground conditions are displayed in the upper right, campaign and day mission information on the right, and hovering the mouse cursor over any map zone will display information about it in the lower right corner of the screen.
The campaign day map is made up of 41 hex zones, each of which are randomly generated as one of six different terrain types. The terrain type of a hex zone influences the time required to travel into it, as well as the terrain for units on the scenario layer if a battle encounter occurs there.
Dark brown lines joining hex zones are roads; travel along roads is usually faster than cross-country. Dark blue lines along the edges of hex zones are rivers; these can only br crossed at a bridge or ford, indicated by a dark brown cell with three horizontal lines.
Objectives are indicated by a ring of light blue dots; capturing these hexes is worth extra VP.
If you reach the top hex row (or the bottom one in Fighting Withdrawl mission), a new hex map will be generated.
Five menu tabs are available in the command menu:
- Supply
- Here you can view the stats of your tank's main gun, and manage the contents of the Ready Rack. From here you can also Request Resupply which, if granted, allows you to replenish main gun ammo, will replace dead or seriously injured crewmen, and will also bring your tank squadron up to full strength.
- Crew
- Displays a list of current crewmen in your tank. From here you can open the crew menu for any of them, and open/close their hatch if they have one.
- Travel
- In this menu you can select a direction from your current location, and either request reconnaissance information about an adjacent enemy-held hex, or travel to an adjacent hex. When moving, you can toggle advancing fire and air and artillery support requests on and off. Advancing fire uses up HE ammo but if a battle encounter is triggered, it has the chance of pinning enemy units before combat begins. You can also Wait in place, but there's a possibility that enemy forces may attack your hex.
- Group
- Lists the current members of your tank squadron.
The campaign day ends when you abandon your tank, your character is killed or seriously wounded, or you reach sunset as indicated by the background of the time display in the top centre of the screen.
- Always recon enemy-held zones so that you know what you're getting into
- Pay close attention to the time required to travel to a new zone, which varies depending on terrain, weather, and presence of a road connection
- Rivers can only be crossed by the player at bridges, so plan your route ahead of time
- Use advancing fire and air/artillery support, especially when moving into heavy resistance
- If you are cut off from the friendly map edge, you will not be able to call for resupply
Once you encounter enemy resistance on the Campaign Day map, or if you wait in place and are attacked, play shifts to the Scenario layer where battles take place.
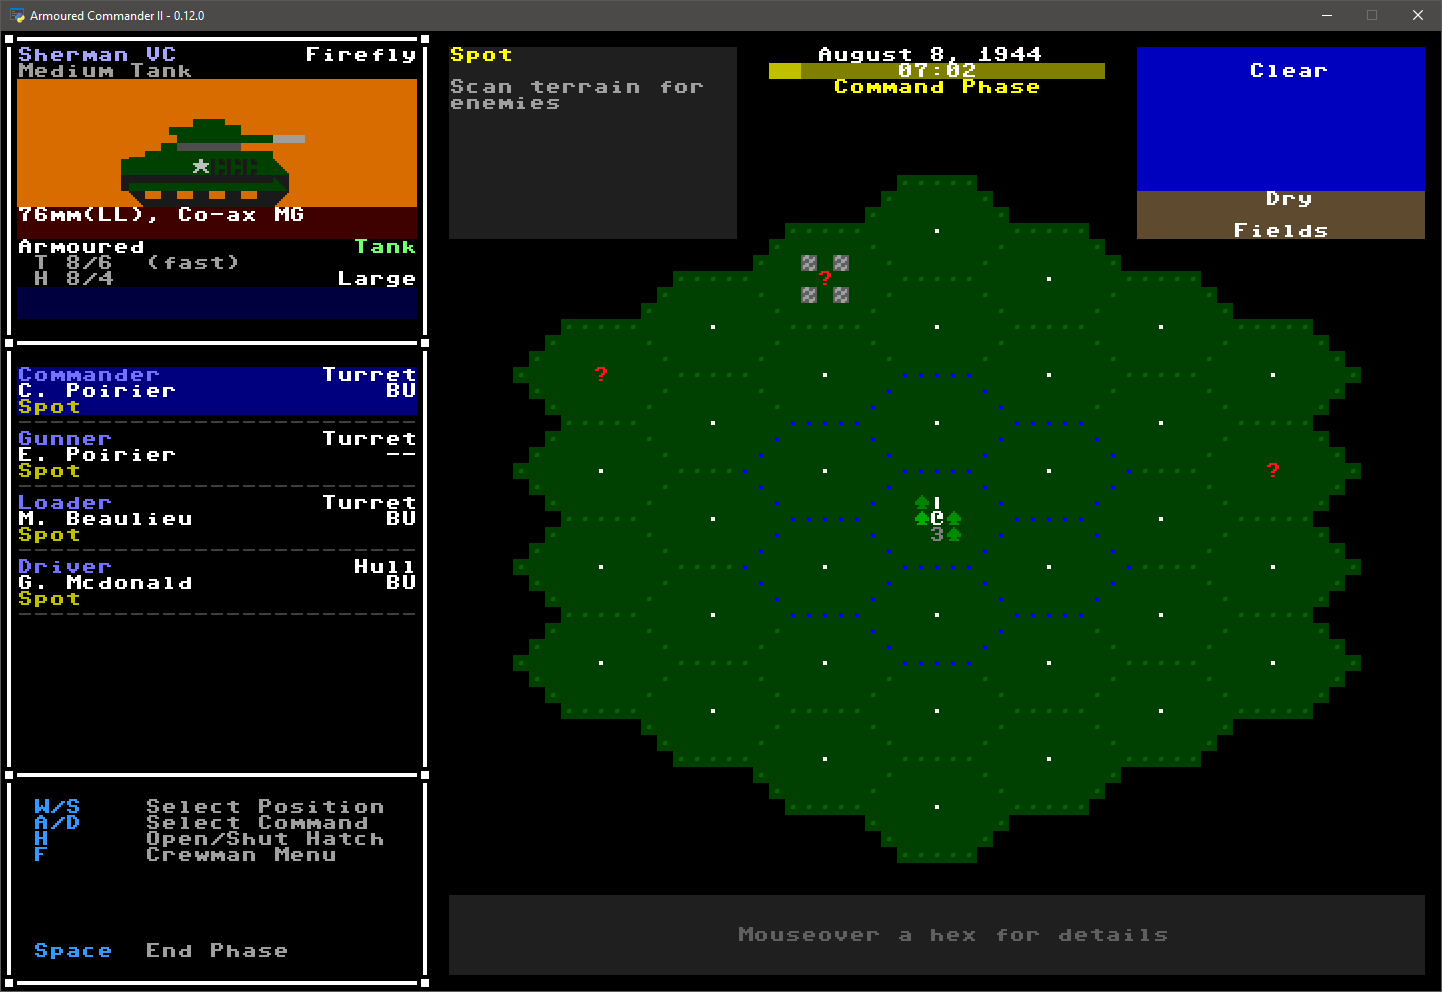
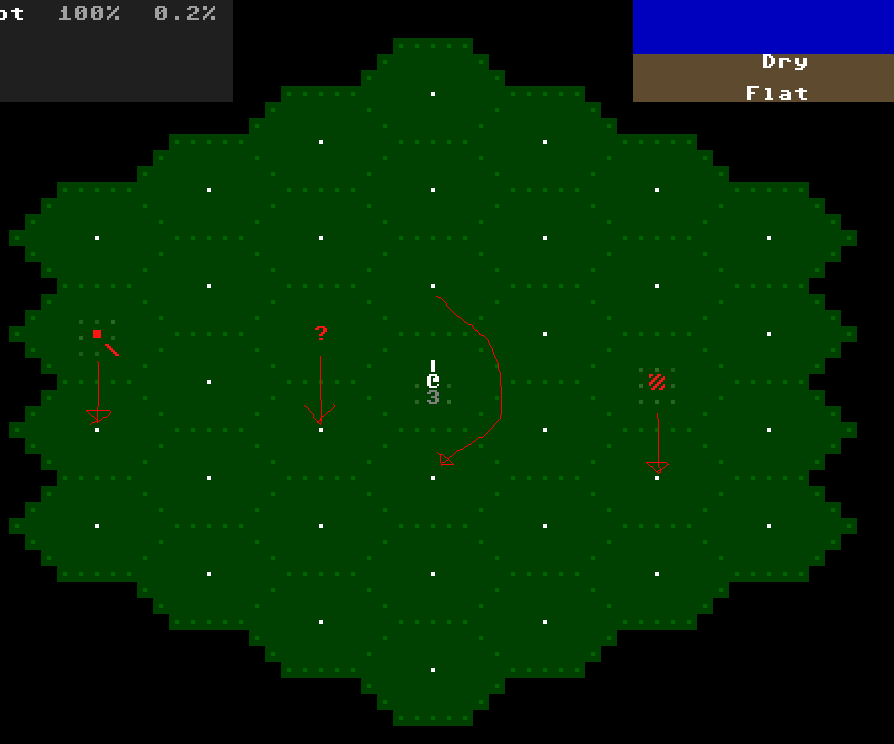
On the right of the scenario interface is the Scenario Map, made up of 36 hexes arranged in 3 rings surrounding a central hex. The map represents, in an abstract way, all terrain in a 1,440 meter radius around the player. Your tank, represented in traditional roguelike fashion by the @ character, is located in the centre of the map. All other units on the map are represented from your point of view, so if you pivot your tank counter-clockwise, units will appear to rotate clockwise around the map. Likewise, if you move into a new hex, all other units will shift around you. Hovering your mouse cursor over any hex will display its info at the bottom of the map; scrolling with the mouse wheel will shift the order of any unit stacks in the hex.
Above and to the left of the scenario map is the contextual console, which displays different information depending on the current phase. Above and to the right is the Environmental Conditions console, which displays information about current weather conditions.
Play on the Scenario Layer proceeds though a series of Phases, each one of which either allows the player to perform certain actions, or allows allied and enemy AI units to act. Each set of phases takes 2 minutes of in-game time to resolve.
In this phase you can open and close the hatch for each crewman that has one, and you can assign one command to each of your tank crew that is neither unconscious nor dead. Each command will allow the crewman to do different types of tasks in the remainder of the turn. The sight radius of your crewman is highlighted on the scenario map in blue; different hatch statuses and commands will result in different areas of the map where your crewman can spot in the following phase. Descriptions for each command are displayed in the Contextual Console.
Note that some commands will only become available when certain conditions are met; for example, you can only abandon your tank if it is immobilized or if you have 1+ crewmen who have been seriously injured.
During this phase no input is required from the player; any crewman who can do so will automatically try to spot any hidden enemy unit in his line of sight. If an enemy unit is spotted, its identity will be displayed in a pop-up message.
Certain crew commands require additional input or will result in automatic actions during this phase. For example, a Gunner can manage his Ready Rack, moving shells into or out of it, or the Commander might throw a smoke grenade, providing some concealment for the player tank. You will need to select a crewman in order to see possible actions associated with his current command.
If the Driver has been given the "Drive" command, then the player can attempt to move the tank in this phase. The Driver can attempt to drive the tank forward or backward, pivot the hull, or attempt to move into a Hull Down position.
The driver is free to pivot the tank hull to face any direction, without ending the Movement Phase. As you pivot, your facing on the map remains the same; instead, all other units on the map are rotated relative to your direction of pivot.
Since the battlefield is represented in a very abstract way, doing a move action will sometimes be successful, other times not. The odds of your tank moving far enough to shift the relative position of enemy units is displayed in the upper left console. Each failed attempt will increase the chance of a successful move in subsequent Movement Phases. If a move action is successful, your tank will appear in the same place, but every other unit on the Scenario Map will shift position.
For example, in the image above, if the player completes a successful Move Forward action, then the enemy tank, unknown unit, and infantry unit will all shift downward one hex. The exception is if there is a unit directly in front of the player, in which case they leapfrog over the player and end up behind (the player moves past them and keeps going.) Reverse move actions would have the opposite effect. If an enemy unit would normally be pushed off the scenario map by a player move, they will stay in relative place instead. Enemy units can only move off the scenario map of their own accord.
When starting a scenario and after a move action, the player may find themselves in a Hull Down position in one direction. This means that a hill or other large solid object is covering their hull from that direction. Any incoming attacks that would have affected the Hull coming from that direction will instead have no effect. The Driver can try to get the tank into a HD position in the forward firection with the Attempt HD action.
If your driver is on an Overrun command, your squad will move close to the hex immediately ahead of you, allowing you to attack them at very close range with MG weapons. This command is only available if there are 1+ gun of infantry units directly head of your location. While on an Overrun command, your squad counts as moving, but there are no movement penalties to MG attacks.
If the player's tank becomes bogged down, then the Driver must successfully unbog the tank in a subsequent Movement Phase before the tank can move again. Surviving player tanks are automatically unbogged at the end of a scenario.
During the Command Phase, one or more crewmen can be commanded to operate one of the tank's weapons. Most player tanks will have a gun as its main weapon, which can usually fire High Explosive (HE) rounds, Armour-Piercing (AP) rounds, and later in the war, Smoke rounds.
Guns are defined by their calibre, with larger-calibre guns producing more of an effect on both soft and armoured targets, and usually better at long range as well. Guns can be short, long, or very long-barreled, indicated by an 'S', 'L', or 'LL' following their calibre in millimeters. The loader for each gun normally has access to a Ready Rack of ammo nearby, use of which makes it faster to reload the gun. Guns will also normally have an innate Rate of Fire chance, which indicates the odds of reloading the gun fast enough to allow two or even more shots per shooting phase. Use of the Ready Rack, as well as crew skills, can greatly increase these odds.
- HE produces an explosion upon impact, and is more effective against infantry, guns, and unarmoured vehicles
- AP is only effective against vehicles, and is best used against armoured targets
- Smoke will produce concealing smoke upon impact, making it more difficult for enemy units to fire at you and your allies
Most player tanks and many other vehicles have one or more machine gun (MG) weapons. Note that coaxial MGs, mounted next to a gun barrel, cannot fire in the same phase as the gun fires, and vice-versa. MGs are only effective against soft targets and unarmoured vehicles; at present (Beta 1) they have no effect on armoured enemy targets. MGs have chance to maintain RoF for additional attacks in the same phase.
Enemy targets hit with HE or machine guns will have Firepower applied to them; an abstract measure of incoming fire. Firepower stacks from different attacks and is resolved at the end of each phase, so a unit hit by a bomb from an HE shell as well as MG fire will have a large amount of firepower to resolve at the end of the opposing side's phase. Higher total firepower values increase the chance that the unit will be destroyed, its soldiers killed, wounded, or routed from the battlefield.
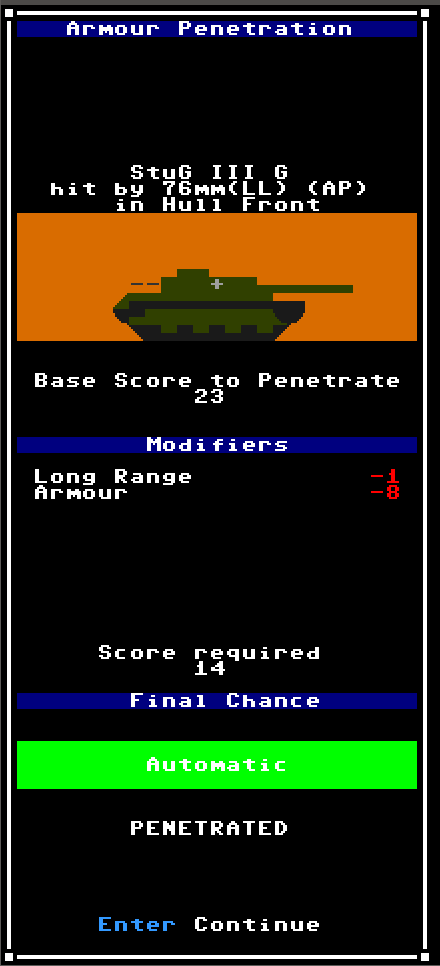
Armoured targets hit with AP will undergo an Armour Penetration check immediately after each hit.
The chance of the hit penetrating the target armour depends on the gun calibre, barrel length, distance from target, and thickness of target armour on the location hit. Especially powerful guns will automatically penetrate all but he thickest armour, as shown here. Enemy armoured targets that are penetrated are destroyed.
During this phase any other tanks in your squad will attack enemy targets automatically.
During this phase enemy units will move around the map, and may attack you or your squadmates.
