An abp application module group that provides basic e-shop service.
You can also clone this repo and run the demo project locally.
-
Follow the document to install the dependent PaymentService module.
-
Install the following NuGet packages. (see how)
- EasyAbp.EShop.Application
- EasyAbp.EShop.Application.Contracts
- EasyAbp.EShop.Domain
- EasyAbp.EShop.Domain.Shared
- EasyAbp.EShop.EntityFrameworkCore
- EasyAbp.EShop.HttpApi
- EasyAbp.EShop.HttpApi.Client
- (Optional) EasyAbp.EShop.MongoDB
- (Optional) EasyAbp.EShop.Web
The above packages are integration packages containing the necessary sub-modules. Please install packages of each sub-module separately if you are using microservices. For example: install only the
EasyAbp.EShop.Products.Applicationpackage. -
Add
DependsOn(typeof(EShopXxxModule))attribute to configure the module dependencies. (see how) -
Add
builder.ConfigureEShop();to theOnModelCreating()method in MyProjectMigrationsDbContext.cs. -
Add EF Core migrations and update your database. See: ABP document.
-
Create a Store (optional)
- EShop supports multi-store, it provides a default store, it will be created when you seed the initial data. (learn more about ABP Data Seeding)
- Use the store management page to create a new store.
-
Define a Product Group (optional)
- Product group is used to classify different types of products, so we can customize different behavior for them, for example, products of the "GiftCard" product group could automatically send the card number and password to the customer's mailbox.
- EShop provides a default product group.
- Refer to the configuration of the default product group and define a new product group.
-
Create a Product
- Use the product management page to create new a product.
- Click the "SKU" item in the actions button of the product you created and then create an SKU.
-
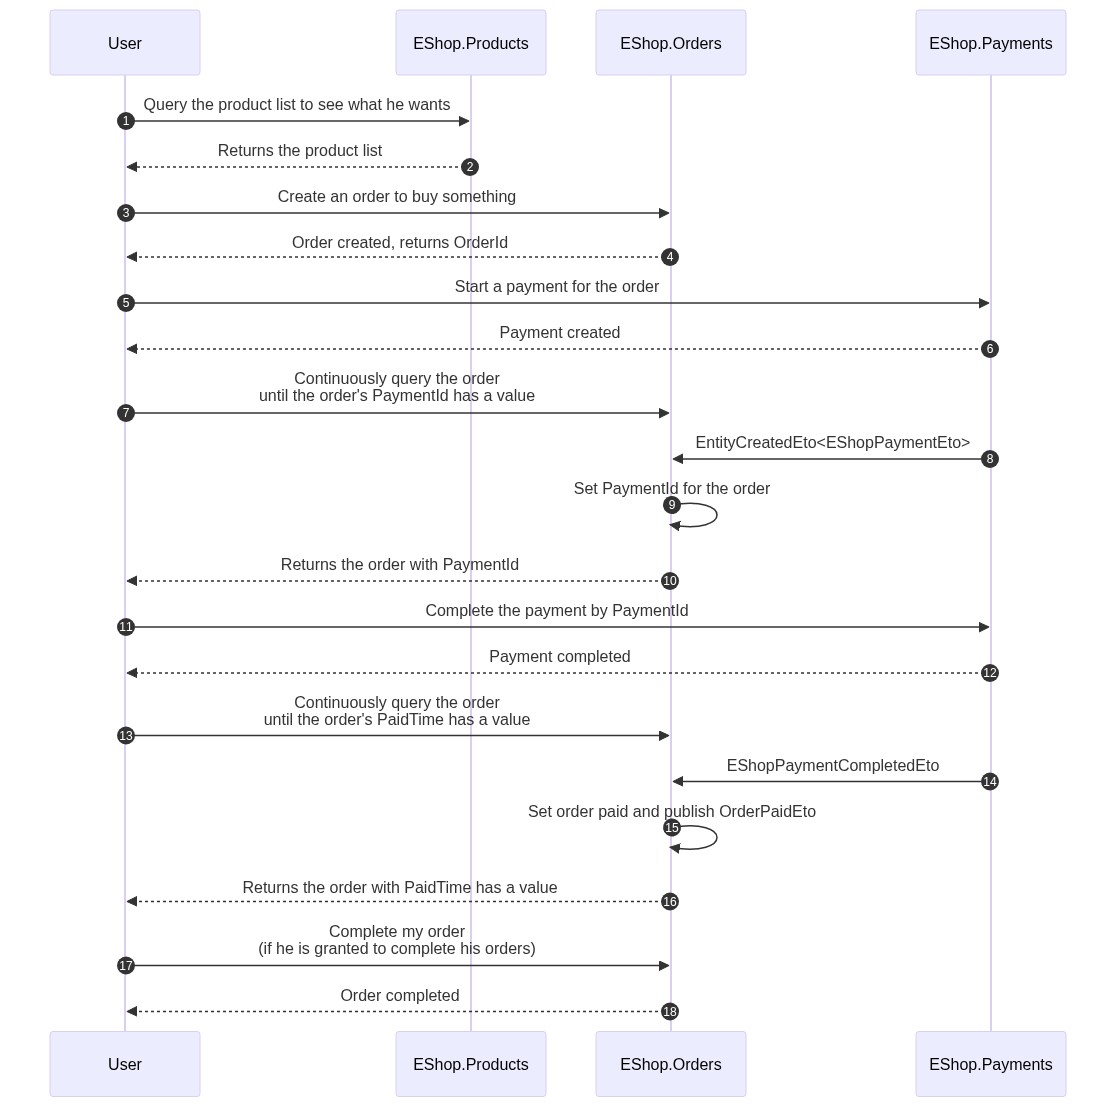
Place an Order (We have not yet provided UI for this step.)
- Use the API
/api/e-shop/orders/order(POST) to create a new order.
- Use the API
-
Pay for the Order (We have not yet provided UI for this step.)
- Wait for the inventory reduction to be completed, get the order and ensure the Order.ReducedInventoryAfterPlacingTime is not null.
- Use the API
/api/e-shop/payments/payment(POST) to create a pending new payment for your order.- You can pay for multiple orders at once.
- You need to decide one of the payment methods provided by the EasyAbp.PaymentService module.
- Use the API
/api/e-shop/orders/order/{id}(GET) get the order, then you can get the "paymentId" in the result. - Use the API
/api/payment-service/payment/{id}/pay(POST) to complete the payment.- "id" is the "paymentId" we got above.
- Different payment methods require different "extraProperties" for this API. Read the document of the EasyAbp.PaymentService module to learn more.
-
Complete the Order
- We have not yet provided relevant UI for this action.
- Use the API
/api/e-shop/orders/order/{id}/complete(POST) to complete the order.- The customer should have permission to complete the order himself.
- You need to override the "CompleteAsync" method of the "OrderAppService" if you want to prohibit users from completing orders themselves for some specific product groups but complete them through automated processes.
We can customize the EShop for complex application scenarios.
- When a gift card order is paid, automatically send the card number and password to the customer's mailbox.
- Automatically set the order status to completed after the mail is sent.
- Read the article to learn how to implement it. (todo)
- Install the EasyAbp.SharedResources module.
- The carrier of knowledge can be articles, pictures, audio, videos, files, streams, etc.
- When a knowledge order is paid, automatically authorize the customer to access the resources he purchased.
- Read the article to learn how to implement it. (todo)
-
Core modules
- Orders
- Payments
- Plugins
- Products
- Stores
-
Plugin modules
- Baskets
- Booking
- Coupons
- FlashSales
- Inventories
- Promotions
Todo.


