During this hands-on we will introduce some of the highlights of Java 9. This document is intended to be self-explanatory, so you can simply work yourself from top to bottom. There is a FAQ section included at the end of the document in case you run into issues.
I hope you enjoy this hands-on. Comments and improvements are always welcome!
Download and install the following items:
JShell (JEP 222) is the long-awaited Java REPL. REPL stands for Read, Evaluate, Print and Loop. It is very useful to learn Java or test new features. JShell is located in the bin folder of your JDK 9 installation.
Try to run JShell from your terminal.
Tip: JShell requires the correct setting of JAVA_HOME.
JShell accepts statements, variable, method, and class definitions, imports, and expressions. Let’s see how this works.
jshell> int x = 8
x ==> 8

jshell> x * x
$2 ==> 64

//support for temporary variables
jshell> printf("the result of x * x = %d", $2)
the result of x * x = 64

//view all the sources you typed
jshell> /list -allTypically you use a REPL for exploratory programming. This means that you may want to use pieces of code that are not yet defined. Here is an example:
jshell> double circumference(double radius){return 2 * radius * PI;}
|  created method circumference(double), however, it cannot be invoked until variable PI is declared

jshell> double PI = 3.14
PI ==> 3.14

jshell> circumference(x)
$6 ==> 50.24The API to control and managing operating-system processes is improved (JEP 102). This is useful as many enterprise applications and containers involve several Java virtual machines of which you would like to control.
Let’s have a quick peek at the new API with JShell. With the following operation you will return the pid of JShell.
jshell> ProcessHandle.current().getPid()It is quite easy to build processes and pipelines. This example prints all your processes.
jshell> ProcessHandle.allProcesses().forEach(h -> printf("%s\t%s\n",h.getPid(), h.info().command().orElse("-")))Java 8 already gave the possibility to add default and static methods to an interface. Java 9 allows you to use private methods as well. Let’s see what happens if you run this program!
import static java.lang.System.out;

public interface Awkward {
    String SAY_HI = "Hello interface program!";

    String respond();

    default String respond(int version) {
        if (version < 9) {
            return "This is a Java 8 response";
        }
        return coolResponse();
    }

    private String coolResponse() {
        return "Cool! Private methods are allowed in Java 9";
    }

    static void main(String[] args) {
        out.println(SAY_HI);

        Awkward awkward = () -> "This is a legacy response";
        out.println(awkward.respond());
        out.println(awkward.respond(8));
        out.println(awkward.respond(9));
    }
}Tip: A step by step guide of creating a Java application in Netbeans can be found in the FAQ section.
There is a shiny new HTTP client API that supports HTTP/2, websockets and can replace the HttpURLConnection API. The new HttpClient is a container that is immutable and created via a builder. Here is an example of an asynchronous call.
public class Main {

    public static void main(String[] args) {
        HttpClient.getDefault()
            .request(URI.create("http://www.nljug.org/jcp/"))
            .GET()
            .responseAsync()
            .thenAccept(httpResponse
                        -> out.println(httpResponse.body(
                            HttpResponse.asString()))
                        );


        try {
            Thread.sleep(1000); //The worker may need some time...
        } catch (InterruptedException ex) {
            out.println(ex.getMessage());
        }
    }
}Project Jigsaw envisions a modular system that provides reliable configuration and strong encapsulation. A module is defined as a named, self-describing collection of code and data. This collection is packaged in a modular jar file.
A modular jar file is recognized on the compiled module descriptor: the module-info.java. This file is by convention located at the root of your collection of code and data. Another convention is that the name of the module is identical to the name of the jar. The module-info.java contains contains information about the APIs the jar exposes and requires.
Before we start with the technicalities of how this principle of module descriptors works, I would like to emphasise some opinionated architectural aspects:
- Apply the SOLID principles. Always.
- Package by functionality, never by layer. If your code base still embraces the idea that you have a presentation, business, data and model layer, then refactor/regroup your code in such a way that it clearly represents the intended functionality.
- Code duplication across jars isn’t necessarily bad.
- Be backwards compatible as versioning is yet not supported.
Let’s start to build an application that presents some immutable dummy data. In order to do this you create one Java application with two classes: a Collector and a Viewer.
The Collector returns an immutable collection and the Viewer prints the data.
Tip: Java 9 now supports simplified immutable collections via Map | List | Set.of( "a" ,"b" , "c" ).
We want to make a separate module from our Collector. The result of this exercise will be two projects: the DataViewer that contains the Viewer and the DataCollector that contains the Collector. Let’s do this step by step.
-
Create another Java application for the
Collectorwithout a main class. -
Create a new package and move the
Collectorto this newly created project. Be aware that the packages cannot be identical. -
Generate a
module-info.javain the newly created application. You can do this via a right click on theSource Packagesand thennew | Java Module Info -
You need to export the package that contains the refactored
Collectorin order to make it available outside theDataCollectormodule. Please add an export statement in yourmodule-info.java. The example below exports theorg.nljug.jcp.java9.datacollector.module DataCollector { exports org.nljug.jcp.java9.datacollector; }
-
Go to the properties of your
DataViewerproject. Add underLibraries | Modulepathyour data collector project. -
Generate a
module-info.javain yourDataViewerproject. -
You need to import the
DataCollectormodule. Please add arequiresstatement in yourmodule-info.java. The example below requires the moduleDataCollector.module DataViewer { requires DataCollector; }
-
Clean and run your
DataViewerproject.
Public methods are not as public as they were. This means that only the API that is described in the module-info.java is exposed for clients outside the module. Let’s see how this works.
We refactor the DataCollector module in such a way that the API implementation acts as a proxy for an internal collector.
- Create a new package internal in the
DataCollector. - Create a new
publicservice class in this internal package and move the dummy data functionality to this class. - Reference this new internal collector in your
Collector. - Clean and build the
DataCollectorproject. - Run the
DataViewerto check if everything works. - Try to reference the internal data collector directly in your
Viewerimplementation. If all is well, this should not work even if the internal collect method is public!
At this moment, the Viewer references directly with the Collector. Sometimes you would like to loosen the coupling or switch between Collector implementations. Typically, you introduce a service interface class that represents the API and a service provider class that provides the interface implementation.
The decoupling of service interfaces and service providers proved to be powerful in large software systems and is long supported in Java via the ServiceLocator class.
Today, the ServiceLocator scans artifacts for META-INF/services resource entries in order to wire the interface to the provider. Java 9 allows you to use the modele-info.java to declare the interfaces and providers instead of the META-INF/services file.
The Collector is in our case the service provider. We need to define a service interface and for the sake of simplicity we will define it in the DataCollector module as well. The Viewer needs to reference the new service interface and will have no direct knowledge of the Collector.
-
Remove all dependencies under
Libariesandmodule-info.javain both projects. -
Create an interface class
Collectablein theDataCollectormodule in a separate api package. HaveCollectorimplement this interface. -
We need to change the implementation of the
Viewerthat is uses a provided implementation ofCollectable. This is done via theServiceLoaderclass. Here is an example implementation.public static void main(String[] args) { //Load the potential providers ServiceLoader<Collectable> loader = ServiceLoader.load(Collectable.class); Iterator<Collectable> availableServices = loader.iterator(); //Check if there is at least one provider is available if(!availableServices.hasNext()){ String msg = "No providers available for " + Collectable.class.getName(); throw new RuntimeException(msg); } //Take the first available and print the data Collectable dataProvider = availableServices.next(); dataProvider.collect().forEach(data -> out.println(data)); }
-
We need to expose this new interface outside the module. This is done via the
exportsstatement as in the previous exercises. We also need to declare its actual implementation for theServiceLocator. This is done via aprovides [service interface] with [service provider]statement. Here is an example implementation of such amodule-info.java.module DataCollector { exports org.nljug.jcp.java9.api; provides org.nljug.jcp.java9.api.Collectable with org.nljug.jcp.java9.collector.Collector; }
-
The next step is to declare the requirement and use of this interface in the client module. The
DataViewermodule is the client module in our example. Here is an example of such declaration in themodule-info.java.module DataViewer { requires DataCollector; uses org.nljug.jcp.hackathlon.java9.api.Collectable; }
-
Wire the projects correctly in Netbeans under
Properties | Libraries, clean the projects and run theViewerto check if the program works again as expected. -
Now, create a new module that implements the
Collectableinterface as well with a different set of data. Tip: Mind the package names. -
Change the
Viewerin such a way that it presents the data from both providers. Note that no changes in themodule-info.javaor project properties are required!
Please be aware that the versioning changed from 1.x to simply 9. This new as of Java 9. For more information, please check JEP 223.
export JAVA_HOME=`/usr/libexec/java_home -v 9` sets it to JDK 9. SET JAVA_HOME=C:\JDK9
SET PATH=C:\JDK9\bin;%PATH%It might be that Netbeans uses Java 9 - EA. You can fix the default location of the JDK (netbeans_jdkhome) for netbeans in netbeans.conf in the etc folder of the Netbeans installation.
If you set the default JDK to Java 8, then you need to manually add JDK 9. This can be done via Tools | Java Platforms.
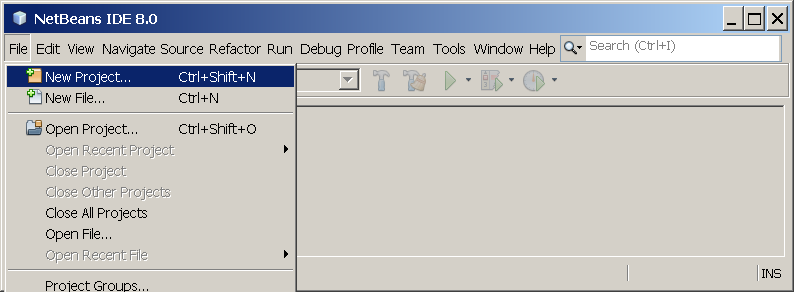
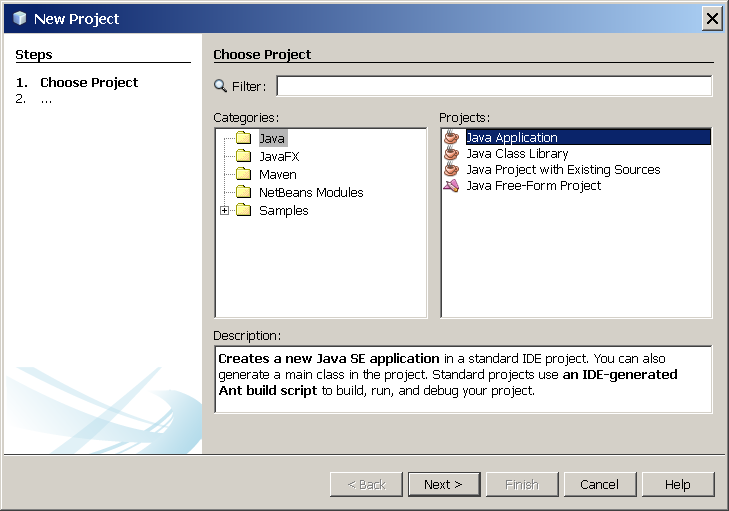
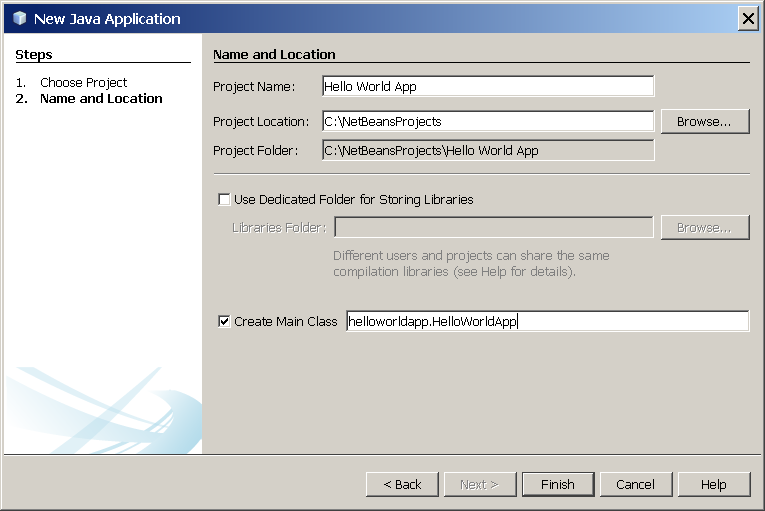
(images are taken from this Netbeans tutorial)
- Go to
File | New Project - Select the category Java and then Java Application
- Next, fill out the form and create a main class. Please note that the main class creation field assumes the full path, so including package name.
- Check under project properties if the
Source/Binary Formatis set to JDK 9. This can be done underSources. You can find the properties via a right click on the project root folder. - Check under project properties if the library is set to JDK 9. This can be done under
Libraries. - Done.