- Introduction
- Pre-requisites
- How to get started?
- Setting up the project
- Project Information
- Postman Collection
- Database Schema
- Credits
This repository contains the backend code for the Breaking Bug event. The event is organized by IEEE Computer Society, Manipal University Jaipur.\
Breaking Bug is an electrifying virtual showdown for tech enthusiasts and coding maestros! An exciting and challenging event where participants step into the shoes of skilled developers and problem-solvers! In this unique competition, their mission is to identify and fix bugs in a GitHub repository across three diverse domains: Frontend, Backend, and Machine Learning (ML).
- Fork the repository.
- Clone the repository in your local system.
- Follow the steps mentioned in the Setting up the project section.
- Once you have set up the project, you can start working on the issues.
- After you have made the changes, push the code to your forked repository.
- Put the link to your forked repository in the Google Forms which will be shared with you.
Fork the repository by clicking on the Fork button on the top right corner of the page.
Clone the repository in your local system.
git clone https://github.com/<your-github-username>/BreakingBug-Backend.gitNavigate to the project directory.
cd BreakingBug-BackendInstall the dependencies.
npm installCreate a .env file in the root directory of the project and add the following environment variables.
PORT=3000
MONGO_URL=<Your MongoDB URI>
SECRET_KEY=<Your JWT Secret>
Start the server.
npm startThe server will start running on http://localhost:5000.
Once this is done, set up the database. For that, run the following command:
node database.jsThis should make the required schemas in the database. You can now start working on the issues.
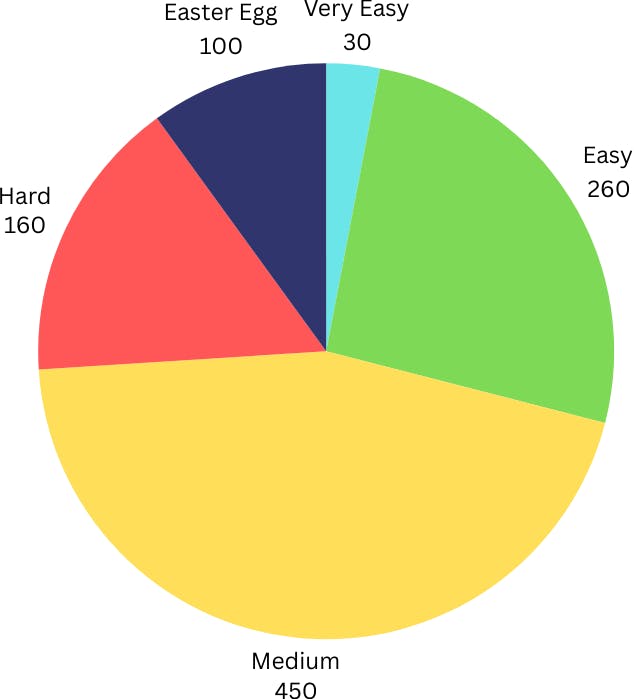
The maximum attainable points for this project are 1000. The points are distributed as follows:
| Difficulty Level | Points | Count | Total |
|---|---|---|---|
| Very easy | 10 | 3 | 30 |
| Easy | 20 | 13 | 260 |
| Medium | 30 | 15 | 450 |
| Hard | 40 | 4 | 160 |
| Easter egg | 50 | 2 | 100 |
| Total | 1000 |
Postman is a collaboration platform for API development. You can use the following Postman collection to test the API endpoints.
For a tutorial on how to use Postman, you can refer to the following link.
Click on the button below to import the Postman collection.

The database schema for the project is as follows:
You can also view the schema in the models directory in the project.
Here is the schema listed in a tabular format:
| Field | Type | Required | Unique | Default | Subfields |
|---|---|---|---|---|---|
| name | String | Yes | No | - | - |
| String | Yes | Yes | - | - | |
| password | String | Yes | No | - | - |
| role | String | No | No | Customer | - |
| cartDetails | Array | No | No | - | productName, price (mrp, cost, discountPercent), subcategory, productImage, category, description, tagline, quantity, seller (ref: seller) |
| shippingData | Object | No | No | - | address, city, state, country, pinCode, phoneNo |
| Field | Type | Required | Unique | Default | Subfields |
|---|---|---|---|---|---|
| buyer | ObjectId (ref: customer) | Yes | No | - | - |
| shippingData | Object | Yes | No | - | address, city, state, country, pinCode, phoneNo |
| orderedProducts | Array | No | No | - | productName, price (mrp, cost, discountPercent), subcategory, productImage, category, description, tagline, quantity, seller (ref: seller) |
| paymentInfo | Object | Yes | No | - | id, status |
| paidAt | Date | Yes | No | - | - |
| productsQuantity | Number | Yes | No | 0 | - |
| taxPrice | Number | Yes | No | 0 | - |
| shippingPrice | Number | Yes | No | 0 | - |
| totalPrice | Number | Yes | No | 0 | - |
| orderStatus | String | Yes | No | Processing | - |
| deliveredAt | Date | No | No | - | - |
| createdAt | Date | No | No | Date.now() | - |
| Field | Type | Required | Unique | Default | Subfields |
|---|---|---|---|---|---|
| productName | String | No | No | - | - |
| price | Object | No | No | - | mrp, cost, discountPercent |
| subcategory | String | No | No | - | - |
| productImage | String | No | No | - | - |
| category | String | No | No | - | - |
| description | String | No | No | - | - |
| tagline | String | No | No | - | - |
| quantity | Number | No | No | 1 | - |
| reviews | Array | No | No | - | rating, comment, reviewer (ref: customer), date |
| seller | ObjectId (ref: seller) | No | No | - | - |
| Field | Type | Required | Unique | Default |
|---|---|---|---|---|
| name | String | Yes | No | - |
| String | Yes | Yes | - | |
| password | String | Yes | No | - |
| role | String | No | No | Seller |
| shopName | String | Yes | Yes | - |
Here are the sub-schemas used in the above schemas:
| Field | Type | Required | Unique | Default |
|---|---|---|---|---|
| productName | String | No | No | - |
| price | Object | No | No | - |
| mrp | Number | No | No | - |
| cost | Number | No | No | - |
| discountPercent | Number | No | No | - |
| subcategory | String | No | No | - |
| productImage | String | No | No | - |
| category | String | No | No | - |
| description | String | No | No | - |
| tagline | String | No | No | - |
| quantity | Number | No | No | - |
| seller | ObjectId (ref: seller) | No | No | - |
| Field | Type | Required | Unique | Default |
|---|---|---|---|---|
| address | String | No | No | - |
| city | String | No | No | - |
| state | String | No | No | - |
| country | String | No | No | - |
| pinCode | Number | No | No | - |
| phoneNo | Number | No | No | - |
| Field | Type | Required | Unique | Default |
|---|---|---|---|---|
| id | String | Yes | No | - |
| status | String | Yes | No | - |
| Field | Type | Required | Unique | Default |
|---|---|---|---|---|
| mrp | Number | No | No | - |
| cost | Number | No | No | - |
| discountPercent | Number | No | No | - |
| Field | Type | Required | Unique | Default |
|---|---|---|---|---|
| rating | Number | No | No | - |
| comment | String | No | No | - |
| reviewer | ObjectId (ref: customer) | No | No | - |
| date | Date | No | No | Date.now() |
To set up the database schema, follow these steps:
- Create a new database in MongoDB.
- Create the collections in the database as per the schema mentioned above.
- Use the mongoose library to create the collections programmatically.
- Once you have created the collections, you can start using the API endpoints to interact with the database.