step 3
This step will introduce a fair number of Angular concepts, so it's a good idea to follow along with the Angular Tutorial to get a solid description of the Angular concepts underpinning the application.
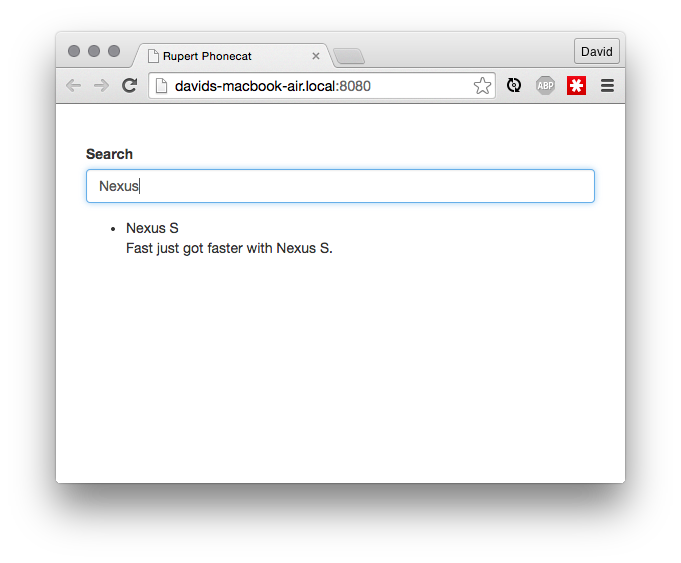
The list of phones is great and dandy, but adding more than a couple will become difficult to keep track of them. In this step, a search box will streamline how quickly users can find the phone they're interested in. Start by modifying the template, making it a two-column Bootstrap layout contained completely by the PhoneController.
./src/client/main-template.html
<div class="container-fluid" ng-controller="PhoneController as state">
  <div class="row">
    <div class="col-md-2">
      <form>
        <div class="form-group">
          <label for="search">Search</label>
          <input type="search" name="search" class="form-control" ng-model="state.query">
        </div>
      </form>
    </div>
    <div class="col-md-10">
      <ul class="phones">
        <li ng-repeat="phone in state.phones | filter:state.query">
          {{ phone.name }}
          <p>{{ phone.snippet }}</p>
        </li>
      </ul>
    </div>
  </div>
</div>
That's actually all there is! Most of this change is HTML for Bootstrap to create a two column layout. The Angular parts are on the Search input, with ng-model="state.query", and in the li ng-repeat, where we added the | filter:state.query. The first part with ng-model tells Angular to perform two-way data binding between the input to the Search field and the query parameter on the state, the controller. (The property will get created by Angular automatically when it's used.) The filter will take the list of phones, and only render the ones that have whatever value is in state.query exactly.
Because there's no change to the controller, tests for this new functionality will happen at the integration level, as a feature test. The test from step-2 is commonly called a unit test, because it exercises and tests a single unit of work, in isolation. Feature tests, also called integration or end to end (e2e) tests, run against the entire application as a whole.
In Rupert, Feature tests are written using the Cucumber specification tool (via the javascript port). This allows writing feature tests using a very common English syntax, and turned into code by combining those plain English statements with code that automates the web browser. An example will show this well.
Delete ./src/features/app.feature, because it is the baked-in Rupert functionality that doesn't fit our project.
Add ./src/feature/phonecat.feature, and add the following feature and scenario.
Feature: Phonecat

  Scenario: Filter
    Given I am on the site
    When I type "Wi-Fi" into the "search filter"
    Then I should see 1 "phonelist" item
In this test, Feature is synonymous to describe from our unit tests in step 2, Scenario is synonymous with it, and the Given, When, and Then are the Set Up / Act / Assert trio. The Cucumber test runner will parse this feature block, and execute the series of steps specified. To execute the correct functionality, Cucumber needs step definitions, which we can provide in the file ./src/features/steps/phonecat.js:
var mappings = require('../mappings');

module.exports = function(){
  this.When(
    /type \"([^\"]+)\" into the \"([^\"]+)\"/,
    function(value, field){
      this.world.fill(mappings[field], value);
    }
  );

  this.Then(
    /see ([0-9]+) \"([^\"]+)\"/,
    function(count, field){
      this.world.findAll(mappings[field]).then(function(elements){
        elements.length.should.equal(+count);
      });
    }
  );
};
Let's break this file down. The exports on line 3 provides a function that Cucumber will execute to get step definitions. Inside the function, the cucumber this reference has three methods - Given, When, and Then, which correspond exactly to the phases for setting up, acting on, and tearing down the application. Each of those methods takes two parameters - a regular expression, and a function. The regular expressions in each step are matched against the lines in the feature file - the first regular expression to match determines which function will be executed for that step. The matched regex subgroups are passed to the function as parameters, and the function can then return a promise that will either resolve, indicating a successful test, or fail, indicating a failed step.
In the feature steps, this.world is a helper wrapper around selenium webdriver, with references to protractor for AngularJS testing, and is provided by and documented in the qcumberbatch library.
In the first step, the regular expression looks for the phrase type ___ into the ___, where the ___s are wrapped in double quotes (regexper). Those two matched subgroups are passed as value and field, respectively. Semantically, this is a way to state that the user has input some characters into a certain form on the application. The function does this by calling the fill method of the qcumberbatch world manager. That method itself delegates to the underlying webdriver utilities.
The last piece of this approach is the concept of a mappings model (also called a ui-map). This is a map of human-readable words and phrases to their equivalent CSS selector. As projects and teams grow, the mappings model is a powerful tool to implement a domain model, a consistent set of words and phrases anyone on a project can recognize and understand. For our Phonecat application, our mappings model in ./src/features/mappings.js starts with this:
module.exports = {
'search filter': 'search',
'phonelist': '.phones .phone'
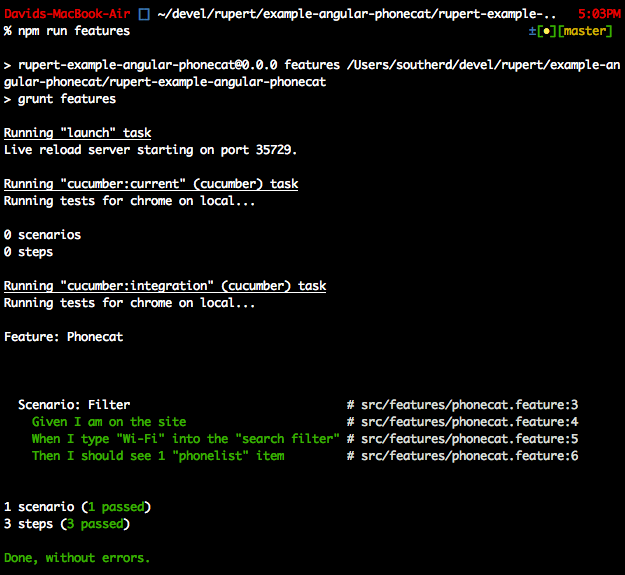
};All together, these let us run our first set of feature tests! We do that with the command npm run features, and our output should list one scenario with three steps: