This repository is a collection of resources for beginners who want to contribute in open source projects and learn how it works, what are the best practices etc..


1. Fork a project
2. Clone the forked project
3. Create a new branch
4. Make Useful Changes
5. Stagging or Adding Chnages
6. Commit Changes
7. Switching branch
8. Merge branch
9. Push code
10. Submit your changes for review
- You can contribute in terms of Code
- You can contribute in terms of improving Documentation
Some useful repos to start with Check Here
Click to see the git commands you have to learn Git Cheat Sheet
Before we proceed, it's better to know the difference between Git and Github. Git is a version control system (VCS) that allows us to keep track of the history of our source code , whereas GitHub is a service that hosts Git projects.
We assume you have created an account on Github and installed Git on your System.
Now enter your name and E-mail (used on Github) address in Git, by using following command.
$ git config --global user.name "YOUR NAME"
$ git config --global user.email "YOUR EMAIL ADDRESS"
If everything went well then now run
git status
This is an important step to mark your commits to your name and email.
You can make a copy of the project to your account. This process is called forking a project to your Github account. On Upper right side of project page on Github, you can see -

Click on fork to create a copy of project to your account. This creates a separate copy for you to work on.
You have forked the project you want to contribute to your github account. To get this project on your development machine we use clone command of git.

Now you have the project on your local machine.
It is recommended to create a new branch for your contribution. This keeps your changes separate from the main codebase and makes it easier to manage. Use the following command to create a new branch:
git checkout -b new-branch-name
Replace "new-branch-name" with a descriptive name for your branch.
Now you can make the necessary changes to the project code or files. You can use any text editor or integrated development environment (IDE) of your choice.
$ git add --all
or
$ git add .
These commands adds all the files or you can add specific files by removing -a and adding the file names.
After making your changes, it's time to commit them. Committing is the process of saving your changes to Git with a descriptive message. Use the following command:
git commit -m "Your commit message"
Replace "Your commit message" with a brief summary of the changes you made.
Switching back to the main branch is important to ensure you are up to date with the latest changes in the project. Use the following command to switch back:
git checkout main
Before you push your changes, it's recommended to merge the changes from the main branch into your branch. This helps avoid conflicts and keeps your branch up to date. Run the following command to merge the main branch into your branch:
git merge new-branch-name
Replace "new-branch-name" with the name of your branch.
You now have a new branch containing the modifications you want in the project you forked. Now, push your new branch to your remote github fork.
$ git push origin <feature-branch>
If you go to your repository on GitHub, you'll see a Compare & pull request button. Click on that button.
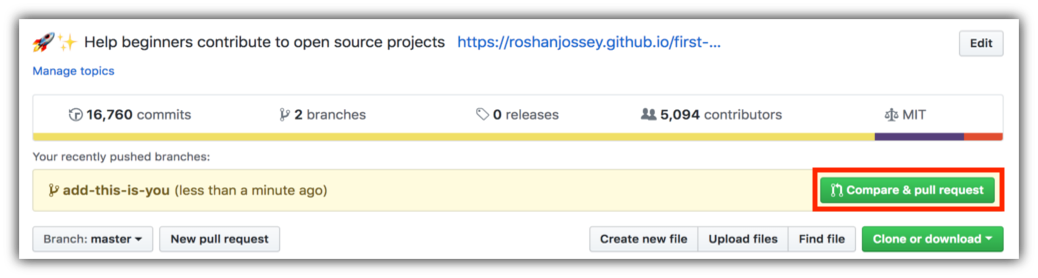
Now submit the pull request.

Soon I'll be merging all your changes into the main branch of this project. You will get a notification email once the changes have been merged.
Fantastic! You've already made your first contribution.🥳
Here are some useful beginner friendly repositories thorugh which you can start your open source journey.
You can see those by clicking useful repos Useful Repos