Post Processing Stages
appleseed implements a stack of post-processing stages which are applied to the rendered image once rendering is complete.
Three post-processing stages are currently available: a false color visualization stage, a render stamp stage that allows to add an appleseed logo and various text information to a render, and a vignetting effect stage to darken the edges of a render.
Note that, the order in which they are applied follows the value of the Order parameter, set for each stage. You can also view hints about what other parameters do by hovering the mouse over their labels.
During Google Summer of Code (GSoC) 2020, three new post-processing stages have been implemented, with a focus on artistic effects: bloom, chromatic aberration and tone mapping. Though, these have not yet been included in an official release of appleseed.
Furthermore, the ability to preview effects before a final render (e.g. when an interactive rendering is paused or stopped) has also started to be developed.
- 1. Color Map
- 2. Render Stamp
- 3. Vignette
- 4. Bloom (#2875)
- 5. Chromatic Aberration (#2887)
- 6. Tone Map (#2884)
This stage allows you to visualize the Rec. 709 relative luminance of a render through a number of predefined color maps, or through a custom color map defined by an image file.
Five predefined color maps are available: the venerable Jet color map popularized by MATLAB; Turbo, an improved rainbow color map designed by Google AI; and four modern, "perceptually uniform sequential" color maps from Matplotlib: Inferno, Magma, Plasma and Viridis.
In addition, the Color Map stage can render relative luminance isolines, that is, lines of equal relative luminance in the render, and also include a color legend.
| Label | Default | Description |
|---|---|---|
| Order | 0 | Relative order in which to process this stage |
| Color Map | inferno |
Applied color map Possible values: Custom, Jet, Turbo, Inferno, Magma, Plasma, Viridis
|
| Colormap File Path | None | Path to a custom color map image (requires Color Map to be custom) |
| Auto Range | true |
true = map the full range of luminance values to the color mapfalse = manually set limit values |
| Range Min | 0.0 | Luminance value mapped to the first row in the colormap Requires Auto Range to be false
|
| Range Max | 1.0 | Luminance value mapped to the last row in the colormap Requires Auto Range to be false
|
| Add Legend Bar | true |
Include a legend bar in the render |
| Legend Bar Ticks | 8 | Set the number of divisions in the legend bar Requires Add Legend Bar to be true
|
| Render Isolines | false |
Draw lines of equal relative luminance in the render |
| Line Thickness | 1.0 | Set the thickness of luminance isolines Requires Render Isolines to be true
|

The render stamp is fully configurable and can contain a mixture of arbitrary text and predefined variables such as appleseed version, render time, etc.
The following variables are available:
-
{lib-name}: name of the appleseed library -
{lib-version}: version string of the appleseed library -
{lib-cpu-features}: CPU instruction sets that are potentially taken advantage of (e.g. "SSE SSE2") -
{lib-config}: configuration of the appleseed library (e.g. "Debug" or "Release") -
{lib-build-date}: compilation date of the appleseed library -
{lib-build-time}: compilation time of the appleseed library -
{render-time}: rendering time -
{peak-memory}: peak amount in bytes of virtual memory used by the current process
| Label | Default | Description |
|---|---|---|
| Order | 0 | Relative order in which to process this stage |
| Format String | appleseed {lib-version} | Time: {render-time} |
Render stamp text |
| Scale Factor | 1.0 | Controls the size of the render stamp |
This post-processing effect simulates natural vignetting, reducing the image's brightness towards its edges.
On non-square resolutions you can choose between the vignette being perfectly rounded (Anisotropy = 0.0), or respecting the aspect ratio of the frame (Anisotropy = 1.0).
| Label | Default | Description |
|---|---|---|
| Order | 0 | Relative order in which to process this stage |
| Intensity | 0.5 | Strength of the vignetting effect Higher values lead to stronger darkening of the image edges |
| Anisotropy | 0.0 | Vignette's degree of deviation from a circle0.0 = perfectly rounded1.0 = mimics the image aspect ratio |
| Original | Vignette |
|---|---|
 |
 |
4. Bloom (#2875)
Bloom adds veiling glare to the frame, extending light from the borders of bright areas. This can make the final image be perceived as more realistic, simulating the effect of an extremely bright light overwhelming the camera capturing the scene.
Note that, when used together with tone mapping, you should usually set the Order for bloom to be lower than the one for tone mapping (especially if Clamp Colors is set, which would lead bloom to be applied on LDR color values).
The Debug Blur toggle lets you see exactly which pixels are being used for the effect, and can help you more quickly find which settings' values are best suited for your desired effect.
| Label | Default | Description |
|---|---|---|
| Order | 0 | Relative order in which to process this stage |
| Radius | 4 | Bloom spread distance |
| Intensity | 0.1 | Bloom strength (for blending with the original image) |
| Threshold | 1.0 | Filters out pixels under this brightness level |
| Soft Knee | 0.5 | Softens the transition between under- and over-threshold values |
| Debug Blur | false | Shows only the bloom effect (instead of blending it with the original image) |

5. Chromatic Aberration (#2887)
Simulates transverse (lateral) chromatic aberration of lenses by sampling pixels with slightly different shifts for each color channel.
Higher Fringe Smoothness values make the color fringing effect have a smoother (rainbow-like) gradient, instead of the usually seen three-color split.
| Label | Default | Description |
|---|---|---|
| Order | 0 | Relative order in which to process this stage |
| Strength | 0.4 | Chromatic Aberration strength Increases distortion towards image edges |
| Fringe Smoothness | 6 | Color fringing granularity Higher values lead to a smoother gradient |
Low Fringe Smoothness
|
High Fringe Smoothness
|
|---|---|
 |
 |
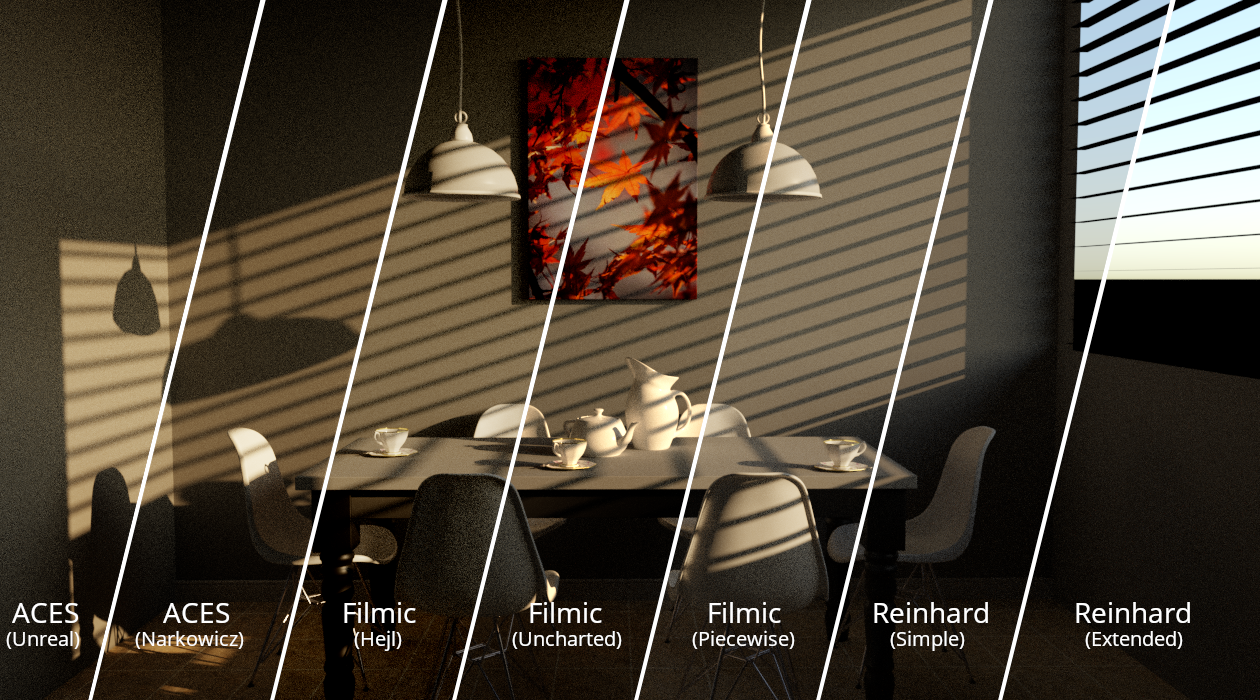
6. Tone Map (#2884)
The tone mapping stage allows you to change the colors, brightness and contrast of your image. appleseed works in High Dynamic Range (HDR) (which you can export in the .exr format), but most screens can only reproduce values in the limited [0, 255] range, namely, Low Dynamic Range (LDR).
By using different tone curves you can map the range of radiance values of your render to the viewable target range (represented as [0.0, 1.0] in appleseed).
appleseed offers seven different tone mapping operators: two ACES approximations, three filmic curves (which try to mimic the distinct feel of real photographic film), and the classic Reinhard operators.
| Label | Default | Description |
|---|---|---|
| Order | 0 | Relative order in which to process this stage |
| Operator | Linear | Tone mapping operator |
| Clamp Colors | true | Clamp color values to [0.0, 1.0] range after tone mapping |
Possible Operator values:
-
Linear: doesn't influence the image (i.e. the same as to not apply tone mapping) -
ACES (Narkowicz): Krzysztof Narkowicz's fitting of the ACES curve -
ACES (Unreal): Romain Guy's approximation of the ACES curve -
Filmic (Hejl): filmic curve developed by Jim Hejl and Richard Burgess-Dawson at EA -
Filmic (Piecewise): highly customizable filmic curve developed by John Hable -
Filmic (Uncharted): filmic curve developed by John Hable for Uncharted 2 -
Reinhard: simplest (but classic) tone mapping operator, developed by Erik Reinhard et al. -
Reinhard (Extended): extended version of the previous operator, whereMax Whitecan be set to the maximum radiance value in the scene, so that its value maps to the highest LDR value