Migrating pre v0.22 Uno Choice Projects
###Uno-Choice code-base changes in v0.22 break backward compatibility Nothing new here. We decided to make a fresh start with the code base as we are preparing to release Uno-Choice v1.0 to the Jenkins community. It was time for some serious refactoring of the code to bring along common threads and introduce a more robust testing framework.
###My project migration challenge As an early adopter and experimenter of Uno-Choice for almost a year now, I had accumulated more than a dozen Jenkins projects with heavy use of Uno-Choice parameters (up to 7 sometimes!). Not only that, but many of these projects are in 'production' with many people accessing them on a daily basis. The main application of Jenkins, in my case, is life-sciences applications with a heavy dose of R-analytics. These applications require a dynamic and complex user-interface, something that only Uno-Choice has been able to deliver in a single plugin! My challenge now is to migrate all of these projects to the new code-base as we move the Uno-Choice plugin forwards.
###Considering migration strategies The recommendation was to not import previous Uno-Choice version projects into a Jenkins instance with the new v0.22 Uno-Choice plugin installed. Any attempt to do that is destined to be met with problems due to the class differences between the old and new version.
So, the only option is to start creating new 'parallel' Jenkins projects and copy as much as possible from the one to the other. But even that is difficult, as a version of Jenkins hosting the new plugin would not be able to import the old projects even for inspection. You would need another instance of Jenkins still running the old version plugin to even just open and inspect them.
So two instances of Jenkins, two versions of the Uno-Choice plugin and a few strong cups of coffee to take you through the inspect and copy-paste process! Unless there is a better way?
DISCLAIMER: If you have just a few scattered uses of old Uno-Choice controls, the process below may be an overkill! Just delete the old Uno-Choice control from your project configuration and replace it with the new Uno-Choice parameter. Redo the configuration similarly to your old parameter.
###Refactoring Uno-Choice xml How about if we decide to directly refactor the project config.xml files without involving Jenkins?
Well, I would not recommend doing this working with xml directly, but I would be willing to attempt it with a tool like XMLNotepad.
The advantage of XMLNotepad is that it displays a coherent xml tree and allows you to edit the xml as nodes, elements and attributes easily moving and copying them from one file to another. This is a big advantage when you try to work with complicated xml files such as the config.xml from Jenkins that could potentially contain bits of code etc.
The structure of a rather complicated config.xml file looks a lot less intimidating in XMLNotepad!
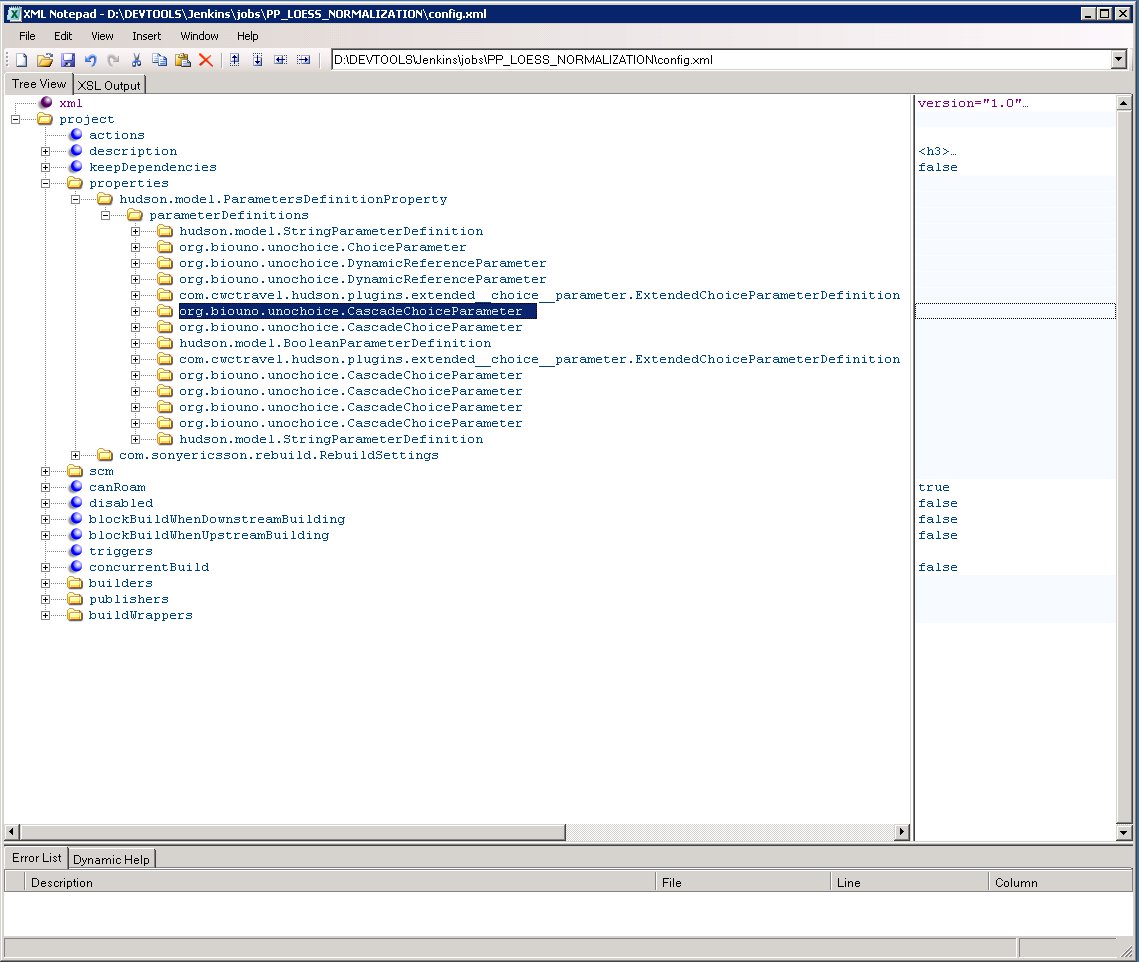
And expanding one of the nodes you can easily navigate, review and edit each element and attribute value shown in the right panel.
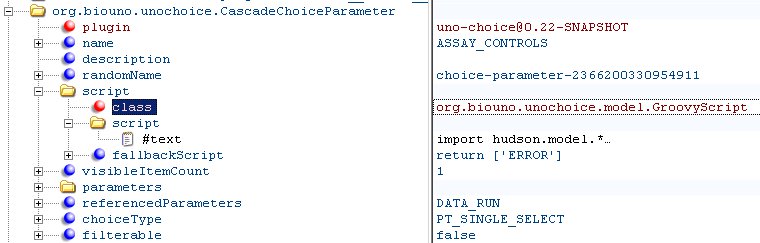
But what makes XMLNotepad even more useful for this refactoring job is its ability to copy, paste, move and delete nodes, elements and attributes at any level of granularity you desire. Furthermore you can work simultaneously with more than one open files and perform operations between files with 'drug and drop' ease.
###Migration process Pre-requisites
- Download and install Uno-Choice v0.22 from the Uno-Choice hpi file (found on the developers list). The plugin needs a server restart to install. So..
- Shut down your Jenkins server!
- Insure that you have backups of the jobs you want to migrate. I simply 'hid'my current jobs by renaming the Jenkins jobs folder, but this may not be appropriate for you case. The point is you don't want to have your old jobs imported automatically when Jenkins restarts, so do what it takes to do so. Typically you'll need to remove or rename the config.xml files from jobs you want to prevent from auto-importing.
- Restart the server. The Uno-Choice v0.22 will now install
- Create a new parameterized 'dummy' job and add all of the new Uno-Choice parameters. You may want to add copies of each Uno-Choice parameter with different options such as Groovy Script or Scriptler. The idea here is to have some 'seeded' Uno-Choice parameter nodes that you can use as targets during the migration of your old Uno-Choice parameters using XMLNotepad.
Here is what such a project may look like when viewed in XMLNotepad
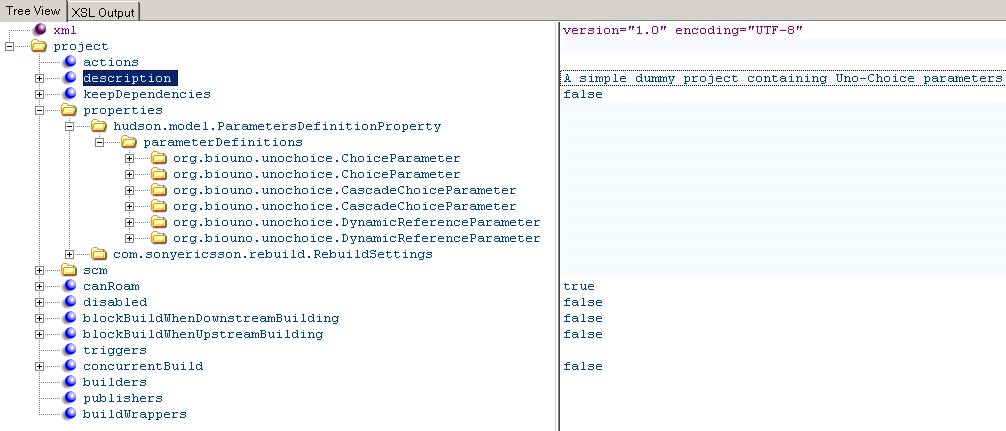
I name these dummy Uno-Choice parameters in a way that helps me identify their overall type and function. This is helpful when I view the expanded nodes in XMLNotepad.

###Main migration process You will migrate each of the old Uno-Choice parameters in your projects one by one to the corresponding new Uno-Choice type. Note that the early Uno-Choice plugin had a lot more parameter types. These are now condensed to just three Uno-Choice parameter types:
- Dynamic Choice (org.biouno.unochoice.ChoiceParameter)
- Cascade Dynamic Choice (org.biouno.unochoice.CascadeChoiceParameter)
- Dynamic Reference (org.biouno.unochoice.DynamicReferenceParameter)
- Using XMLNotepad open the config.xml file for the project you want to migrate, and the config.xml file of the 'dummy' Jenkins project.
- For each old Uno-Choice parameter in the config.xml add the corresponding Uno-Choice node from the 'dummy' file (by copy/paste or drug and drop). If the node ends-up at the wrong level in the hierarchy, you can move it using the 4 'arrow nudge buttons' in the XMLNotepad icon bar.
- Expand each old and new node so you can see their full structure.

- Edit the new node to match the old one where possible (such as name, description, referenced parameters etc). You do not necessarily have to type these edits, as you can copy/paste (CTRL-Click-drug and drop)these nodes from the old parameter to the new one. This technique works great from simple strings to entire scripts!
- Use the full functionality of XMLNotepad to make your editing session easier. Nodes, elements, attributes etc. can be added, duplicated, moved and deleted with ease. Experiment and you'll know what I mean.
- Once your new Uno-Choice node is configured to resemble the old one you can delete the old node
- Once you replace all the of the old Uno-Choice nodes with new ones you can save the config.xml file and make it visible to the Jenkins server again!
- Now you can do a reload to load the updated project configuration.
At this stage your project should reload fine into Jenkins. You will of course want to do some tests to insure that you have retained all of the dynamic expected behavior of your user interface controls using the new Uno-Choice parameters.
Of course, you can still do some fine tuning or corrections using the Jenkins project configuration tool, but the process above should have saved you a lot of time (I hope at least... it certainly did for me).