operate_docs
- prepare a usb with some videos you want to sample
- connect the hdmi output or composite (via 3.5mm trrs) to the display you want to use
- power the raspberry pi. you should see red lights on the pi board, the lcd display light up and the r_e_c_u_r splash screen on your video output
- after a few moments the interface should appear on lcd screen.

the controls on r_e_c_u_r work by mapping keys to actions. this map can be fully customised by editing the respective json file.
the default layout uses a hard mapping for every key except the < - > - ■ in red. this means every other key triggers the same actions independent of the state r_e_c_u_r is in.
the control keys ,< - > - ■ use a soft mapping. the action they trigger depends on the state , displayed on screen as control_mode in red.
these let you navigate and select folders, video files and settings when in BROWSER / SETTINGS mode, and by default control video playback (seek forward and back, pause/play) of the currently playing [NOW] sample in SAMPLER mode.
the display modes SAMPLER, BROWSER and SETTINGS are cycled by using the DSPLY key. (FN + DSPLY cycles back)
some actions are accessible through a function layer, toggled by the FN key.
-
→(SWITCH) is used to switch the [NEXT] loaded sample to the [NOW] current sample - loading the sample in slot
xinto [NEXT]; wherexis a key from0to9 - cropping the current sample to start (
[) or end (]) at the current time - cycling forward (
PRV BNK) or back (NXT BNK) through the banks of sampleS , or clearing a bank (CLR BNK)
some keys are empty to leave room for future features and user experimentation. i encourage you to modify your keymap or add custom actions you would like to use.


this section displays information about what is in the video player : the position from the start and the end of currently playing sample (yellow), what slot is playing [NOW] and what slot is loaded [NEXT]
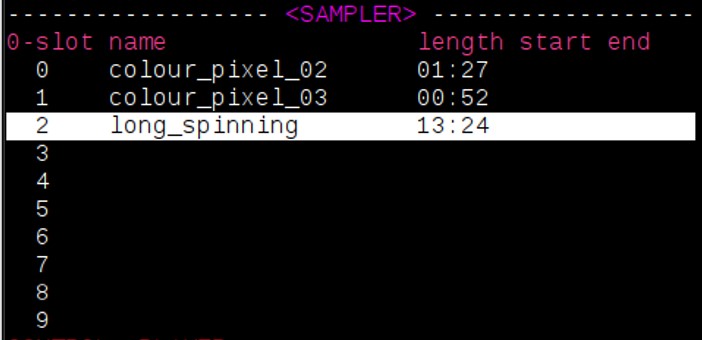
this is the main display mode for using r_e_c_u_r. from this view you can see details of all the samples loaded into the sampler. a bank contains 10 slots labelled 0 - 9. pressing the corresponding key will load the sample in this slot to start when the current sample finishes. the slot of the currently playing sample is highlighted.

this is where you can load samples from your usb or internal Videos folder into the SAMPLER
- in this mode , the
<and>keys will move the selection up and down - folders are displayed ending in
|for closed and/for open , the depth is displayed as indentation - pressing the
■key while a folder is selected toggles it open/closed - pressing the
■key while a video is selected loads it into the next available slot (note : you can see the first slot a video is loaded into on right column)
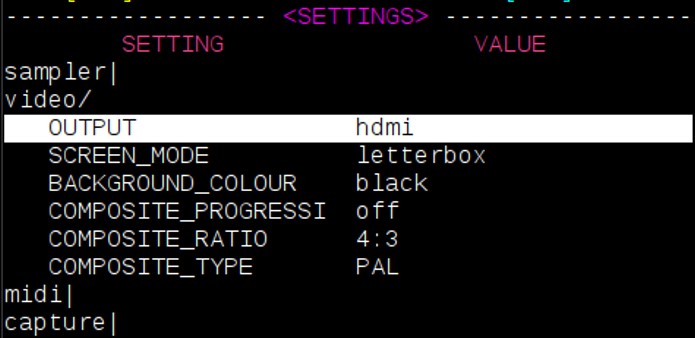
this is where you can configure r_e_c_u_r's settings.
- navigate the menu with
<and>keys like above - pressing
■on a setting will either cycle through it'soptionsor run anactiondepending on its type
the bottom line shows the control_mode by default (what mapping the keys are currently using), but is also for displaying messages:
- shows a yellow bar when function layer is selected
- shows a blue bar for
INFOmessages - shows a red bar for
ERRORmessages - full message and trace for these can be found in the log files

the feature set of this project has grown beyond the simple 'seamless' video player it started out as. with more options inevitability comes more complexity and confusion. feel free to try whatever extensions interest you and ignore the rest.
capture
live video-input is possible for previewing and recording. this can be enabled in the SETTINGS display mode. you need to ensure the capture type is set correctly : choose from piCamera, piCaptureSd1 or usb.
-
piCamerareads from raspberry pi's CSI input. it is a performant, reliable and cheap (see build docs) way to get video input into recur - note: limited to camera / rescanning -
piCaptureSd1is currently the best solution for a general composite-video input to raspi. it is low latency with reasonable quality, and also handles s-video / component inputs (watch this space for possible other options to be supported) -
usb; with this setting the recur attempts to read video from an attached usb source. integration, quality and performance is less predictable but i have tried it using these cheap ezycap dongles with some (lofi) success.

with capture enabled in the settings you can toggle preview by pressing the ⦿ key. the capture input will take priority over any video-samples playing.
pressing FN + ⦿ will toggle sample recording. this can be enabled with or without preview on. the state of capture is displayed on the PLAYER display between the NOW and NEXT.
after a recording is stopped the displayed state will be saving.. while the raw video-footage is converted. after this the sample can be loaded from video/internal_recordings/<date>-<count>.mp4 in browser. recur will automatically map new recordings to your current bank if there is space
NOTE: for users of piCaptureSd1: please ensure you have the composite video source active and plugged in to the HAT before powering on recur. there seems to occasionally be issues with recognizing the hardware otherwise and a reboot is required.
user-inputs
the usb-numpad is a convenient way to manually trigger discrete actions within recur (any usb-keyboards can also be used). this is fine for basic sample loading and switching however more advance features benefit from continuous control of parameters. this is where alternative user-input options are useful. (another use is to sequence recur using external gear)

this is by far the easiest way to control recur externally / with continuous control. plug a controller into one of recurs existing usb-sockets and set midi to usb in the SETTINGS display mode. you should see a message with the name of your device pop up. the midi-map can be configured in the same way as key-mappings.
for anyone interested in a diy 'standalone' solution i designed a pcb that allows continuous control via analog input (four knobs and four 0-5v cv inputs) + serial-midi. see the build guide for more info. they can also be enabled in the SETTINGS
shaders
fragment shaders are small text-files of glsl-code that can tell your graphics card what to show. these can be used to create your own colours, shapes and patterns on the screen. for an introduction to writing shaders i recommend Patricio Gonzalez Vivo's The Book of Shaders.
recur can load a shader in a similar way to loading a sample, allowing you to trigger them and update their parameters in real time.

ensure that shaders is enabled in the settings and then use DSPLY to cycle to the SHADER display mode.
here you can navigate folders and files using < > and ■ same as BROWSER/SETTINGS. selecting a shader (■) will load it, and pressing FN + 6 will toggle it on and off.
the top line of SHADER_DISPLAY shows you the state (stopped and running), name and parameters (x_0, x_1 etc) of the current shader. beneath this is the file-menu you can use to select this current shader.
-
0-input: these shaders use no input, everything you see is generated by the code and graphics card -
1-input: shaders can also process video. when active your current output will be passed through this shader (either from avideo sampleorcapture preview) this is similar to the effects section on a v4 mixer except now you can create, customize and share them too ! -
2-input: allows you to perform fades, wipes and keys between two video-input sources - eg betweencapture previewand avideo sampleor even twovideo samples(see notes below on how to set this up)
the shader parameters are best controlled by continuous inputs ( see user-inputs above) however can also be set by the numpad (somewhat clumsily):
- pressing
■on a shader willloadit; pressing■on the loaded shader entersSHADER_PARAMcontrol mode (written in red at bottom) - from here you can cycle through the params with
[and] -
<and>will change the amount of the currnet param. (FN + <andFN + >will change the delta) - pressing
■will exitSHADER_PARAMcontrol mode back toNAV_SHADER
you can enable SHADER_BANK in the shader settings. this is a new display mode similar to SAMPLER.
- shaders are mapped to the bank from the
SHADERSdisplay by pressingFN + ■on the desired shader - now from within the
SHADER_BANKshaders can be selected byx, pressing the number key of the slot the shader is in. - similar to before params can be set with
<,>and selected with[,]. - from this view
■also toggles this shader on and off - on is displayed as a highlighted line on the selected shader. - similar to in the
SAMPLERview, you can useFN + 0andFN + 1to change banks, andFN + 2to clear the current bank. there is max of 3 banks available.
however in this case each bank is on a different layer and can be switched off and on independently. this means you can chain shaders together using different layers. for example a 0-input shader on the first layer can be processed by two 1-input shaders on the next layers. a 2-input shader always takes input from the 2 previous sources, so you could mix between two 0-input shaders by putting them on layer_0 and layer_1 and then using mix shader on layer_2
if you have a midi controller with atleast 12 cc inputs then the params of each layer can be controlled at once. the setting FIX_PARAM_OFFSET_LAYER will ensure the mapping is the same regardless of which layer you are in.
loop vs parallel playing mode
recur was created to try loop videos seamlessly. it does this by using two video-players and preloading the NEXT player while the NOW is playing. this is most useful for short samples where a few frames every loop is very noticeable. however there are some situations where this is not so important: for example when working with long samples, or when a 1080p video loaded twice maxes out the pi's memory. if you do not require the seamless switch there is now a new option LOOP_TYPE to choose between; seamless and parallel .
-
seamlessis the default behavior described above -
parallel: in this mode when the current player finishes it takes a moment to load the next sample itself. there is noSWITCHaction and pressing aSLOTkey will start loading the corresponding sample into this player immediately.

introducing parallel mode also allows the possibility of having two different samples playing at the same time (using roughly the same amount of memory as one in loop mode). to access the second (NEXT) player press FN + -> (player switch). you can tell which player is selected by the colour of the player bar - yellow for now, cyan for next. with next player selected you can load, seek, toggle_pause the same as normal. pressing the -> key now will 'switch' which player is displaying. (FN + ■ can manually toggle_show for the current player)
other forms of mixing between the two players can be done using the 2-input shaders mentioned above.
internal feedback
r_e_c_u_r with its live processing and fx shaders already is a powerful tool for creating external feedback. now there is also an explicit toggle for internal feedback :
- press
FN + 8to toggle FDBCK - this is visible on the bottom right of the display - feedback works best when combined with shaders, in particular a 2-input shader to mix between feedback and a source video - or capture. 1-input shaders that make fine changes to the colour or displacement of the image also work well
another effect that works well with feedback is strobe , this restricts how often the frame updates. by default it is mapped to cc-12 on midi but can also be set in the shaders settings
detour demo (frame-sampling)
d_e_t_o_u_r is a frame-sampler created to address some limitations of sampling with video-files (eg very short loops, instant switching, varying speed and direction). although conceived as a standalone instrument i also wanted (brave) recur users to be able to test it. this is a rough integration with basic (and confusing) ui and some crashes (a RESET_OPENFRAMEWORKS should recover these) use at your own risk !
to use detour_demo you must have continuous controls (either midi or i_n_c_u_r pcb). after enabling it in the settings you can cycle to FRAME_SAMPLER with DSPLY key. information about the state of the program is displayed here.
a detour is an array of frames which, when played back together, simulates video (imagine pictures in a flip-book). the mix-shader combines sampler-input (output from recur : can be a video sample playing or capture preview) with the current frame from detour.

from the FRAME_SAMPLER display:
- pressing
FN + 7will toggle FRAME_SAMPLER mode on and off - pressing
■will toggle_play on the current_detour - pressing
->will toggle_record ; this adds the output of mix-shader into the current_detour - pressing
FN + ->will toggle_record_loop ; this switches record between increasing the size of current_detour or overwriting an existing frame in it - pressing
0, 1, 2, 3will switch between different detours. for this demo the total number of frames can not exceed 500 - you can select the mix-shader type with
[and](it reads from recurs2-inputfolder) -
a1(analog input 1) will mix between the sampler-input and the current_detour (FN + [andFN + ]are shortcuts for mix=0 and mix=1) -
a2will set the velocity of the detour if playing or position if paused -
a3will set the start frame of current detour -
a4will set the end frame of current detour

this program uses the mix_shader to select the input. there is also the option to use a 1-input shader in this chain - either before the mix (only on sampler-input) or after (nice for feedbacky effects). this shader can be selected and toggled in the usual SHADER display.
glossary of every setting value
-
OUTPUT : sets the video output between
hdmiandcomposite- it is best to siginal hdmi by booting with it plugged in, or composite with it not. this may be removed in future as it seems to cause crashes/ corruption somehow - SCREEN_MODE : only works for VIDEOPLAYER_BACKEND=omxplayer : changes how the player fits video to screen - see omxplayer docs
- BACKGROUND_COLOUR : only works for VIDEOPLAYER_BACKEND=omxplayer : the colour around a video in SCREEN_MODE=letterboxd for example
-
VIDEOPLAYER_BACKEND : sets how recur decides to play video files. v1 only used
omxplayerand some settings only work in this mode. v2 uses openframeworks.ofxomxplayeris recommended overofvideoplayer -
HDMI_MODE : this sets the raspberry pi hdmi out - see tvservice - on some 1080 hdmi displays the pi dropped out and setting down the resolution
CEA 4 HDMIwas a fix, but this may be removed in future as it seems to cause crashes/ corruption somehow - COMPOSITE_PROGRESSIVE : sets progressive flag to tvservice / config.txt. this may be removed in future as it seems to cause crashes/ corruption somehow
- COMPOSITE_RATIO : sets composite ratio to tvservice / config.txt. this may be removed in future as it seems to cause crashes/ corruption somehow.
-
COMPOSITE_TYPE : sets composite type
PALorNTSCto tvservice / config.txt. this may be removed in future as it seems to cause crashes/ corruption somehow. if you find it doesnt work try setting the config.txt yourself.
-
LOAD_NEXT : when in
seamlessplayback mode this decides what slot is loaded into thenextplayer - RAND_START_MODE : loads the player to a random starting point
- FIXED_LENGTH_MODE : loads the player with a end point a fixed lenth from the start
-
ACTION_GATED : when on the
squarekey will trigger on a press and release - use this to only play a video while holding down the key etc -
RESET_PLAYERS : stops and unloadsboth video players. useful for running only one player in
parallelplayback mode, or if you want to free some memory shaders / some live camera work -
LOOP_TYPE : see the entry in docs above - in short
seamlesswill use two players to ensure there is no gap between samples.parallelhas a small freeze at end of each sample but allows you to use both players in parallel -
FIXED_LENGTH : sets the length the sample will play for in
FIXED_LENGTH_MODEby tempo tapping - i never found this as usual as i imagined, maybe it needs some work... - FIXED_LENGTH_MULTIPLY : multiplies the FIXED_LENGTH above by this value. i thought it would help sync video to music but i dunno now ...
-
FUNC_GATED : when on the
FNkey will trigger on a press and release - this is the default. switch off if you prefer to press to turn fn on and press again to turn off -
ON_ACTION : what should happen when you press the
squarekey ? default is play/pause, but maybe you would rather just show/hide the sample ? or both ? -
ON_FINISH : what should happen when the current sample finishes ? default is to
SWITCHto the next player but maybe you want 'one-shots' where the next sample needs to be triggered manually ? -
ON_LOAD : what should the opacity of a sample start as when loaded ? default is
shownbut maybe you want to trigger this manually ? -
ON_START : how should a sample be set when it starts ? default is
playingandshownbut ... you get the idea!
-
MIDI_INPUT :
serialis for din-midi via the rpi serial gpio pin.usbis for midi over usb. - MIDI_STATUS : will give info on whether usb midi is connected. it will always be connected for serial as there is no way to tell here
- CYCLE_MIDI_PORT : in the rare case where the usb-midi device creates multiple ports but only receiving data on one of them. if you are trying to use a usb-midi device that is connecting but not working it is worth trying CYCLE_MIDI_PORT a few times and see if that helps ..
- DEVICE : enables capture and tries to connect with input
-
TYPE :
PiCameraandpiCaptureSd1both use the raspi csi port but need different settings to be displayed correctly.usbtries to read input from usb - i guess it depends on the device and drivers etc - i will find more info about this in future -
PICAPTURE_INPUT : if using
piCaptureSd1you can switch between inputs in the software - FRAMERATE only works for VIDEOPLAYER_BACKEND=omxplayer VIDEOPLAYER_BACKEND=omxplayer uses piCamera whereas v2 uses openframeworks - i havent got ported all features onto of yet. i thought setting the framerate would help with rescanning crt displays. havnt really tried it yet...
- IMAGE_EFFECT : only works for VIDEOPLAYER_BACKEND=omxplayer - just some fun - i think it is possible to reimplement in openframeworks...
- RESOLUTION : only works for VIDEOPLAYER_BACKEND=omxplayer
- SHUTTER only works for VIDEOPLAYER_BACKEND=omxplayer i thought setting the shutter would help with rescanning crt displays. havnt really tried it yet...
- USE_SHADER : show SHADER tab display_mode. dunno why you might want t disable it ??
-
SHADER_PARAM : sets the delta when changing shader param with numpad -
FN + <FN + >are shortcuts for also setting these
- TRY_DEMO : shows the FRAMES tab in display_mode. if you are not using it you might want it off ?
-
SHADER_POSITION : this determines how the effect_shader you can choose in SHADER tab interacts with the detour program -
inputis how you might expect - processing the source before it is passed to input of detour.outputinstead processes the result of mix_shader inside the detour loop - this can create some wild feedback effects - see detour block diagram above
-
UPDATE_CODE : tries to do a
git pullon all the repos involved - if c++ code changes it will try to compile it. this probably isnt working so well - it wont work if any files are changed - it is quite hard to test ! - CLEAR_MESSAGE_BAR : sometimes messages get stuck - a bug i guess - this removes them
- DEV_MODE_RESET : this resets the pi with the display and a video window on the main hdmi output. useful for developing since the lcd is too small. also if you want to use the pi for other things ...
- RESTART_PROGRAM : closes recur and opens it again. useful if something broke and fast to try before a full power reset
- QUIT : stops the recur program and its dependencies
-
SHUTDOWN_PI : for peace of mind - saving you from yanking the power cable.
FN + 9is shortcut - will ask to confirm shutdown - RESTART_OPENFRAMEWORKS : sometimes openframeworks just crashes - especially with detour - this will quickly start it again