if you want to use MPI-ESM-HR you can donwload the utility from that link. This repository can also be used but change the config file and ensure correct csv file in the db folder is chosen
I have added miroc6 model to the code and monthly 'ps' files are merged to yearly file. then all 3hr files ('tas',''huss','mrsos') are conevrted to 6hr files. all of this are done internally.
variable 'tos' is needed for SST calculations but, is available in Oday format for miroc6 and the file naming conventions are different. this utility requires the precense of all timestamps to work properly. Hence i wrote a shell script that takes decadal tos_Oday files and converts them to 6-hourly files suitable for this utility. you can find the script here
https://github.com/jeevakir/data_handling/blob/main/shell/tos-cdo-decade-merge.sh
please install libraries from requiremtns.txt
python3.8 and 3.9 is tested. If numpy, pandas, scipy, xarray, netcdf4 are properly installed, you may skip the installation step.
run the utility by the following command
python3 run_c2w.pyIf you successfully run the above command (it is okay to see some FutureWarnings), you should see CMIP6:2100-01-02_00 and CMIP6:2100-01-02_00 in the ./output folder.
If you are in windows the files will look like CMIP6_2100-01-02_00 and CMIP6_2100-01-02_00
Copy or link the two intermidiate files to your WPS folder, prepare your geo_em files and setup your namelist.wps properly, now you are ready to run metgrid.exe and the following WRF procedures.
When you properly download the MPI-ESM1-2-HR data, First edit the ./conf/config.ini file properly.
[INPUT]
input_root=./sample/
model_name=MPI-ESM1-2-HR
vtable_name=@model
exp_id = ssp585
esm_flag=r1i1p1f1
grid_flag=gn
#YYYYMMDDHHMM
cmip_strt_ts = 210001020000
cmip_end_ts = 210001020600
# In hours
cmip_frq=6

[OUTPUT]
#YYYYMMDDHHMM, please seperate your ETL processes if request very long-term simulation
etl_strt_ts = 210001020000
etl_end_ts = 210001020600
output_root = ./output/
output_prefix=CMIP6 -
[INPUT]['input_root']is the root directory of the CMIP6 data, here it points to the./sample/folder. -
[INPUT]['model_name']is the name of the model. Now only theMPI-ESM-1-2-HRmodel is supported. If you plan to use other models, you need to setup your own variable mapping table (see below). -
[INPUT]['vtable_name']Will assign which Vtable to use. This item will guide the script to read the corresponding variable mapping table in./db/. The seperation of model_name and vtable_name will be useful if you hope to replace some variables in the same model. -
[INPUT]['exp_id']['esm_flag']['grid_flag']are used to form the netCDF file name. -
[INPUT]['cmip_strt_ts']and[INPUT]['cmip_end_ts']are the start and end time of the CMIP6 data. -
[OUTPUT]['etl_strt_ts']and[OUTPUT]['etl_end_ts']are the start and end time of your desired ETL period.
After you have edited the config.ini file, you can run the script again for your desired period. The intemediate files will be generated in the [OUTPUT]['output_root'] folder.
Note that for MPI-ESM-1-2-HR, the soil properties between 10-200cm is not provided by the model and we overwrote it by 0-10cm soil properties, a special type mark of 2d-soilr is provided in the varaible mapping table. You may need long-term (~1-month) spin-up run if your research requests accurate soil properties.
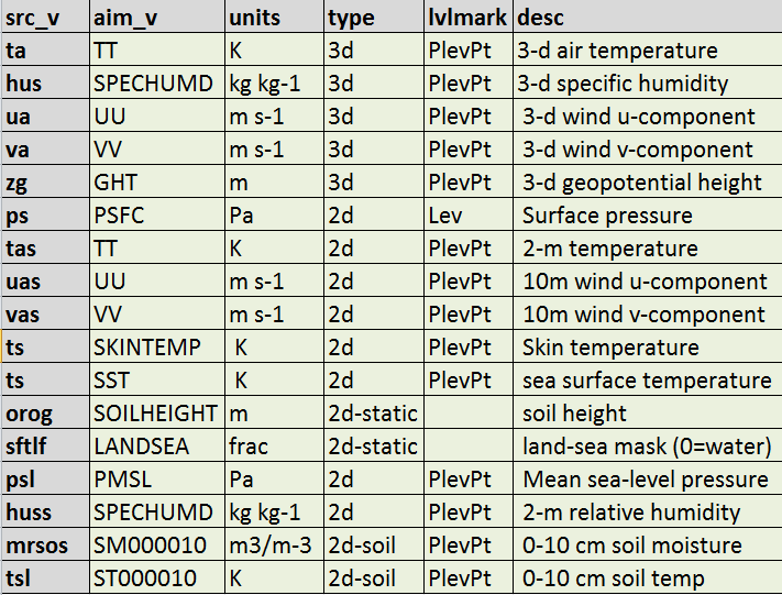
./db/${MODEL_NAME}.csv records the model-specified variable mapping table. If you plan to use other models, you need to setup your own variable mapping table.
src_v,aim_v,units,type,lvlmark,desc
ta,TT,K,3d,PlevPt,3-d air temperature
hus,SPECHUMD,kg kg-1,3d,PlevPt,3-d specific humidity
ua,UU,m s-1,3d,PlevPt, 3-d wind u-component
va,VV,m s-1,3d,PlevPt, 3-d wind v-component
zg,GHT,m,3d,PlevPt, 3-d geopotential height
ps,PSFC,Pa,2d,Lev, Surface pressure
tas,TT,K,2d,PlevPt, 2-m temperature
uas,UU,m s-1,2d,PlevPt, 10m wind u-component
vas,VV,m s-1,2d,PlevPt, 10m wind v-component
ts,SKINTEMP, K,2d,PlevPt, Skin temperature
ts,SST, K,2d,PlevPt, sea surface temperature
psl,PMSL,Pa,2d,PlevPt, Mean sea-level pressure
huss,SPECHUMD, kg kg-1,2d,PlevPt, 2-m relative humidity
mrsos,SM000010, m3/m-3,2d-soil,PlevPt, 0-10 cm soil moisture
tsl,ST000010,K,2d-soil,PlevPt, 0-10 cm soil temp
mrsos,SM010200, m3/m-3,2d-soilr,PlevPt, 10-200 cm soil moisture
tsl,ST010200,K,2d-soilr,PlevPt, 10-200 cm soil temp src_vis the name of the variable in the CMIP6 data, which is also used to form the netCDF file name.aim_vis the name of the variable archived in WRF intermidiate file, which is used bymetgrid.exe.unitsis the unit of the variable.typedenotes the type of the variable.3dmeans 3-d variable,2dmeans 2-d variable,2d-soilmeans 2-d variable in the soil layer. Note that forMPI-ESM-1-2-HR, the soil properties between 10-200cm is not provided by the model and we overwrote it by 0-10cm soil, a special type mark of2d-soilris provided here.lvlmarkis the level mark of the variable.PlevPtmeans the variable is a 3-d variable with pressure level.descis the description of the variable.
The core of the converter is cmip_handler.py. It is a Python module that handles the CMIP6 data and converts it to WRF intermidiate file. The module first load CMIP6 data according to the config.ini file, then it interpolates to regular latXlon mesh. Finally it convert the data to WRF intermidiate file. The module includes the following functions and classes:
Functions:
    gen_wrf_mid_template():
        Generate a WRF-Mid template dict for the WRF-Intermediate data.

    write_record(out_file, slab_dic):
        Write a record to a WRF intermediate file
    --------------------
    Classes:
    CMIPHandler():
        Construct CMIP Handler

        Methods
        -------
        __init__:   initialize CMIP Handler with config and loading data
        interp_data: interpolate data to common mesh
        write_wrfinterm: write wrfinterm file
According to WRF Users Guide (v4.2), P3-36:
Required Meteorological Fields for Running WRF
In order to successfully initialize a WRF simulation, the real.exe pre-processor requires a minimum set of meteorological and land-surface fields to be present in the output from the metgrid.exe program. Accordingly, these required fields must be available in the intermediate files processed by metgrid.exe.
CMIP6 data can be downloaded from the LLNL interface, after cross-check the variable list from MPI-ESM-1-2-HR and the WRF required variables, we have the following table:

You may setup your own variable mapping table in ./db/${MODEL_NAME}.csv if you want to use other models.
You can also contact Jeevanand Palanisamy ([email protected]) for any doubts and if the original developer is busy. His approach is different than mine