This section assumes you are created the project as described in Working with Laravel.
Before you do anything, add the project directory to git, commit and push. This provides a baseline that will track all changes from the base framework.
vagrant sshcd ~/projects/laravel-apigit initgit add .git commit -m "initial commit - laravel base project"git remote add origin https://github.com/YOUR_REPO/laravel-api.gitgit push -u origin master
In the last section I explained how to create the base Laravel project. The first step in a new project is to set the configuration as required.
Laravel's configuration is found in app/config/app.php. You can change your defaults here if you like, but anything that will vary per environment you'll want to implement using environment files. Environment files are stored in your project root and are named as .env.
By default, the debug and app_key values are set to use environment variables but you can modify anything to use this, like so:
'log' => 'single',
becomes:
'log' => env('LOG_CONFIG', 'single'),
Take a moment now to copy the .env.example file from the project root to .env. If you're developing in a team, leave the .env.example file in place and make sure it contains the same variables as your .env file, but with placeholder values. This is so it can be checked in to source control and used as a reference by team members to set up their own local version of the .env file.
Values to change:
debug: you can set this to true to enable detailed error logging when required. This setting must ALWAYS be false in Production. Set this to true in your .env file. url: set this to the url you'll be using to access the application, e.g. http://laravel-api.phplocal.dev. Convert this to an environment variable as described above and set it in .env. timezone: set this to the timezone that's most useful to you. It might be local time or server time. Convert this to an environment variable.
This file is where all the database connection information is stored. Again the key config values are set in .env. You can optionally remove all the database entries that you won't use. For example you may remove everything except for pgsql and redis.
There are several other config files, which we'll go through later.
Configuration describes how to work with Laravel's configuration. Laravel API includes a reference for all the classes used by Laravel. Lavavel Book has some good tutorials on advanced Laravel usage. Laracasts are screencasts showing a wide variety of Laravel topics.
Just like many other frameworks, laravel uses a single php file index.php to handle all requests. When index.php receives a request from the web server, the following will happen:
TO BE UPDATED FOR L5
- bootstrap/start.php runs - this detects the environment
- Service providers loaded - these provide services to your application
- app/start/*.php files are loaded - this initialises your application
- app/routes.php is loaded
- Application processes request and generates a Response object
- Web server sends response back to client.
This document will summarise the process for creating a Laravel application. I recommend reading the docs here too.
We're now ready to start building something unique. We will build out an endpoint to handle user registration, modification and authentication.
We'll use generators to scaffold out our models, controllers, and views.
This guide goes through the exact steps you need to do to implement this endpoint. As a reference I've included them in laravel-api-sample (coming soon)
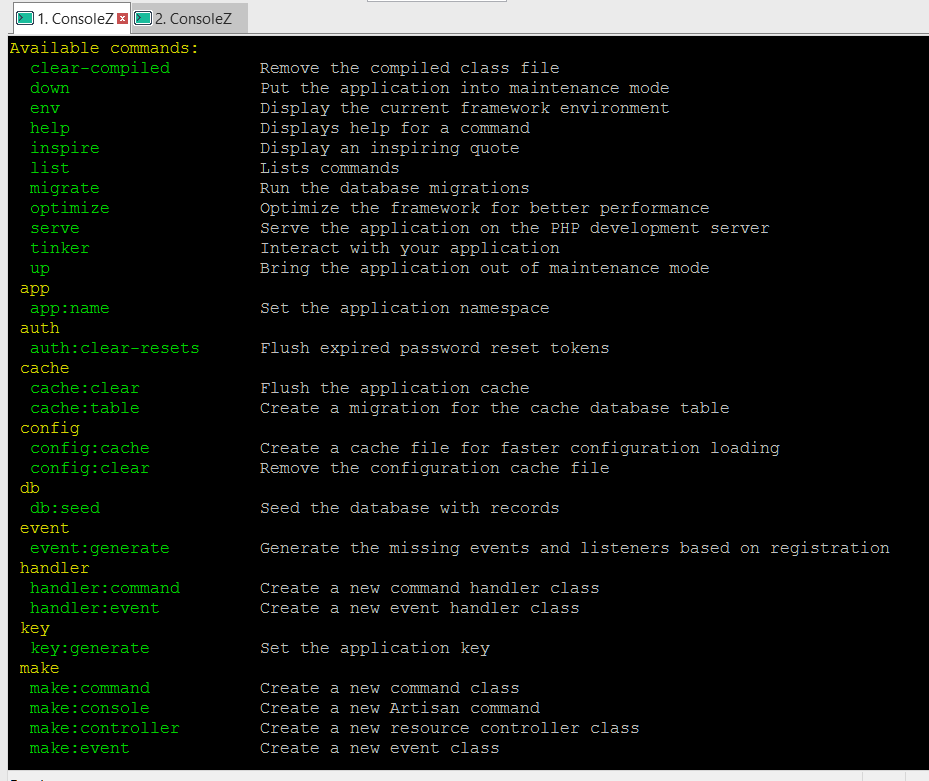
Laravel ships with a command line tool called artisan. Artisan lets you interact with your project in powerful ways. One of these ways is to perform 'scaffolding', which creates new code files based on templates.
To see the commands made available by the above Service Provider, type php artisan or just artisan from *dev_root/laravel-api/
Before we create a model, we need to create the migrations table in our database. The migrations table tracks the database changes by referencing migration classes.
artisan migrate:install
To create a model with a migration:
artisan make:model MyModel --migration
Migrations are created as PHP class files in project_root/database/migrations. Model classes are place in project_root/app/
artisan migrate