This section assumes that you're using Laravel Homestead.
- The purpose of the Homestead VM is to provide a consistent, configuration-managed environment for your Laravel development. Maximum productivity requires us to isolate ourselves from operating system configuration differences across our own, or our team's machines.
- You can use your favourite Windows-based PHP IDE to edit code via the Vagrant shared folders
- You will log in via
vagrant sshto run command line tasks, such asphp artisan
-
Within the homestead directory on your Windows PC (dev_root\homestead) type:
vagrant ssh -
Within the VM, type
cd ~/projects -
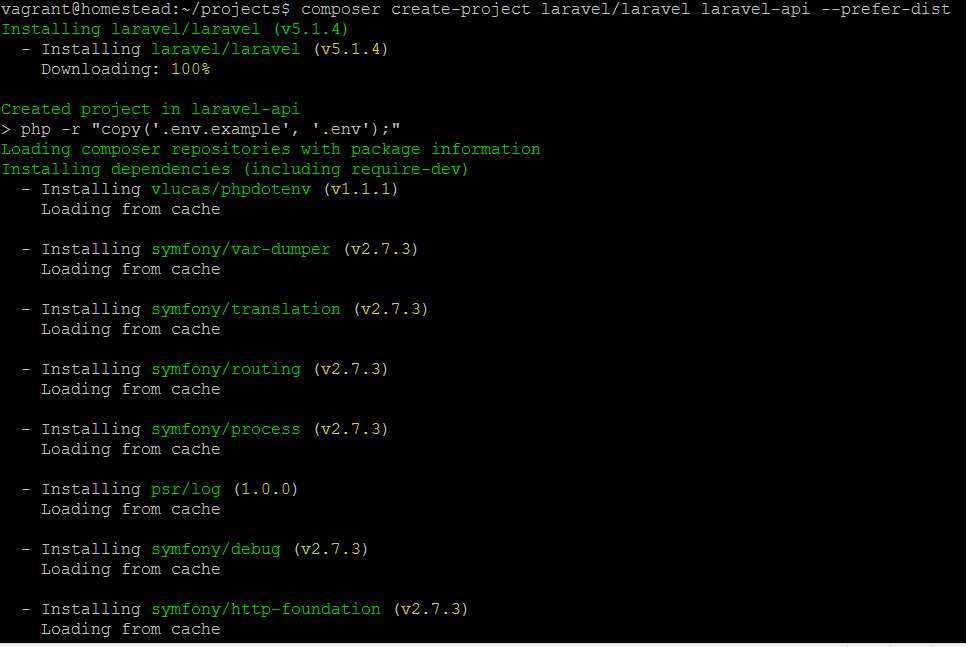
Create the Laravel project with composer:
composer create-project laravel/laravel laravel-api --prefer-dist.Composer will download the latest version of Laravel into your project directory. This will take a few minutes.
NOTE: If you checked out someone else's project from git, there are a couple of manual steps you need to do before you use the project:
cd ~/projects/laravel-apiartisan key:generatecp .env.example .env- Edit
.envand copy in the key generated above into the APP_KEY value
The above steps are done automatically during the above
composer create-projectcommand.

Let's make sure that everything is working. Open a browser and navigate to http://laravel-api.phplocal.dev or http://localhost:8000.
If all goes well, you should see:

Let's pause for a second and notice how awesome that is: a fully working PHP site with just a few commands. Yes, I know it took a whole chapter to set up vagrant, etc, but you only need to do that once! You didn't need to know anything about nginx config, PHP config, MySQL config, and the list goes on. It just works! And it's not just any PHP site. It's a well-constructed, easy to configure, MVC-based site. Welcome to 2015.
Note: since the VirtualBox VM's IP address is mapped to laravel-api.phplocal.dev in your hosts file, you can use this directly.
If you don't want to bother with hosts mapping, you can use localhost and the ports that Vagrant has automatically mapped.
Based on the Vagrant configuration, port 8000 on your machine has been forwarded (by VirtualBox) to port 80 on the VM, so you could also access the above site at: http://localhost:8000
For reference the full list of mapped ports is:
- SSH: 2222 -> Forwards To 22
- HTTP: 8000 -> Forwards To 80
- MySQL: 33060 -> Forwards To 3306
- Postgres: 54320 -> Forwards To 5432
Note: All code within your VM will use the ports on the right. When accessing ports on your development machine, use the ports on the left.
Here are a couple of common gotchas:
-
You browse to
your.local.domainand receive the error message "No input file specified".This means that nginx passed a non-existent path to PHP-FPM.
Go to your
Homestead.yamlfile and check the folder mapping.
The idea of the VM is that you can use your Windows PC to do PHP coding, using your preferred IDE. This is made possible by the shared folders features in Vagrant.
You will ssh into the VM to perform tasks such as:
- Running composer to update dependencies
- Running scripts to create database tables
Vagrant makes it easy to ssh into a box. All you have to type is vagrant ssh from the homestead directory. In the last section, this was set to **dev_root**\homestead\. SSH works because we installed Git earlier - Git includes an ssh client for Windows.
If you receive an error from vagrant regarding no ssh executable in your path, and you have used msysgit, you'll most likely need to add c:\program file (x86)\git\bin to your path environment variable (mine is in the System PATH variable.)
There is nothing to configure but you may like to set your local timezone so that log timestamps will make more sense:
timedatectl list-timezones
sudo timedatectl set-timezone Country/City [choose from above list]
By default there will be a database called homestead on MySQL and Postgres already created.
To get to the MySQL database, all you have to do is connect your Windows database development tool to 127.0.0.1:33060. Inside the VM, you can use mysql -uhomestead -psecret
The default username and password is set in the .env file created by the composer installer. (They are homestead / secret in case you need to know.)
You will want to add new sites as time progresses. The easiest way to do this is add the sites to dev_root/homestead/Homestead.yaml and run vagrant provision. This will re-configure the VM to add those sites.
The above composer package installed a base Laravel application in the laravel-api directory. This is how it's laid out:
- app/ -> Your application code
- bootstrap/ -> PHP code to initialise the application on each request
- config/ -> Application configuration
- vendor/ -> 3rd party components used by the application
- public/ -> the root directory served by the web server
The project root contains files describing the project, such as composer.json, readme.md, etc.
A great feature of Laravel is the fact that it relies on Composer. This means you have very easy access to any of the packages on packagist or actually any repository on github that contains a composer.json file!
To add a package, just edit the composer.json file and add the package to the "require" or "require-dev" elements. In general, require-dev packages are those that won't be deployed to the Production server.
When adding a package that is available in packagist, you only have to add the require line.
If you want to add a package from github, you have to add an entry to the "repositories" array.
e.g.
   "require": {
         "php": ">=5.5.9",
         "laravel/framework": "5.1.*"
         "laravel/framework": "4.2.*",
         "league/oauth2-server": "4.0.*@dev",
         "lucadegasperi/oauth2-server-laravel": "dev-rewrite"
      },
      "require-dev": {
         "fzaninotto/faker": "~1.4",
         "mockery/mockery": "0.9.*",
         "phpunit/phpunit": "~4.0",
         "phpspec/phpspec": "~2.1"
         "rtablada/package-installer": "dev-master",
         "barryvdh/laravel-debugbar": "1.*",
         "guzzlehttp/guzzle": "~4.0"
      },
      "repositories": [
         {
         "type": "vcs",
         "url": "https://github.com/lucadegasperi/oauth2-server-laravel"
         }
      ],
Once you've edited composer.json, run composer update from your project root.
Someone has created a Laravel package installer which allows package installation with one command line entry.
-
Install the Laravel package installer, add the folllowing to composer.json, in the "require-dev" block:
"rtablada/package-installer": "dev-master" -
Add the following service provider in app/config/app.php:
'Rtablada\PackageInstaller\PackageInstallerServiceProvider'
Now to add a package you can simply type:
php artisan package:install author/package_name:version
e.g.
php artisan package:install lucadegasperi/oauth2-server-laravel:1.0.*
The next section Building an Application with Laravel for the next steps.
If you run vagrant provision from your development PC when the Homestead VM is running, it will refresh the configuration. As part of this it will update composer to the latest version.
To do this manually, just type sudo composer self-update from within the Homestead VM.
Homestead is configured to allow xdebug debugging with no extra setup. The only change I had to make was to allow connections from the Homestead Vagrant VM (192.168.10.10) to port 9000 on my Windows Host (192.168.10.1). This allows the xdebug extension running on the Homestead VM to connect to your development PC and send the debug information to your PHP IDE.
Here are instructions for debugging with xunit in Sublime Text 3 and PHP Storm.