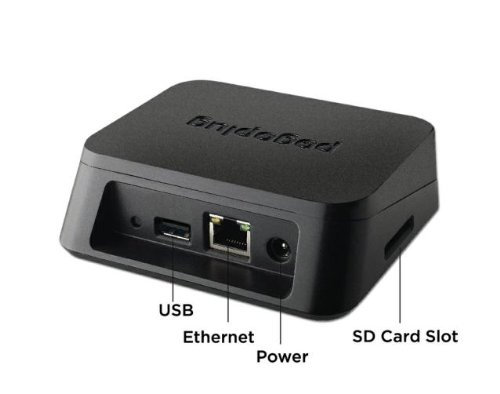
A script which installs uboot onto a Pogoplug Mobile or Pogoplug Series 4 (allowing you to boot Linux from USB or SD card).
From the command-line of your pogoplug:
cd /tmp
wget http://ssl.pepas.com/pogo/uboot.sh
ash uboot.sh
UPDATE: Pogoplug, Inc. has disabled the ability to gain ssh access to pogoplugs. This means you'll have to crack the case open and use a USB-to-serial converter to get a command-line on the pogoplug.
- Connect the GND, TX, and RX pins of your USB-serial converter to the pogoplug (using solder, or just hold them in place)
- Plug the USB-serial converter into a Linux laptop
- On the Linux laptop, open up a terminal and run
screen /dev/ttyUSB0 115200,cs8,-parenb,-cstopb,-hupcl - Boot the pogoplug
For a complete walk-through of connecting via USB-to-serial converter, see #4 (comment)
Meet the Pogoplug Mobile, a $10 Linux server:
- 800MHz ARMv5TE processor
- 128MB of RAM
- an Ethernet port
- a USB 2.0 slot
- an SD card slot
- 128MB of built-in flash
Also included with the Pogoplug:
- 12V/1A power adapter
- 3 foot ethernet cable
UPDATE: I have verified this script also works with the Pogoplug Series 4. Twice the price, with the addition of a SATA port and two addition USB ports (and a 12V/2A power adapter).
So, you ordered a Pogoplug Mobile from amazon.com and it just arrived.
Here's what you do:
- Plug it into your local network and turn it on (connect the power supply).
The Pogoplug will boot its busybox-based Linux install and try to grab a DHCP address.
- Figure out what IP address it got from DHCP.
If you run your own DHCP server, check your logs.
If DHCP is managed by your wifi router, use nmap:
nmap -sn 192.168.2.*
The Pogoplug will try to inform your DHCP server that its hostname is PogoplugMobile, so you should see something like this in the output of nmap:
Starting Nmap 6.47 ( http://nmap.org ) at 2015-10-07 21:01 CDT
...
Nmap scan report for PogoplugMobile.localnet (192.168.2.204)
Host is up (0.017s latency).
...
- Start SSH on the Pogoplug
The Pogoplug's stock busybox-based Linux distro ships with the dropbear SSH daemon installed, but it isn't running by default. Luckily, you can start it by sending an HTTP POST to the Pogoplug's web interface.
If your local network supports resolving the Pogoplug's default hostname of PogoplugMobile, you can run this curl command:
curl -k "https://root:ceadmin@PogoplugMobile/sqdiag/HBPlug?action=command&command=dropbear%20start"
Otherwise, you'll have to stick it's IP address in there, e.g.:
curl -k "https://root:[email protected]/sqdiag/HBPlug?action=command&command=dropbear%20start"
The curl command will spit out a bunch of HTML in your terminal. That means it worked.
- SSH into the Pogoplug
Again, if you can resolve the Pogoplug's default hostname, run this:
ssh root@PogoplugMobile
Otherwise, use it's IP address, e.g.:
The stock root password is ceadmin.
- Download and run the script
cd /tmp
wget http://ssl.pepas.com/pogo/uboot.sh
ash uboot.sh
Here's what the script does (have a look: http://git.io/vCtIl):
- Prompt you to verify the Pogoplug's MAC address
- (it is printed on a sticker on the underside of your Pogoplug)
- Download some flash utility binaries
- Download some uboot binary blobs
- Burn uboot into flash
- (it will prompt you for permission to do this)
- Burn uboot's default settings into flash
- (it will prompt you for permission to do this)
- Tweak a bunch of firmware settings in the flash
poweroffthe Pogoplug- (it will prompt you for permission to do this)
After rebooting, your Pogoplug will be able to do the following:
- Boot the stock Pogoplug OS
- (just disconnect any USB drive and SD card and turn it on)
- Boot your Linux distro of choice from USB or SD card
- (uboot expects a bootable ext3 partition labelled 'rootfs')
Note: If you are rebooting back into the stock Pogoplug Linux install, don't freak out when you can't ssh into it anymore. You have to run that curl command again every time it boots into its stock OS.
Note: If you are running this script on several Pogoplugs and get tired of answering all of the prompts, you can instead tell the script to assume yes to all prompts via ash uboot.sh -y.
This script is based on the instructions in Qui's blog post: http://blog.qnology.com/2014/07/hacking-pogoplug-v4-series-4-and-mobile.html
Qui's work was in turn based on work from the crew at the doozan forums: http://forum.doozan.com/
Q: Why aren't you using a github URL in the above instructions?
A: It turns out the version of wget (busybox) which ships with the Pogoplug doesn't do HTTPS at all, and github now forces all HTTP traffic onto HTTPS, which causes wget to fail like so:
# wget -O - http://git.io/vCtIl
Connecting to git.io (54.225.117.235:80)
wget: not an http or ftp url: https://raw.githubusercontent.com/pepaslabs/pogoplug_mobile_uboot_installer/master/pogoplug_mobile_uboot_installer.sh
Q: I'd like to verify the contents of the script before running it.
A: Run this:
md5sum -c - << EOF
31a14c72b25b54e458063cdc6a8c788e  uboot.sh
EOF
- Verified the script also works with the Pogoplug Series 4 (model POGO-V4-A3-01).
- Initial version of script. Verified to work the Pogoplug Mobile (models POGO-V4-A1-01 and POGO-V4-A1-05).
You may also be interested in my other Pogoplug github projects:

