This example shows you generic AI / ML workflow through lifecycle - exploration, train, tune, and publishing - with Azure Machine Learning (AML) API.
There exist 2 options to run Azure Machine Learning (AML) API - CLI/YAML and Python SDK.
CLI / YAML (v2)
- Exercise01 : Login Azure
- Exercise02 : Prepare Data
- Exercise03 : Just Train in Your Working Machine
- Exercise04 : Train on Remote GPU Virtual Machine
- Exercise05 : Distributed Training
- Exercise06 : Track Logs and Metrics
- Exercise07 : Hyperparameter Tuning
- Exercise08 : Publish as a Web Service
- Exercise09 : ML Pipeline (MLOps Integration)
Python SDK (v2)
- Exercise01 : Initialize Client
- Exercise02 : Prepare Data
- Exercise03 : Just Train in Your Working Machine
- Exercise04 : Train on Remote GPU Virtual Machine
- Exercise05 : Distributed Training
- Exercise06 : Track Logs and Metrics
- Exercise07 : Hyperparameter Tuning
- Exercise08 : Publish as a Web Service
- Exercise09 : ML Pipeline (MLOps Integration)
Python SDK (v1)
Note : When you are new to Azure Machine Learning, use v2 API.
- Exercise01 : Prepare Config Settings
- Exercise02 : Prepare Data
- Exercise03 : Just Train in Your Working Machine
- Exercise04 : Train on Remote GPU Virtual Machine
- Exercise05 : Distributed Training
- Exercise06 : Track Logs and Metrics
- Exercise07 : Hyperparameter Tuning
- Exercise08 : Publish as a Web Service
- Exercise09 : ML Pipeline (MLOps Integration)
You can also use raw REST API for invoking AML API.
Create new "Machine Learning" resource in Azure Portal .
Note : When you use GPU instance in Exercise04, please specify the location (region) for machine learning resource, in which you can run GPU virtual machine.
See Exercise04 for details.
We run code with TensorFlow in Exercise03.
Here I use Ubuntu Server 20.04 LTS in Microsoft Azure for client, in which Python 3.8 is already installed.
-
Create Ubuntu Server 20.04 LTS virtual machine resource in Azure Portal.
-
Please make sure that Python 3.8 is installed on Ubuntu.
# Check version
python3 -V
### # Set python3.8 as default python command (Here I assume /usr/bin/python3.8)
### sudo update-alternatives --install /usr/bin/python python /usr/bin/python3.8 1
- Install and upgrade pip3 as follows.
sudo apt-get update
sudo apt-get install -y python3-pip
sudo -H pip3 install --upgrade pip
- In this tutorial, we run all exercises in IPython notebook.
Install Jupyter as follows.
pip3 install jupyter
- Install the required packages for Exercise03. (Use "tensorflow-gpu" instead, when using GPU VM.)
pip3 install matplotlib tensorflow==2.10.0
Note : When you use Azure Machine Learning compute instance, install packages in terminal.
Choose the following settings (3A, 3B, or 3C), depending on which API (CLI/YAML or Python SDK) you use.
For running AML CLI/YAML, install Azure Machine Learning CLI extension version 2.0 or above as follows.
- Install Azure CLI (version 2.15 or above) as follows. (See here for details.)
curl -sL https://aka.ms/InstallAzureCLIDeb | sudo bash
Note : To see the installed Azure CLI version, run
az --version.
- Install AML CLI extension as follows.
az extension add --name ml --version 2.12.1
For running AML Python SDK v2, install Python SDK version 2 as follows.
pip3 install azure-ai-ml==1.2.0 azure-identity==1.12.0
For running AML Python SDK v1, install Python SDK version 1 and depending other packages as follows.
Azure Machine Learning (AML) provides core package (azureml-core) and as well as extension packages. Depending on tasks, you should install addtional extensions. (For instance, if you want to run automated machine learning in AML, you should install automl extension package (azureml-train-automl) as well.)
In this tutorial, we use AML interactive widget's extension (azureml_widgets) used in Exercise 06, and AML train core extension (azureml-train) used in Exercise 07, and pipeline extensions (azureml-pipeline-core and azureml-pipeline-steps) used in Exercise 09.
Install the required Python packages as follows.
# Install AML SDK Core
pip3 install azureml-core

# Install AML interactive widgets extension
pip3 install azureml-widgets

# Install AML train extension (including HyperDrive package)
pip3 install azureml-train

# Install AML dataset extension
pip3 install azureml-dataset-runtime

# Install AML pipeline extension
pip3 install azureml-pipeline-core azureml-pipeline-steps
Note : AML widget's extension is installed as Jupyter notebook extension.
Runjupyter nbextension listto see the installed Jupyter extensions.
Clone this repository in your working environment.
git clone https://github.com/tsmatz/azureml-tutorial
- Start Jupyter notebook as follows. (Please re-login to take effect for "jupyter" path.)
This will show the access url in console, such ashttp://localhost:8888/tree?token=xxxxxxxxxx.
(The default port is 8888.)
jupyter notebook
-
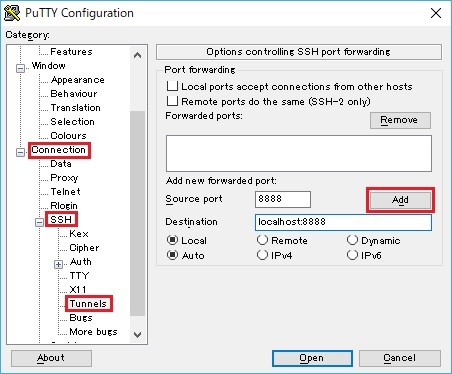
Connect to Ubuntu server with SSH tunnel (port forwarding) from your working desktop in order to access notebook URL.
For instance, the following is the SSH tunnel setting on "PuTTY" terminal client in Windows. (You can usessh -Loption in Mac OS.)
-
Copy the notebook URL (
http://localhost:8888/?token=...) in the console output (see above) and open this address with your web browser.
See my post "Azure Machine Learning Walkthrough and Key Features" for feature's overview in Azure Machine Learning.
Tsuyoshi Matsuzaki @ Microsoft
