Install
SOL features a very simple installation procedure.
Users can either install the C++ executables or python scripts. They provide similar interfaces (sol_train for training and sol_test for testing). To choose the best method:
-
If you are working on C/C++ or other non-python languages, you should choose the C++ executables and dynamic libraries.
-
If you are a python worker, then just try the python scripts.
NOTE:
Both the python scripts and C++ executables & Libraries are dependent on the same C++ codes.
The project is managed by CMake. There exists a CMakeLists.txt in the root directory of SOL. Note that all the following are tested on "CMake 2.8.12". Lower versions of cmake may work, but are not ensured.
###Getting the code
The latest version of SOL is always available via "github" by invoking one of the following:
# For the traditional ssh-based Git interaction:
$ git clone git://github.com/LIBOL/SOL.git

# For HTTP-based Git interaction
$ git clone https://github.com/LIBOL/SOL.gitThe following steps have been tested for Ubuntu 14.04, Centos 6.6 (with "devtoolset-2" installed for the latter one), and OS X 10.10, but should work with other Unix like distributions as well, as long as it provides a "C++11" compiler.
- g++(>=4.8.2) or clang++(>=3.3);
- CMake 2.8.12 or higher;
- Navigate to the root directory of SOL and create a temporary directory to put the generated project files, as well the object files and output binaries.
$ cd SOL && mkdir build && cd build- Generate and build the project files.
$ cmake ..
$ make -j
$ make install- For Xcode users, the command is:
$ cmake -G"Xcode" ..By default, SOL will be installed in the directory "SOL/dist". If you want to change the installation directory, set the "PREFIX" variable when using "cmake".
$ cmake -DPREFIX=/usr/local ..The following steps have been tested on Visual Studio 2013 and Visual Studio 2015. Lower versions of Visual Studio do not provide full support of C++11 features.
- Visual Studio 2013, 2015, or higher
- CMake 2.8.12 or higher
-
Navigate to the root directory of SOL and create a temporary directory to put the generated project files, as well the object files and output binaries. Then follow either Step 2 or Step 3.
-
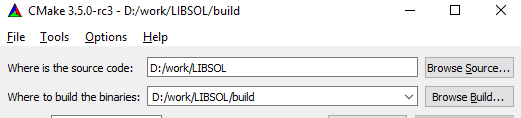
Install with CMake GUI.
-
Open cmake-gui.exe, set "where is the source code" and "where to build the binaries".
-
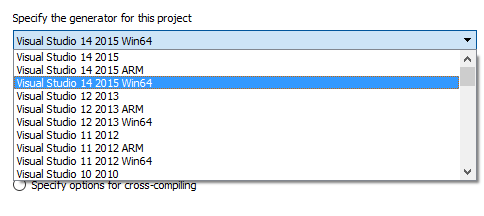
Click Configure and select compiler.
-
After finish configuration, click Generate.

-
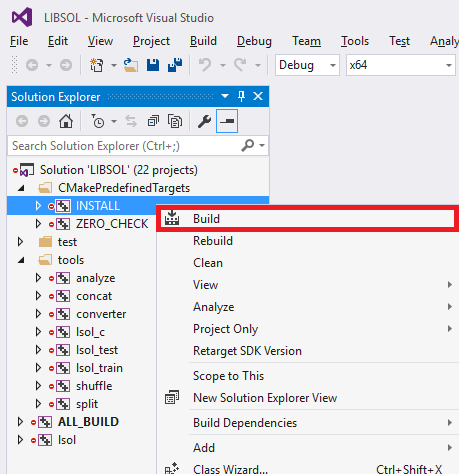
Open SOL.sln, Rebuild the ALL_BUILD project and then build the INSTALL project.

-
Install from command line.
Before this step, you should make sure that cmake is in the environment path or set environment path manually as step (3) shows.
-
Search cmd in "Start Menu" and open it.
-
Navigate to the root directory of SOL and create a temporary directory to put the generated project files, as well the object files and output binaries.
$ cd SOL && mkdir build && cd build- If cmake is not in environment path, add by executing the following command:
$ set path=<path_to_cmake>;%path%- Generate Visual Studio Projects. Example code for Visual Studio 2013, 2015 and their 64-bit versions are as the following shows:
#Generate Visual Studio 2013 Projects
$ cmake  -G "Visual Studio 12 2013" ..
#Generate 64-bit Visual Studio 2013 Projects
$ cmake  -G "Visual Studio 12 2013 Win64" ..
#Generate Visual Studio 2015 Projects
$ cmake  -G "Visual Studio 14 2015" ..
#Generate 64-bit Visual Studio 2015 Projects
$ cmake -G "Visual Studio 14 2015 Win64" ..- Open SOL.sln, Rebuild ALL_BUILD project and then build INSTALL project.
We highly recommend users to install python packages in a virtual enviroment.
-
Prerequisites
- C++11 Compiler:
- g++(>4.8.2) or clang++(>3.3) on Unix/Linux/MinGW/Cygwin
- Visual Studio 2013 or higher on Windows
- Python2.7 (Anaconda is highly recommend on Windows)
- C++11 Compiler:
-
For on Unix/Linux/MacOS Users
-
Create and Activate a new virtual environment
$ virtualenv --system-site-packages pyenv $ source pyenv/bin/activate -
Build and install the python scripts
  $ python setup.py build
  $ python setup.py install
-
-
For Windows Users
Windows Users still need Visual Studio to compile the codes. Besides, we high recommend to install Anaconda as the python environment. If you are a Canopy user, the procedures are similar except for the creation of virtual environment.
-
Open a Command Prompt and go to the source directory
$ cd <SOL> -
Create and Activate a new virtual enviroment
$ virtualenv --system-site-packages pyenv $ pyenv/Scripts/activate -
Set up the build environment
By default, Anaconda requires the Visual C++ 9.0 (Visual Studio 2008) to compile the native codes. However, this is a very old compiler. We recommend to use the following tricks to user new visual studio compilers.
$ cd <Anaconda>\Lib\distutils $ backup msvc9compiler.py $ open msvc9compiler.py $ find the line 'majorVersion=int(s[:2]) - 6' $ change the line to 'majorVersion=12' for Visual Studio 2013 or $ change the line to 'majorVersion=14' for Visual Studio 2015 or -
Build and install the python scripts
$ python setup.py build $ python setup.py install -
Revert the changes to Anaconda if you are not sure its influences in the future.
-
-
On MacOS, the default python is not a framework build. Seems matplotlib does not work properly. See here for more details. We recommend the Anaconda python distribution.
-
On MacOS, if you met the 'Value Error: unknown locale: UTF-8' error, fix by:
  $ export LC_ALL=en_US.UTF-8
  $ export LANG=en_US.UTF-8