Getting Started Guide
Welcome to the NetFPGA-SUME getting started guide!
This guide is for new users. It covers:
- System Requirements.
- Downloading the code repository.
- Installation.
- Testing your board.
- What to do next!
Let's get started...
In principle, any operating system that is supported by the Xilinx Vivado Design Suite should work for composing and synthesizing the IP in the code base. However, please note that the NetFPGA team develops strictly on Linux. While hardware composition and synthesis can be done on any platform which runs the Xilinx tools, software components of the NetFPGA-SUME platform have been and will continue to be developed initially for Linux. Special care is needed for installing the driver on Linux Operating Systems. The Reference Operating System page will provide you instructions about how to set up the development system.
To do any development you will need the Xilinx Vivado Design Suite. Please note that (until the SUME project is stable) the NetFPGA team strives to always use the latest version of the tools, and we strongly advise all other developers to do the same. At the time of writing, the version for the latest repo is Xilinx Vivado Design Suite 2020.1.
In order to build bitstreams, you must have a valid license for Xilinx 10G MAC. For more information on how to acquire and install, see Licensing Page
The NetFPGA-SUME board has four SFP+ connectors for 10Gb Ethernet. The IP core supports 10GBASE-SR/LR transceivers. The transceiver we used in development is AVAGO AFBR-709SMZ with Multimode OM3 10Gb Fibre.
The NetFPGA-SUME board works both standalone and inside a host. If you intend to use the NetFPGA-SUME board in a host, you need to make sure that the motherboard supports PCI Express Gen3 x8 configuration. It is recommended to have an up-to-date firmware on your motherboard. For some motherboards, you may need to set the PCI Express configuration to Gen3 in the BIOS configuration manually.
You need a micro-USB cable to access the JTAG chain or serial port of the reference design. You can also use a Xilinx Platform Programming cable to access the JTAG chain on board.
Prior to accessing code, we need you to register here. We do this to understand who is using NetFPGA-SUME, so please give as complete answers as you can. The better usage we can show, the more support we can motivate our sponsors to provide. Feel free to explore the wiki, it is publicly readable.
Continue on from here once you have registered.
The code base for NetFPGA-SUME board is available as a git repository hosted on GitHub.
After you have gained access to the repository, change into your desired directory and execute the following command:
git clone [email protected]:NetFPGA/NetFPGA-SUME-live.git
For more information about git and GitHub in general, please consult GitHub help.
The NetFPGA-SUME package contains the following:
- NetFPGA-SUME board
- A micro-USB cable
- 4 unique MAC address stickers (one per 10G SFP+ Ethernet port)
Below is an image of the NetFPGA-SUME board, out of the box:
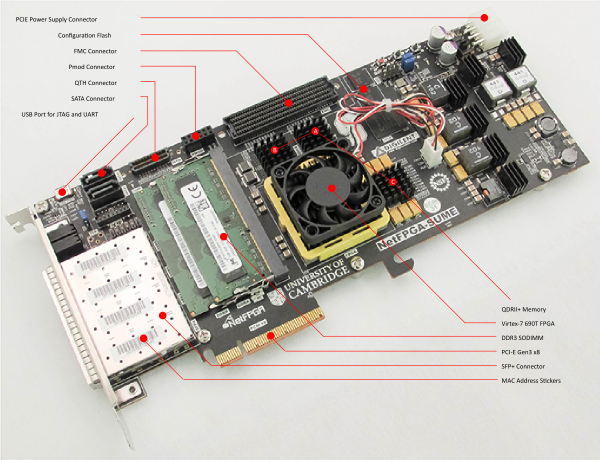
The NetFPGA-SUME board is pre-configured with a manufacturing production test project. The board can be powered up either in a stand alone mode or within a host. The following instructions apply to both modes:
- Plug a PCI-E 2x3/2x4-pin power connector into the 2x4-pin PCI Express Auxiliary Power receptacle (header J14)
- Connect the USB-JTAG port (J16, marked by a "USB JTAG" label) on NetFPGA-SUME board to your PC with the micro-USB cable
- Turn on the power switch (SW1)
- You should see Power LED (LD10) and DONE LED (LD4) turn on immediately. This is an indication of functioning power circuit and FPGA configuration circuit.
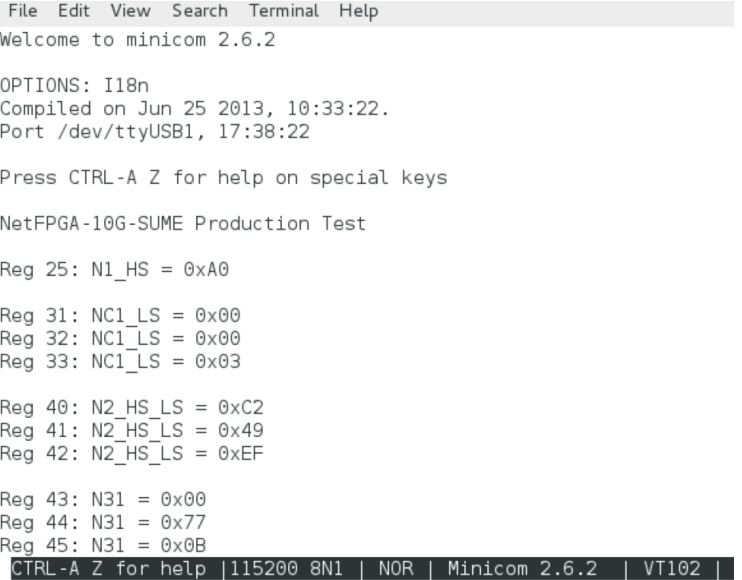
- Communicate with the board through hyper-terminal by opening the corresponding serial port with a baud rate of 115200, 8 data bits, 1 stop bit, no parity checking, and no flow control. An operating UART interface also indicates a functioning programming interface. In the following image, minicom is used as the hyper-terminal program in Linux to open the serial port /dev/ttyUSB1.
- The NetFPGA group is still working on an acceptance test project for users to fully verify their boards with minimum amount of external test fixtures. We will update as soon as we finalize the production test project. The new production test project will be available at the NetFPGA-SUME-live repository.
Currently, there are no known issues. We are looking forward to your feedback after you get the board. And we will populate this list as issues are reported along the way.