VirtTestDocumentation
Contents
- Autotest Introduction
- Quickstart
- Test Execution
- Cartesian Configuration
- Default Configuration Files
- Configuration Parameter Reference
- Virtualization Autotest Architecture
- Test writing Example
- Build tests and unittests
- Collaboration
- Contributions
It is critical for any project to maintain a high level of software quality, and consistent interfaces to other software that it uses or uses it. Autotest is a framework for fully automated testing, that is designed primarily to test the Linux kernel, though is useful for many other functions too. It includes a client component for executing tests and gathering results, and a completely optional server component for managing a grid of client systems.
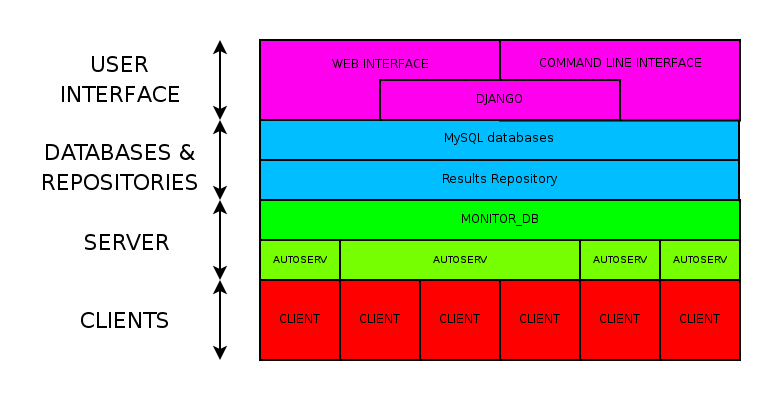 Autotest high level components
Job data, client information, and results are stored in a MySQL database, either locally or on a remote system. The Autotest server manages each client and it’s test jobs with individual “autoserv” processes (one per client). A dispatcher process “monitor_db”, starts the autoserv processes to service requests based on database content. Finally, both command-line and a web-based graphical interface is available.
The Autotest client can run either standalone or within a server harness. It is not tightly coupled with the autotest server, though they are designed to work together. Primary design drivers include handling errors implicitly, producing consistent results, ease of installation, and maintenance simplicity.
KVM-Autotest is a suite of tests for the Autotest client, which directly
exercise the lower-level qemu binaries. Libvirt-Autotest, while very
similar in many respects, relies on the higher-level virsh, and
virt-install utilities. The majority of KVM-Autotest documentation
also applies to Libvirt-Autotest, though there are some differences.
A number of helpful command-line utilities are provided along with the Autotest client. Depending on the installation, they could be located in various places. The table below outlines some of them along with a brief description.
| Name | Description |
|---|---|
autotest-local |
The autotest command-line client. |
cartesian_config.py |
Test matrix configuration parser module and command-line display utility. |
scan_results.py |
Check for and pretty-print current testing status and/or results. |
html_report.py |
Command-line HTML index and test result presentation utility. |
get_started.py |
Quickstart helper script. |
For developers, there are a separate set of utilities to help with writing, debugging, and checking code and/or tests. Please see section development_tools for more detail.
Within a full-blown production testing grid, an Autotest server takes care of provisioning client systems and establishing operating environments. Many GNU/Linux distributions can be used as a server or client, however this guide and the default test-set assumes the autotest client is running on a recent Fedora system. It's highly recommended to begin with a fresh, defaults-based, Fedora install.
The following commands will ensure needed software is available:
[root@localhost ~]# yum groupinstall -y "Development Libraries" "Development Tools" "Virtualization" "Virtualization Client" "Virtualization Tools”
[root@localhost ~]# yum install -y dnsmasq genisoimage mkisofs python-imaging gdb boost-devel glibc-devel libvirt python-devel ntpdate gstreamer-plugins-good gstreamer-python
Next, download and install autotest. For example, use git to clone the latest version under `` /usr/local``:
[root@localhost ~]# git clone git://github.com/autotest/autotest.git /usr/local/autotest
Initialized empty Git repository in /usr/local/autotest/.git/
...
There are two get_started.py helper scripts to assist with setting
up and verifying the client environment. One is specific to
KVM-Autotest, the other is for Libvirt-Autotest.
[root@localhost autotest]# client/tests/kvm/get_started.py
or
[root@localhost autotest]# client/tests/libvirt/get_started.py
Either script may be run as many times as necessary, to setup or verify the client environment. For example:
[root@localhost autotest]# cd client
[root@localhost client]# tests/libvirt/get_started.py
16:16:49 INFO | libvirt test config helper
16:16:49 INFO |
16:16:49 INFO | 1 - Verifying directories (check if the directory structure expected by the default test config is there)
16:16:49 DEBUG| Creating /tmp/libvirt_autotest_root/images
16:16:49 DEBUG| Creating /tmp/libvirt_autotest_root/isos
16:16:49 DEBUG| Creating /tmp/libvirt_autotest_root/steps_data
16:16:49 INFO |
16:16:49 INFO | 2 - Creating config files from samples (copy the default config samples to actual config files)
16:16:49 DEBUG| Config file /usr/local/autotest/client/tests/libvirt/tests.cfg exists, not touching
16:16:49 DEBUG| Config file /usr/local/autotest/client/tests/libvirt/build.cfg exists, not touching
16:16:49 DEBUG| Config file /usr/local/autotest/client/tests/libvirt/cdkeys.cfg exists, not touching
16:16:49 DEBUG| Config file /usr/local/autotest/client/tests/libvirt/base.cfg exists, not touching
16:16:49 DEBUG| Config file /usr/local/autotest/client/tests/libvirt/guest-hw.cfg exists, not touching
16:16:49 DEBUG| Creating config file /usr/local/autotest/client/tests/libvirt/subtests.cfg from sample
16:16:49 DEBUG| Config file /usr/local/autotest/client/tests/libvirt/virtio-win.cfg exists, not touching
16:16:49 DEBUG| Creating config file /usr/local/autotest/client/tests/libvirt/guest-os.cfg from sample
16:16:49 INFO |
16:16:49 INFO | 3 - Verifying iso (make sure we have the OS ISO needed for the default test set)
16:16:49 WARNI| File /tmp/libvirt_autotest_root/isos/linux/Fedora-16-x86_64-DVD.iso not found
16:16:49 WARNI| Expected SHA1 sum: 76dd59c37e9a0ec2af56263fa892ff571c92c89a
16:16:49 INFO | Would you like to download it from http://download.fedoraproject.org/pub/fedora/linux/releases/16/Fedora/x86_64/iso/Fedora-16-x86_64-DVD.iso? (y/n) n
16:16:53 WARNI| Missing file /tmp/libvirt_autotest_root/isos/linux/Fedora-16-x86_64-DVD.iso
16:16:53 WARNI| Please download it or put an existing copy on the appropriate location
16:16:53 INFO |
16:16:53 INFO | 4 - Verifying winutils.iso (make sure we have the utility ISO needed for Windows testing)
16:16:53 INFO | In order to run the KVM autotests in Windows guests, we provide you an ISO that this script can download
16:16:53 WARNI| File /tmp/libvirt_autotest_root/isos/windows/winutils.iso not found
16:16:53 WARNI| Expected SHA1 sum: 02930224756510e383c44c49bffb760e35d6f892
16:16:53 INFO | Would you like to download it from http://people.redhat.com/mrodrigu/kvm/winutils.iso? (y/n) n
16:16:55 WARNI| Missing file /tmp/libvirt_autotest_root/isos/windows/winutils.iso
16:16:55 WARNI| Please download it or put an exsiting copy on the appropriate location
16:16:55 INFO |
16:16:55 INFO | 5 - Checking if the appropriate userspace programs are installed
16:16:55 DEBUG| /usr/bin/virt-install present
16:16:55 INFO | If you wish to change any userspace program path, you will have to modify tests.cfg
16:16:55 INFO |
16:16:55 INFO | When you are done fixing eventual warnings found, you can run the test using this command line AS ROOT:
16:16:55 INFO | /usr/local/autotest/client/bin/autotest /usr/local/autotest/client/tests/libvirt/control
16:16:55 INFO | Autotest prints the results dir, so you can look at DEBUG logs if something went wrong
16:16:55 INFO | You can also edit the test config files
Note:
- For KVM-Autotest, the base root directory would be
/tmp/kvm_autotest_root/ - Only non-existent configuration files were copied over from their
*.sample.cfgsource. i.e. customization will not be lost. - I answered "no" to the image downloads because I have my images on an
NFS export. I'll symlink them into
/tmp/libvirt_autotest_root/isos/linux/afterward. Also, I'm not going to do any windows testing, so I did not download winutils.iso.
Once the get_started.py script runs without any warnings or errors,
the default test may be executed. Both KVM and libvirt default test
includes a guest installation test, a reboot test, and a shutdown test.
Test status is written into the file client/results/default/status
- KVM-Autotest:
[root@localhost ~]# cd /usr/local/autotest/client
[root@localhost client]# bin/autotest run kvm
- Libvirt-Autotest:
[root@localhost ~]# cd /usr/local/autotest/client
[root@localhost client]# bin/autotest run libvirt
- A debug log is written to the file
client/results/default/debug/client.DEBUG - There are configuration files, but for simple testing it's often
easier to adjust the environment. The most valuable configuration
files are:
-
client/tests/{libvirt,kvm}/base.cfgdefines many default parameters -
client/tests/{libvirt,kvm}/tests.cfgspecifies tests to execute and defaults to override.
-
- Testing and/or cleanup will continue even after failures occur. If something goes wrong, it's good to find and fix the earliest problem identified in the logs first. Then re-run the set again, because subsequent failures may be related.
- When disk space runs low, a guest may hang, but autotest will
continue until a timeout is reached. By default, guest screenshots
are formed into a ‘movie’ which can be utilized to troubleshoot these
types of problems. For example
client/results/default/kvm.smp2.Fedora.16.64.unattended_install.cdrom/debug/vm1-1.ogg - If a python traceback appears, it can be an indication that a needed package isn't installed. If not, then it’s most likely something in the environment doesn't match the default configuration. We recommend a fresh defaults-based Fedora install for initial experience with Autotest.
- Known bugs are posted to
the autotest issues page,
under the
virtlabel. - Online assistance: Please see the collaboration session.
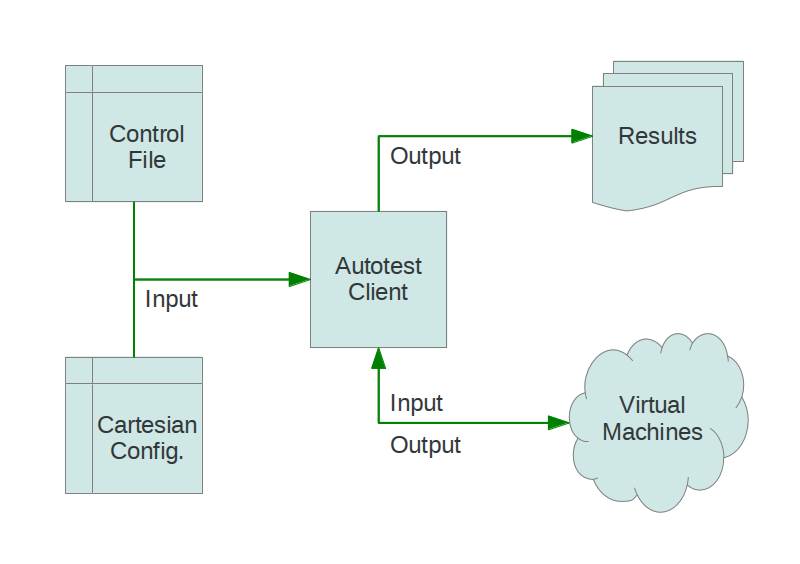
Tests are executed from a copy of the autotest client code, typically on separate hardware from the autotest server (if there is one). For development/exploration purposes, executing tests directly from a copy of the downloaded git tree or installed autotest package is preferred. The tree is configured such that test results and local configuration changes are kept separate from test and autotest code.
Several autotest client command-line options and parameters are
available. Running the ‘autotest’ command with the ‘-h’ or
‘--help’ parameters will display the online help. The only required
parameters are a path to what’s called a control file
(see section control_file), or an autotest client sub-command
(see section autotest_command_line).
Options for controlling client output are the most frequently used. The client process can "in a terminal, or placed in the background. Synchronous output via stdout/stderr is provided, however full-verbosity logs and test results are maintained separate from the controlling terminal. This allows users to respond to test output immediately, and/or an automated framework (such as the autotest server) to collect it later.
Access to the highest possible detail level is provided when the
‘--verbose’ option is used. There are multiple logging/message
levels used within autotest, from DEBUG, to INFO, and ERROR. While all
levels are logged individually, only INFO and above are displayed from
the autotest command by default. Since DEBUG is one level lower than
INFO, there are no provisions provided more granularity in terminal
output.
On the client machine, results are stored in a ‘results’ sub-directory, under the autotest client directory (AUTODIR). Within the ‘results’ sub-directory, data is grouped based on the autotest server-supplied job-name (JOBNAME). Variant shortnames (see section variants) represent the <TESTNAME> value used when results are recorded. When running a stand-alone client, or if unspecified, JOBNAME is 'default'. The structure beneath within the results base directory is:
Relative Directory or File
Description
<AUTODIR>/results/JOBNAME/
Base directory for JOBNAME(‘default’)
sysinfo
Overall OS-level data from client system
control
Copy of control file used to execute job
status
Overall results table for each TAGged test
debug/
Client execution logs, See section verbosity.
Client.DEBUG, client.INFO, client.WARNING, client.ERROR
Client output at each verbosity level. Good place to start debugging any problems.
<TESTNAME><TAG>/
Base directory of results from a specific test
status
Test start/end time and status report table
keyval
Key / value parameters for test
results/
Customized and/or nested-test results
profiling/
Data from profiling tools during testing
debug/
Client test output at each verbosity level
sysinfo/
Test-centric OS-level data
build<TAG>/
Base directory for tests that build code
src/
Source code used in a build
build/
Compile output / build scratch directory
patches/
Patches to apply to source code
config/
Config. Used during & for build
debug/
Build output and logs
summary
Info. About build test/progress.
The ‘-t’, or ‘--tag’ parameter is used to specify the TAG name
that will be appended to the name of every test. JOBNAMEs come from the
autotest server, and scheduler for a particular client. When running the
autotest client stand-alone from the command line, it’s not possible to
set the JOBNAME. However, TAGs are a way of differentiating one test
execution from another within a JOB. For example, if the same test is
run multiple times with slight variations in parameters. TAGS are also a
mechanism available on the stand-alone command line to differentiate
between executions.
Sub-commands are a shortcut method for performing various client tasks. They are evaluated separately from the main command-line options. To use them, simply append them after any standard parameters on the client command line.
The help’sub-command prints out all sub-commands along with a short
description of their use/purpose. This help output is in addition to the
standard client command-line help output.
The list sub-command searches for and displays a list of test names
that contain a valid control file. The list includes a short description
of each test and is sent to the default pager (i.e. more or less) for
viewing.
The run sub-command complements list, but as a shortcut for
executing individual tests. Only the name of the test sub-directory is
needed. For example, to execute sleeptest, the
bin/autotest-local run sleeptest command may be used.
Autotest is a modular framework where virtualization testing is nothing more than a sub-module of the client. The entire suite of top-level autotest tests are available within virtualized guests. In addition, many specific sub-tests are provided within the virtualization sub-test framework. Some of the sub-tests are shared across virtualization technologies, while others are specific. Control over the virtualization sub-tests is performed with a collection of configuration files utilizing a highly specialized format (see section cartesian_configuration).
The autotest source tree is organized between server and client, based on function and scope. At the top-level, resides the autotest server pieces and a client directory. Since the client can operate apart from a server, everything within the client sub-directory is self-contained. In other words, none of the client components depend on server components (though the server does depend on client components). For development and simple testing purposes, nearly all activity will happen within and under the client sub-directory.
The autotest/client/virt directory, and all sub-directories beneath
it, contain components and data accessible to all virtualization tests.
This includes code modules with both guest , host, and utility classes
and functions. The scope spans multiple virtualization hypervisor /
library types, test types, and guest access and tracking facilities. Not
every component is required for every test, but all virtualization tests
consume some data and code within this sub-directory.
As with the shared nature of the parent client/virt directory, all
shared virtualization sub-test modules code resides here. The largest
and most complex of which are the suite of unattended install tests. All
test modules in this directory should be virtualization technology
agnostic. Most of the test modules are simple and well commented. These
test modules serve as excellent reference for test developers, who are
encouraged to review them when crafting custom test modules..
This directory contains data specific to the unattended install shared test. Kickstart and answer-files are located here, as well as other data utilized during the unattended install process. Most of the files contain placeholder keywords which are substituted with actual values at run-time The unattended install test is is highly dependent upon the data within this directory.
Among all the autotest client tests are tests dedicated to managing and
testing virtual machines. The kvm and libvirt sub-directories contain
all the code and sub-tests specific to one technology or the other. Each
has it’s own get_started.py helper script, a control file for
executing sub-tests, the sub-test modules themselves (under the test
sub-directory), and copies of the active virtualization test
configuration files.
You can refer to the networking documentation session on the wiki for more info
Cartesian Configuration is a highly specialized way of providing lists of key/value pairs within combination's of various categories. The format simplifies and condenses highly complex multidimensional arrays of test parameters into a flat list. The combinatorial result can be filtered and adjusted prior to testing, with filters, dependencies, and key/value substitutions.
The parser relies on indentation, and is very sensitive to misplacement of tab and space characters. It’s highly recommended to edit/view Cartesian configuration files in an editor capable of collapsing tab characters into four space characters. Improper attention to column spacing can drastically affect output.
Keys and values are the most basic useful facility provided by the
format. A statement in the form <key> = <value> sets <key> to
<value>. Values are strings, terminated by a linefeed, with
surrounding quotes completely optional (but honored). A reference of
descriptions for most keys is included in section Configuration Parameter
Reference.
The key will become part of all lower-level (i.e. further indented) variant
stanzas (see section variants).
However, key precedence is evaluated in top-down or ‘last defined’
order. In other words, the last parsed key has precedence over earlier
definitions.
A ‘variants’ stanza is opened by a ‘variants:’ statement. The contents of the stanza must be indented further left than the ‘variants:’ statement. Each variant stanza or block defines a single dimension of the output array. Therefore, if a Cartesian configuration file contains two variants stanzas, the output will be all possible combination's of both variant contents. Variants may be nested within other variants, effectively nesting arbitrarily complex arrays within the cells of outside arrays.
While combining, the parser forms names for each outcome based on prepending each variant onto a list. In other words, the first variant name parsed will appear as the left most name component. These names can become quite long, and since they contain keys to distinguishing between results, a 'short-name' key is also used.
Variant shortnames represent the <TESTNAME> value used when results are
recorded (see section Job Names and Tags. For convenience
variants who’s name begins with a ‘@’ do not prepend their name to
'short-name', only 'name'. This allows creating ‘shortcuts’ for
specifying multiple sets or changes to key/value pairs without changing
the results directory name. For example, this is often convenient for
providing a collection of related pre-configured tests based on a
combination of others (see section tests).
Often it is necessary to dictate relationships between variants. In this way, the order of the resulting variant sets may be influenced. This is accomplished by listing the names of all parents (in order) after the child’s variant name. However, the influence of dependencies is ‘weak’, in that any later defined, lower-level (higher indentation) definitions, and/or filters (see section filters) can remove or modify dependents. For example, if testing unattended installs, each virtual machine must be booted before, and shutdown after:
variants:
    - one:
        key1 = Hello
    - two: one
        key2 = World
    - three: one two
Results in the correct sequence of variant sets: one, two, then three.
Filter statements allow modifying the resultant set of keys based on the name of the variant set (see section variants). Filters can be used in 3 ways: Limiting the set to include only combination names matching a pattern. Limiting the set to exclude all combination names not matching a pattern. Modifying the set or contents of key/value pairs within a matching combination name.
Names are matched by pairing a variant name component with the character(s) ‘,’ meaning OR, ‘..’ meaning AND, and ‘.’ meaning IMMEDIATELY-FOLLOWED-BY. When used alone, they permit modifying the list of key/values previously defined. For example:
Linux..OpenSuse:
initrd = initrd
Modifies all variants containing ‘Linux’ followed anywhere thereafter with ‘OpenSuse’, such that the ‘initrd’ key is created or overwritten with the value ‘initrd’.
When a filter is preceded by the keyword ‘only’ or ‘no’, it limits the selection of variant combination's This is used where a particular set of one or more variant combination's should be considered selectively or exclusively. When given an extremely large matrix of variants, the ‘only’ keyword is convenient to limit the result set to only those matching the filter. Whereas the ‘no’ keyword could be used to remove particular conflicting key/value sets under other variant combination names. For example:
only Linux..Fedora..64
Would reduce an arbitrarily large matrix to only those variants who’s names contain Linux, Fedora, and 64 in them.
However, note that any of these filters may be used within named variants as well. In this application, they are only evaluated when that variant name is selected for inclusion (implicitly or explicitly) by a higher-order. For example:
variants:
    - one:
        key1 = Hello
variants:
    - two:
        key2 = Complicated
    - three: one two
        key3 = World
variants:
    - default:
        only three
        key2 =

only default
Results in the following outcome:
name = default.three.one
key1 = Hello
key2 =
key3 = World
Value substitution allows for selectively overriding precedence and defining part or all of a future key’s value. Using a previously defined key, it’s value may be substituted in or as a another key’s value. The syntax is exactly the same as in the bash shell, where as a key’s value is substituted in wherever that key’s name appears following a ‘$’ character. When nesting a key within other non-key-name text, the name should also be surrounded by ‘{‘, and ‘}’ characters.
Replacement is context-sensitive, thereby if a key is redefined within
the same, or, higher-order block, that value will be used for future
substitutions. If a key is referenced for substitution, but hasn’t yet
been defined, no action is taken. In other words, the
For example, if one = 1, two = 2, and three = 3; then,
order = ${one}${two}${three} results in order = 123. This is
particularly handy for rooting an arbitrary complex directory tree
within a predefined top-level directory.
An example of context-sensitivity,
key1 = default value
key2 = default value

sub = "key1: ${key1}; key2: ${key2};"

variants:
    - one:
        key1 = Hello
        sub = "key1: ${key1}; key2: ${key2};"
    - two: one
        key2 = World
        sub = "key1: ${key1}; key2: ${key2};"
    - three: one two
        sub = "key1: ${key1}; key2: ${key2};"
Results in the following,
dict    1:  one
    dep = []
    key1 = Hello
    key2 = default value
    name = one
    shortname = one
    sub = key1: Hello; key2: default value;
dict    2:  two
    dep = ['one']
    key1 = default value
    key2 = World
    name = two
    shortname = two
    sub = key1: default value; key2: World;
dict    3:  three
    dep = ['one', 'two']
    key1 = default value
    key2 = default value
    name = three
    shortname = three
    sub = key1: default value; key2: default value;
Parameters for objects like VM’s utilize array’s of keys specific to a particular object instance. In this way, values specific to an object instance can be addressed. For example, a parameter ‘vms’ lists the VM objects names to instantiate in in the current frame’s test. Values specific to one of the named instances should be prefixed to the name:
vms = vm1 second_vm another_vm
mem = 128
mem_vm1 = 512
mem_second_vm = 1024
The result would be, three virtual machine objects are create. The third one (another_vm) receives the default ‘mem’ value of 128. The first two receive specialized values based on their name.
The order in which these statements are written in a configuration file is not important; statements addressing a single object always override statements addressing all objects. Note: This is contrary to the way the Cartesian configuration file as a whole is parsed (top-down).
The ‘include’ statement is utilized within a Cartesian configuration
file to better organize related content. When parsing, the contents of
any referenced files will be evaluated as soon as the parser encounters
the include statement. The order in which files are included is
relevant, and will carry through any key/value substitutions
(see section key_sub_arrays) as if parsing a complete, flat file.
The parser is available as both a python module and command-line tool
for examining the parsing results in a text-based listing. To utilize it
on the command-line, run the module followed by the path of the
configuration file to parse. For example,
common_lib/cartesian_config.py tests/libvirt/tests.cfg.
The output will be just the names of the combinatorial result set items
(see short-names, section Variants). However,
the ‘--contents’ parameter may be specified to examine the output in
more depth. Internally, the key/value data is stored/accessed similar to
a python dictionary instance. With the collection of dictionaries all
being part of a python list-like object. Irrespective of the internals,
running this module from the command-line is an excellent tool for both
reviewing and learning about the Cartesian Configuration format.
In general, each individual combination of the defined variants provides the parameters for a single test. Testing proceeds in order, through each result, passing the set of keys and values through to the harness and test code. When examining Cartesian configuration files, it’s helpful to consider the earliest key definitions as “defaults”, then look to the end of the file for other top-level override to those values. If in doubt of where to define or set a key, placing it at the top indentation level, at the end of the file, will guarantee it is used.
-
The parser produces a list of dictionaries (dicts). Each dictionary contains a set of key-value pairs.
-
Each dict contains at least three keys: name, shortname and depend. The values of name and shortname are strings, and the value of depend is a list of strings.
-
A list of dictionaries will henceforth be referred to as a frame.
-
The initial frame contains a single dict, whose name and shortname are empty strings, and whose depend is an empty list.
-
Parsing dict contents
- The dict parser operates on a frame, which will henceforth be referred to as the current frame.
- A statement of the form <key> = <value> sets the value of <key> to <value> in all dicts of the current frame. If a dict lacks <key>, it will be created.
- A statement of the form <key> += <value> appends <value> to the value of <key> in all dicts of the current frame. If a dict lacks <key>, it will be created.
- A statement of the form <key> <= <value> pre-pends <value> to the value of <key> in all dicts of the current frame. If a dict lacks <key>, it will be created.
- A statement of the form <key> ?= <value> sets the value of <key> to <value>, in all dicts of the current frame, but only if <key> exists in the dict. The operators ?+= and ?<= are also supported.
- A statement of the form no <regex> removes from the current frame all dicts whose name field matches <regex>.
- A statement of the form only <regex> removes from the current frame all dicts whose name field does not match <regex>.
-
Content exceptions
- Single line exceptions have the format <regex>: <key> <operator> <value> where <operator> is any of the operators listed above (e.g. =, +=, ?<=). The statement following the regular expression <regex> will apply only to the dicts in the current frame whose name partially matches <regex> (i.e. contains a substring that matches <regex>).
- A multi-line exception block is opened by a line of the format <regex>:. The text following this line should be indented. The statements in a multi-line exception block may be assignment statements (such as <key> = <value>) or no or only statements. Nested multi-line exceptions are allowed.
-
Parsing Variants
- A variants block is opened by a variants: statement. The contents of the block should follow the variants: line and should be indented.
- A line in a variants block should be of the format - <variant_name>:. The contents of this variant should be specified following that line, and should be indented. The contents are parsed by the dict parser described above; they may be of the format <key> <op> <value>. They may also contain variants: statements, or whatever the dict parser recognizes.
- Each variant in a variants block inherits a copy of the frame in which the variants: statement appears. The 'current frame', which may be modified by the dict parser, becomes this copy.
- The name of the variant (specified in the line - <variant_name>:) is pre-pended to the name field of each dict of the variant's frame, along with a separator dot ('.').
- If the name of the variant is not preceeded by a @ (i.e. - @<variant_name>:), it is pre-pended to the shortname field of each dict of the variant's frame. In other words, if a variant's name is preceeded by a @, it is omitted from the shortname field.
- The frames of the variants defined in the variants block are joined into a single frame which replaces the frame in which the variants: statement appears.
-
Filters
-
Filters can be used in 3 ways:
-
only <filter>
-
no <filter>
-
<filter>: (starts a conditional block, see 4.4 Filters)
-
-
Syntax:
-
.. means AND
. means IMMEDIATELY-FOLLOWED-BY
-
Example:
qcow2..Fedora.14, RHEL.6..raw..boot, smp2..qcow2..migrate..ide
means match all dicts whose names have:
(qcow2 AND (Fedora IMMEDIATELY-FOLLOWED-BY 14)) OR
((RHEL IMMEDIATELY-FOLLOWED-BY 6) AND raw AND boot) OR
(smp2 AND qcow2 AND migrate AND ide)
-
Note:
'qcow2..Fedora.14' is equivalent to 'Fedora.14..qcow2'.
'qcow2..Fedora.14' is not equivalent to 'qcow2..14.Fedora'.
'ide, scsi' is equivalent to 'scsi, ide'.
- A single dictionary
key1 = value1
key2 = value2
key3 = value3
Results in the following:
Dictionary #0:
    depend = []
    key1 = value1
    key2 = value2
    key3 = value3
    name =
    shortname =
- Adding a variants block
key1 = value1
key2 = value2
key3 = value3

variants:
    - one:
    - two:
    - three:
Results in the following:
Dictionary #0:
    depend = []
    key1 = value1
    key2 = value2
    key3 = value3
    name = one
    shortname = one
Dictionary #1:
    depend = []
    key1 = value1
    key2 = value2
    key3 = value3
    name = two
    shortname = two
Dictionary #2:
    depend = []
    key1 = value1
    key2 = value2
    key3 = value3
    name = three
    shortname = three
- Modifying dictionaries inside a variant
key1 = value1
key2 = value2
key3 = value3

variants:
    - one:
        key1 = Hello World
        key2 <= some_prefix_
    - two:
        key2 <= another_prefix_
    - three:
Results in the following:
Dictionary #0:
    depend = []
    key1 = Hello World
    key2 = some_prefix_value2
    key3 = value3
    name = one
    shortname = one
Dictionary #1:
    depend = []
    key1 = value1
    key2 = another_prefix_value2
    key3 = value3
    name = two
    shortname = two
Dictionary #2:
    depend = []
    key1 = value1
    key2 = value2
    key3 = value3
    name = three
    shortname = three
- Adding dependencies
key1 = value1
key2 = value2
key3 = value3

variants:
    - one:
        key1 = Hello World
        key2 <= some_prefix_
    - two: one
        key2 <= another_prefix_
    - three: one two
Results in the following:
Dictionary #0:
    depend = []
    key1 = Hello World
    key2 = some_prefix_value2
    key3 = value3
    name = one
    shortname = one
Dictionary #1:
    depend = ['one']
    key1 = value1
    key2 = another_prefix_value2
    key3 = value3
    name = two
    shortname = two
Dictionary #2:
    depend = ['one', 'two']
    key1 = value1
    key2 = value2
    key3 = value3
    name = three
    shortname = three
- Multiple variant blocks
key1 = value1
key2 = value2
key3 = value3

variants:
    - one:
        key1 = Hello World
        key2 <= some_prefix_
    - two: one
        key2 <= another_prefix_
    - three: one two

variants:
    - A:
    - B:
Results in the following:
Dictionary #0:
    depend = []
    key1 = Hello World
    key2 = some_prefix_value2
    key3 = value3
    name = A.one
    shortname = A.one
Dictionary #1:
    depend = ['A.one']
    key1 = value1
    key2 = another_prefix_value2
    key3 = value3
    name = A.two
    shortname = A.two
Dictionary #2:
    depend = ['A.one', 'A.two']
    key1 = value1
    key2 = value2
    key3 = value3
    name = A.three
    shortname = A.three
Dictionary #3:
    depend = []
    key1 = Hello World
    key2 = some_prefix_value2
    key3 = value3
    name = B.one
    shortname = B.one
Dictionary #4:
    depend = ['B.one']
    key1 = value1
    key2 = another_prefix_value2
    key3 = value3
    name = B.two
    shortname = B.two
Dictionary #5:
    depend = ['B.one', 'B.two']
    key1 = value1
    key2 = value2
    key3 = value3
    name = B.three
    shortname = B.three
- Filters,
noandonly
key1 = value1
key2 = value2
key3 = value3

variants:
    - one:
        key1 = Hello World
        key2 <= some_prefix_
    - two: one
        key2 <= another_prefix_
    - three: one two

variants:
    - A:
        no one
    - B:
        only one,three
Results in the following:
Dictionary #0:
    depend = ['A.one']
    key1 = value1
    key2 = another_prefix_value2
    key3 = value3
    name = A.two
    shortname = A.two
Dictionary #1:
    depend = ['A.one', 'A.two']
    key1 = value1
    key2 = value2
    key3 = value3
    name = A.three
    shortname = A.three
Dictionary #2:
    depend = []
    key1 = Hello World
    key2 = some_prefix_value2
    key3 = value3
    name = B.one
    shortname = B.one
Dictionary #3:
    depend = ['B.one', 'B.two']
    key1 = value1
    key2 = value2
    key3 = value3
    name = B.three
    shortname = B.three
- Short-names
key1 = value1
key2 = value2
key3 = value3

variants:
    - one:
        key1 = Hello World
        key2 <= some_prefix_
    - two: one
        key2 <= another_prefix_
    - three: one two

variants:
    - @A:
        no one
    - B:
        only one,three
Results in the following:
Dictionary #0:
    depend = ['A.one']
    key1 = value1
    key2 = another_prefix_value2
    key3 = value3
    name = A.two
    shortname = two
Dictionary #1:
    depend = ['A.one', 'A.two']
    key1 = value1
    key2 = value2
    key3 = value3
    name = A.three
    shortname = three
Dictionary #2:
    depend = []
    key1 = Hello World
    key2 = some_prefix_value2
    key3 = value3
    name = B.one
    shortname = B.one
Dictionary #3:
    depend = ['B.one', 'B.two']
    key1 = value1
    key2 = value2
    key3 = value3
    name = B.three
    shortname = B.three
- Exceptions
key1 = value1
key2 = value2
key3 = value3

variants:
    - one:
        key1 = Hello World
        key2 <= some_prefix_
    - two: one
        key2 <= another_prefix_
    - three: one two

variants:
    - @A:
        no one
    - B:
        only one,three

three: key4 = some_value

A:
    no two
    key5 = yet_another_value
Results in the following:
Dictionary #0:
    depend = ['A.one', 'A.two']
    key1 = value1
    key2 = value2
    key3 = value3
    key4 = some_value
    key5 = yet_another_value
    name = A.three
    shortname = three
Dictionary #1:
    depend = []
    key1 = Hello World
    key2 = some_prefix_value2
    key3 = value3
    name = B.one
    shortname = B.one
Dictionary #2:
    depend = ['B.one', 'B.two']
    key1 = value1
    key2 = value2
    key3 = value3
    key4 = some_value
    name = B.three
    shortname = B.three
The test configuration files are used for controlling the framework, by specifying parameters for each test. The parser produces a list of key/value sets, each set pertaining to a single test. Variants are organized into separate files based on scope and/or applicability. For example, the definitions for guest operating systems is sourced from a shared location since all virtualization tests may utilize them.
For each set/test, keys are interpreted by the test dispatching system, the pre-processor, the test module itself, then by the post-processor. Some parameters are required by specific sections and others are optional. When required, parameters are often commented with possible values and/or their effect. There are select places in the code where in-memory keys are modified, however this practice is discouraged unless there’s a very good reason.
When the ‘get_started.py’ script is run (see section setup_), copies of the
sample configuration files are copied for use under the virtualization engine’
sub-directory beneath the client’s ‘test’ sub-directory The copies
(with .sample removed from the name) are the versions used by the framework.
Modification of the .sample files is only necessary to share
modifications.
The source, scope, content description interpretation order of the
sample files is roughly outlined below. Remember, these are all copied
into client/tests/<libvirt, kvm, etc.>/ by the get_started.py
script.:
Relative Directory or File
Applicability
Description
client/
tests/
libvirt/, kvm/, etc.
build.cfg.sample
Specialized
Specific to code compilation where required for testing. Interpretation of this is skipped when a client is not setup for build testing. In other words, testing with native OS-provided code. Also includes hook configuration for obtaining content with YUM, Koji/Brew.
tests.cfg.sample
Specialized
Primary test set configuration file, includes all other operational files (except build), and dictates the master sub-set of tests and parameters to be used. Definitions, filters, and keys defined here override those from all other configuration files.
virt/
base.cfg.sample
Generalized
The first file included, before the master test-set is interpreted in
tests.cfg. It’s purpose is to establish the default keys for all
variants. Therefor, no variants are defined within this file, only
top-level keys and values.
subtests.cfg.sample
Generalized
All tests that execute beneath the context of the main virtualization
test are defined here. This includes back-references to the
non-virtualization autotest tests as well as several tests specific to
particular hypervisors and/or guest operating systems. Often these
variants and keys are filtered and/or redefined within tests.cfg to
control run-time testing operation.
guest-os.cfg.sample
Generalized
Defines all supported guest operating system types, architectures, installation images, parameters, and disk device or image names.
guest-hw.cfg.sample
Generalized
All virtual and physical hardware related parameters are organized within variant names. Within subtest variants or the top-level test set definition, hardware is specified by Including, excluding, or filtering variants and keys established in this file.
cdkeys.cfg.sample
Generalized
Certain operating systems require non-public information in order to operate and or install properly. For example, installation numbers and license keys. None of the values in this file are populated automatically. This file should be hand-edited to supply this data for use by the autotest client.
virtio-win.cfg.sample
Generalized
Paravirtualized hardware when specified for Windows testing, must have dependent drivers installed as part of the OS installation process. This file contains mandatory variants and keys for each Windows OS version, specifying the host location and installation method for each driver.
The tests.cfg file is likely the most frequently accessed among all
the others, simply because the Cartesian configuration parser gives
precedence to statements and values appearing last. This file is
responsible for acting on the complete collection of variants available
and producing a useful result. In other words, all other configuration
files (more or less) define “what is possible”, tests.cfg defines
what will actually happen.
In the order they appear, there are three essential sections:
- A set of pre-configured example short-name variants for several OS's, hypervisor types, and virtual hardware configurations. They can be used directly, and/or copied and modified as needed.
- An overriding value-filter set, which adjusts several key path-names and file locations that are widely applicable.
- The final top-level scoping filter set for limiting the tests to run, among the many available.
The default configuration aims to support the quick-start (see section run_) with a simple and minimal test set that's easy to get running. It calls on a variant defined within the pre-configured example set as described above. It also provides the best starting place for exploring the configuration format and learning about how it's used to support virtualization testing.
This is the least-accessed among the configuration files. It exists
because certain operating systems require non-public information in
order to operate and or install properly. Keeping this data stored in a
special purpose file, keeps the data allows it's privacy level to be
controlled. None of the values in this file are populated automatically.
This file should be hand-edited to supply this data for use by the
autotest client. It is not required for the default test configured in
tests.cfg.
The windows-centric virtio-win.cfg file is similar in that it is
only applicable to windows guest operating systems. It supplements
windows definitions from guest-os.cfg with configuration needed to
ensure the virtio drivers are available during windows installation.
To install the virtio drivers during guest install, virtualization
autotest has to inform the windows install programs *where* to find
the drivers. Virtualization autotest uses a boot floppy with a Windows
answer file in order to perform unattended install of windows guests.
For winXP and win2003, the unattended files are simple .ini files,
while for win2008 and later, the unattended files are XML files.
Therefor, it makes the following assumptions:
- An iso file is available that contains windows virtio drivers (inf files) for both netkvm and viostor.
- For WinXP or Win2003, a a pre-made floppy disk image is available with the virtio drivers and a configuration file the Windows installer will read, to fetch the right drivers.
- Comfort and familiarity editing and working with the Cartesian configuration file format, setting key values and using filters to point virtualization autotest at host files.
Two of the largest and most complex among the configuration files, this
pair defines a vast number of variants and keys relating purely to guest
operating system parameters and virtual hardware. Their intended use is
from within tests.cfg (see section tests). Within tests.cfg short-name
variants, filters are used for both OS and HW variants in these files to
choose among the many available sets of options.
For example if a test requires the virtio network driver is used, it
would be selected with the filter 'only virtio_net'. This filter
means content of the virtio_net variant is included from
guest-hw.cfg, which in turn results in the 'nic_model = virtio'
definition. In a similar manner, all guest installation methods (with
the exception of virtio for Windows) and operating system related
parameters are set in guest-os.cfg.
The third most complex of the configurations, subtests.cfg holds
variants defining all of the available virtualization sub-tests
available. They include definitions for running nested
non-virtualization autotest tests within guests. For example, the
simplistic 'sleeptest' may be run with the filter
'only autotest.sleeptest'.
The subtests.cfg file is rarely edited directly, instead it's
intended to provide a reasonable set of defaults for testing. If
particular test keys need customization, this should be done within the
short-name variants defined or created in tests.cfg (see section tests).
However, available tests and their options are commented within
subtests.cfg, so it is often referred to as a source for available tests
and their associated controls.
Nearly as important as tests.cfg, since it's the first file processed. This file is responsible for defining all of the top-level default settings inherited by all hardware, software, subtest, and run-time short-name variants. It's critical for establishing the default networking model of the host system, pathnames, and the virtualization technology being tested. It also contains guest options that don't fit within the context of the other configuration files, such as default memory size, console video creation for tests, and guest console display options (for human monitoring). When getting started in virtualization autotest, or setting up on a new host, this is usually the file to edit first.
TODO: Go through section Simplified Virtualization Test Stack and section Job Execution using the default boot, unattended_install, and shutdown tests (maybe others?). Note all Cartesian Configuration keys & possible values. Organize into tables below, in alphabetical order, based on where they appear (including multiple appearances).
Virtualization Autotest relies exclusively on the test control file (see section Test Control File) to initialize testing and execute all subtests. The following Cartesian Configuration keys are utilized within the control file
Key
Default
Description
Key take_regular_screendumps
Default "no"
Description Setting this to "yes" causes the pre-processor spawn a thread per test to capture guest console (not serial) images at regular intervals. The thread utilizes the configuration options "screendump_temp_dir", "screendump_delay", and "screendump_quality" to control it's behaviour. The image filenames signify the VM name and include increasing sequence numbers after every delay. If "screendump_temp_dir" is not set, the images will be saved to the debug sub-directory beneath the results directory for the test.
Key
Default
Description
Key
Default
Description
Key
Default
Description
For a more complete reference, refer to the cartesian config params documentation
REAL WORLD EXAMPLE here
See Run tests on an existing guest
Required items include access to the virtio driver installation image,
the Windows ISO files matching those provided in
guest-os``.cfg.sample``, and the winutils.iso CD (downloaded using
the get_started.py script (See section quickstart) . Every effort is made to
standardize on files available from MSDN. For example, using the
Windows7 64 bit (non SP1) requires the CD matching:
-
cdrom_cd1 = isos/windows/en_windows_7_ultimate_x86_dvd_x15-65921.iso
-
sha1sum_cd1 = 5395dc4b38f7bdb1e005ff414deedfdb16dbf610
This file can be downloaded from the MSDN site then it’s SHA1
verified.
Next, create a directory for the windows media image as
/tmp/kvm_autotest_root/isos/windows. Copy the Windows 7, 64bit ISO
image into this directory. Edit the cdkeys.cfg file (see section
cdkeys_and_windows_virtio_) to supply
license information if required.
Finally, set up the final tests.cfg filter to include the
windows_quick short-name variant (see section tests). However, modify the
network and block device filters to use 'virtio_net' and 'virtio-blk'
instead (see section guest_hw_and_guest_os_)
 Autotest architecture context
Source file for the diagram above (LibreOffice file)
Autotest architecture context
Source file for the diagram above (LibreOffice file)
 Autotest architecture subsystems
Source file for the diagram above (LibreOffice file)
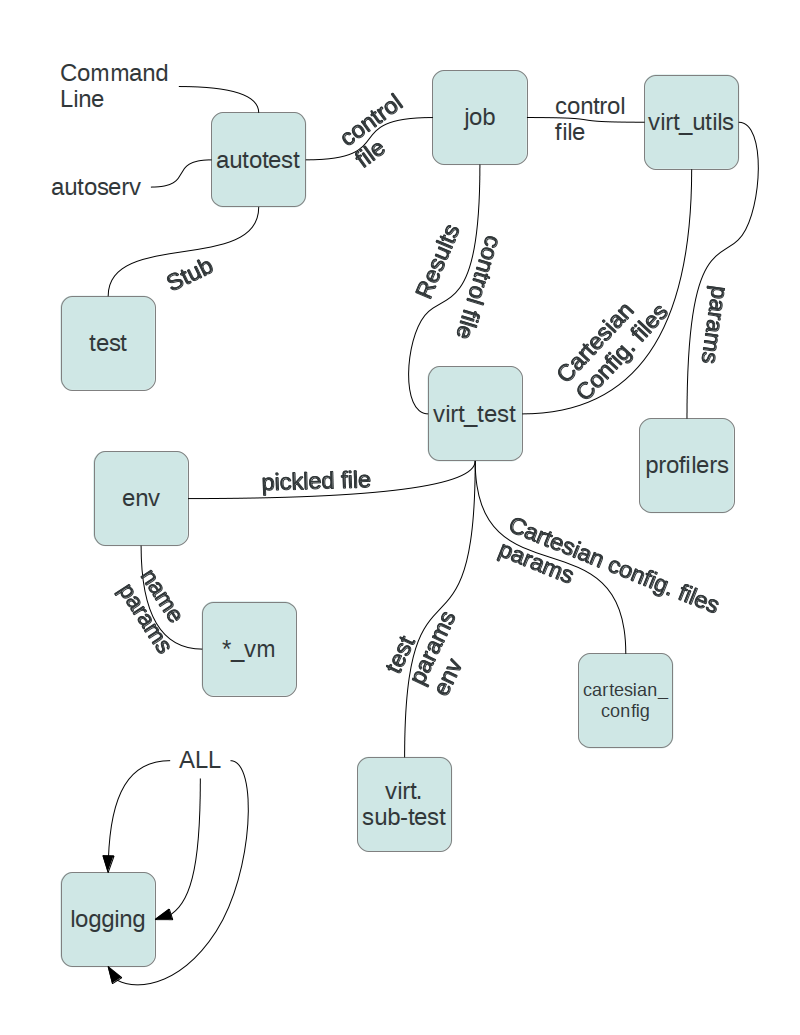
Essential code path from the autotest command-line client, through to a single virtualization sub-test's module code:
autotest_local -> AutotestLocalApp.main()
bin/setup_job.py -> setup_tests()
client/bin/job.py -> runjob()
tests/{kvm,libvirt,etc}/control -> cartesian_config.Parser()
tests/{kvm,libvirt,etc}/control -> virt_utils.run_tests()
virt/virt_utils.py -> job.run_test_detail()
tests/VIRT_TYPE/VIRT_TYPE.py -> run_once()
Note: Secondary, parallel threads omitted along with auxiliary calls within modules.
The code within single virtualization type's sub-test can vary, however in general, the code path leading up to the sub-test execution is uniform:
-
tests/VIRT_TYPE/VIRT_TYPE.py class VIRT_TYPE - inherits from virt/virt_test.py
-
VIRT_TYPE.run_once() - Executes per sub-test
-
virt_utils.py Env() - Optionally recovers pickled instances on host reboot
-
run_once() locates & imports sub-test module among test directories
-
virt/virt_env_process.py preprocess() starts network monitor, prepares VMs, processes disk images, begins capturing guest screen-shots.
-
imported sub-test module's run_<NAME> function executes.
-
sub-test runs, returns success/failure or raises exception.
-
env.save() pickles environment state
-
virt/virt_env_process.py postprocess() Stops screen-shots, produces guest movie. Unresponsive VM's killed off, guest and network monitoring stopped.
The control file is the supervisory set of instructions used to execute a particular autotest test. Within virtualization autotest, they play a more generic role, setting up build and sub-test executions based on the Cartesian Configuration product (see section cartesian_configuration). The specification for the control file format and conventions can be found at the control file requirements documentation
All autotest test modules (e.g. client/tests/sleeptest/sleeptest.py)
inherit from the test module’s test class. Instances of the test
class, represent a specific state and functioning of initialization,
testing, and shutdown for an autotest test. In the case of
virtualization autotest, this ”test” is really another type of harness,
for running virtualization-specific subtests. Wherein, the subtests are
defined by the Cartesian Configuration Product (see section combinatorial_outcome).
The client/virt/virt_test.py module and virt_test class define
the specializations of the inherited test.test class for the
virtualization subtests. In this way, the architecture and flow of the
autotest client is preserved and utilized to the maximum extent. This
design also provides for flexibility of executing arbitrary subtests
within a virtualization context. Therefor, the virt_test class
represents the highest-level bridge between the autotest client, and a
set of virtualization subtests.
For more information on the autotest test API, please see the test developer documentation.
Throughout virtualization autotest code and test modules, the params
variable is one of the most frequently utilized. It is created within
the virtualization autotest control file as a descendant of the
client/common_lib/cartesian_config.py module’s parser class (via
client/virt/virt_utils.py Params class). For all intents and
purposes, this object behaves like a python dictionary. Though the keys
and values are derived from a single item in the result set
(see section combinatorial_outcome).
In the case of keys with sub-arrays of values (see section key_sub_arrays)
the Params class object_params(<name>) method should be used. The name
parameter is the base name of the key, and the result will be
another dictionary-like object who’s keys are the sub-array keys. However, pay
careful attention to the existence of overriding higher-level keys. It’s the
responsibility of the code author to enforce this aspect of sub-array
value precedence.
The preferred way of obtaining key values is through the
get(<name>[,<default>]) method. Name should resolve to a string of
the key’s name. If specified, the <default> argument should resolve to a
string representing the default value, should key not exist. Otherwise,
an IndexError exception will be raised.
Note that the intended usage of this dictionary is read-only, though it does support setting values and creating new keys. However, changing the params object in any way is discouraged unless absolutely necessary. Please contact a community member for advice in this area.
The env class is defined in client/virt/virt_utils.py and used to
record state in between autotest client runs. It’s especially useful
when virtualization sub-tests are run along with a build sub-test where
a reboot is required. The contents of the env file (when it exists) are
are un-piclked into an env instance within the virt_test instance’s
run_once() method. After testing, the instance is pickled into the env
file in case it’s needed on the next virtualization autotest run.
Internally, the env class records a version number intended to keep track of the relevance of the on-disk pickled instance. When the on-disk version number is lower than the version when the virt_test instance’s env_version property, the on-disk file’s contents are discarded. In this way, the relevance of the stored environment from the previous run is managed. For more information on virtualization autotest build sub-tests, please see section build_tests_and_unittests_.
Instances of this class record the state, runtime parameters, and
methods needed to access and manage virtual machines. For virtualization
autotests test writing purposes, attention should be paid first to the
client/virt/virt_vm.py BaseVM class. This defines the base-level VM
API which is shared between all virtualization types. For information on
specialization for a particular virtualization type, please see the
corresponding child-class implementations under
client/virt/<type_name>_vm.py.
Within the table below are names and descriptions of some of the most often used and/or important properties and methods. This is not an exhaustive list, and there are areas where behavior differs between child class implementations. The viscosity column notes where behavior differences may be present, and their degree. Wherein, high viscosity means behavior is drastically different, and low means there are only subtle differences.
| Property / Method Name | Viscosity | Description |
|---|---|---|
__init__() |
medium | Initialize object from params dict values. |
verify_alive() |
low | Raise virt_vm.VMDeadError if not is_alive()
|
is_alive() |
low | Return true if VM and it’s monitor are functional |
is_dead() |
low | Opposite of is_alive()
|
verify_kernel_crash() |
none | Perform regex search for signs of kernel oops on VM
serial port output, if so raise
virt_vm.VMDeadKernelCrashError exception. |
wait_for_login() |
none | Returns an aexpect.ShellSession object (running
in seperate process) after ssh’ing into VM. Call
close method to logout/terminate. |
destroy() |
none | Optionally waits for graceful shutdown of VM, after 60 seconds, terminates VM forcefully. |
reboot() |
none | Attempt VM reboot via shell session, and/or forcefully if required. |
needs_restart() |
low | Returns true/false on compare between VM instance versus arbitrary params dict. A “False” return equates to a positive match (i.e. they are the same) |
migrate() |
high | Supports various methods/protocols for transfering one VM’s state to another. |
clone() |
low | Deep-copy a VM object ready for create().
|
create() |
high | Implements VM object’s parameters into a running virtual guest via monitor or hypervisor interface. |
get_uuid() |
medium | Returns a string guaranteed unique to a VM. |
get_pid() |
none | Returns the process ID of the VM on the host. |
pause() |
none | Place the running VM into a paused state |
resume() |
none | Resume a previously paused VM |
save_to_file() |
low | Save a paused VM then stop it’s process. |
restore_from_file() |
low | Load and resume previously saved VM (set it running) |
The client/virt/aexpect.py module provides multiple classes for
controlling and I/O stream-access to synchronous or asynchronous
shell-like processes. Various ancestries and their methods are focused
in specialized areas of exit codes, and/or output examination. Instances
of these classes are used throughout the virutalization autotest
codebase. Familiarity with them is not essential, but recommended.
Guest shell access within subtests is more convenient through
higher-level methods, see the login() method of the (section vm class).
Similarly, the preferred method for executing shell commands on the client
machine is within the client/common_lib/utils.py module
(imports base_utils.py). Included are the run() and run_parallel()
functions which provide for a wide variety of return data and conditions.
However, all of these functions/methods return and/or operate on ShellSession
instances, which come from the aexpect module.
Within virtualization sub-test module code, there are a preferred set of methods and functions to be used for testing. Further, there is a defined set of exceptions which may be thrown to indicate faults or problems. Any temporary files or resources allocated during a test should be released prior to throwing exceptions or returning.
Virtualization sub-test module’s run_<name>() function is passed
objects permitting access to the params dictionary, the already
instantiated env object, and the virtualization test object. The
sub-test code may utilize all of these interfaces, as long as methods
called don’t begin with any number of underscore, _, characters.
Typically, sub-test modules will begin with loading the following modules:
import logging
from autotest_lib.client.common_lib import error
from autotest_lib.client.virt import virt_test_utils
The standard python logging module provides convenience functions for
dispatching messages to the logging thread, see section verbosity.
The common_lib error sub-module source is heavily documented.
It defines the errors and error context decorators that may be used throughout
the autotest client, including virtualization sub-test modules.
Finally, the virt_test_utils module provides a handful of convenience
functions for working within the scope of a virtualiztion sub-test. Use
of these functions is preferred over the lower level params, env, and
test object methods when possible.
A number of utilities are available for the autotest core, client, and/or test developers.
| Name | Description |
|---|---|
autotest/utils/run_pylint.py |
Wrapper is required to run pylint due to the way imports have been implemented. |
autotest/utils/unittest_suite.py |
Runs all unit tests for autotest components to help spot problems early in development cycle. |
client/tools/make_clean |
Removes temporary files and other junk which can accumulate between client executions. |
client/common_lib/cartesian_config.py |
See section combinatorial_outcome. |
What follows is an example of a simple uptime test, that picks up a living VM guest, connects to it via ssh, and return its uptime. Assuming the client is setup (see section setup_) create a virtualization sub-test module using your favorite editor, client/virt/tests/uptime.py and include the base set of modules:
import logging
from autotest_lib.client.common_lib import error
from autotest_lib.client.virt import virt_test_utils
Virtualization sub-tests are executed by the autotest client by calling
their run_<name> function. In this case, the function would be called
run_uptime():
def run_uptime(test, params, env):
    """
    Docstring describing uptime.
    """
    pass
These functions always take the same parameters indicated above, and
documented elsewhere. The test first will need to obtain a VM object
(see section vm_class) which is provided by the env class’s get_vm()
function. The name of the VM is looked up by referencing the main_vm key
(see section vm_objects) from the params dictionary (see section params_class):
def run_uptime(test, params, env):
    """
    Docstring describing uptime.
    """
    vm = env.get_vm(params["main_vm"])
The first action needed with the vm object is to make sure it’s running, and if not raise an exception to signal VM state doesn’t match initial expectations. This is usually a sign of trouble within the pre-processor (see section job_execution). It’s helpful to the harness and/or operator to signal problems like this as early as possible:
def run_uptime(test, params, env):
    """
    Docstring describing uptime.
    """
    vm = env.get_vm(params["main_vm"])
    vm.verify_alive()
Next our test needs to log into the vm before it can execute any
commands. The virt_test_utils module’s wait_for_login() function
will accomplish this. One of it’s parameters is timeout, which for
example, allows the guest time to finish booting or starting up.
However, in this case it’s acceptable to rely on the default parameter
values:
def run_uptime(test, params, env):
    """
    Docstring describing uptime.
    """
    vm = env.get_vm(params["main_vm"])
    vm.verify_alive()
    session = virt_test_utils.wait_for_login(vm)
If something goes wrong, wait_for_login() will throw an exception,
terminating the test. Because no sub-test private resources have been
allocated up to this point, exiting the sub-test code without any
cleanup is acceptable. Assuming success, the returned session object
(see section aexpect) allows submitting commands to the guest and retrieving
output.
There are several methods provided for executing commands, however for
this test, only the text output is required. Any other condition, such
as a non-zero exit from the shell or uptime command should be deemed
a test failure. Also, the sub-test now has private resources allocated
(a shell session into the guest); therefor, any subsequent fault
condition must catch any exceptions and release private resources:
...
    vm.verify_alive()
    session = virt_test_utils.wait_for_login(vm)
    try:
        uptime = session.cmd('uptime')
    except:
        session.close()
        raise error.TestError
This test only checks if the uptime command functions, though more
sophisticated analysis of the results is certainly possible. For
example, comparing the uptime to an acceptable range. In this case,
printing the uptime output value to the test logs is sufficient.
Finally, close the remote connection since it’s no-longer needed:
...
    logging.info("Guest uptime result is: %s" % uptime)
    session.close()
Note that most failures are implicitly handled. When a sub-test runs from beginning to end without unhandled exceptions, virtualization autotest assumes the test passed. There is no need to mark a test as explicitly passed, only raise exceptions to signal problems or failures.
The final remaining step is to define a test variant for our subtest within the subtests.cfg.sample file (see section sub_tests_). Since the test doesn’t consume any values from the params dict, it’s definition is very simple:
- uptime: install setup image_copy unattended_install.cdrom
    type = uptime
The key elements in this definition are the dependencies, and the type.
The uptime variant depends on having a functional, installed guest,
which makes it dependent of either one of
install, setup, image_copy, or unattended_install.cdrom.
The type key communicates the name of the sub-test module to load, in addition
to the name of the run_*() function inside. If additional parameters were
needed, their keys/values would be set within this variant stanza
(see section variants)
Please refer to the contact info documentation to get the appropriate mailing list addresses.
Contributions of additional tests and code are always welcome. If in doubt, and/or for advice on approaching a particular problem, please contact the projects members (see section _collaboration) Before submitting code, please review the git repository configuration guidelines GitWorkflow.
Simple changes and fixes may be submitted directly to the mailing list.
The preferred method is to use git’s built in ‘format-patch’ sub-command
along with the git-email module. All patches must be signed with the
authors name and contact address (git commit -s ...). They should
also be run through pylint (autotest/utils/run_pylint.py) and
smoke-tested with default parameters. Any sets that require more than a
patch or two, should be preceded by a “cover letter”
(git format-patch ... --cover-letter).
For large and/or complex sets of changes or additions, it’s preferable they be submitted via a “Pull Request”. The process for doing this is documented on github. Prior to embarking on large or intrusive changes, please consult with a project member to see if they’re likely to be accepted.
Please edit the documentation directly to correct any minor inaccuracies or to clarify items. The preferred markup syntax is ReStructuredText, keeping with the conventions and style found in existing documentation. For any graphics or diagrams, web-friendly formats should be used, such as PNG or SVG.
Avoid using 'you', 'we', 'they', as they can be ambiguous in reference documentation. It works fine in conversation and e-mail, but looks weird in reference material. Similarly, avoid using 'unnecessary', off-topic, or extra language. For example in American English, [["Rinse and repeat" | http://en.wikipedia.org/wiki/Lather,_rinse,_repeat]] is a funny phrase, but could cause problems when translated into other languages. Basically, try to avoid anything that slows the reader down from finding facts.
For major documentation work, it’s more convenient to use a different approach. The autotest wiki is stored on github as a separate repository from the project code. The wiki repository contains all the files, and allows for version control over them. To clone the wiki repository, just:
git://github.com/autotest/autotest.wiki.git
When working with the wiki repository, it’s sometimes convenient to render the wiki pages locally while making and committing changes. The gollum ruby gem may be installed so you can view the wiki locally. See the gollum wiki readme for more details.